Basic Navigation

To view meeting information and access settings, click the shield icon at the top left of your meeting window.
Zoom Shield Icon

After clicking on the shield icon, you can access the settings menu by clicking on the gear icon at the top right of the meeting information window.
Zoom Gear Icon for Settings Menu

The main Zoom Meeting Toolbar allows hosts and guests to:

  • Mute/unmute their microphones
  • Start/stop the video
  • Adjust Security Settings
  • Reveal the participant and Chat panels
  • Share Screen
  • Record the meeting
  • Use Reactions
  • Use any available Apps associated with your Zoom account
  • Use the Whiteboards feature
  • Leave the Meeting

Zoom Main Menu Toolbar

Additional Options

The host must permit features such as Share Screen, Whiteboards, and Reactions. Additionally, meeting maintenance features like Record, Captions, and Security Settings are only visible and available to the meeting host.

To access additional options, click on the three-dot icon labeled "more" on the right side of your screen. Here, participants can adjust captioning settings, create or join breakout rooms, or live stream the meeting on YouTube or Twitch.

For more information on how to get started, visit the Zoom Support pages linked on: Getting Started with Zoom Meetings

Host and Participant Functions

Participants have the flexibility to join Zoom meetings via the desktop Zoom client, mobile app, or web browser. 

To join a meeting, each meeting is assigned a 9, 10, or 11-digit meeting ID. Participants can either click on the Zoom meeting link provided by the host or enter the meeting ID directly on their preferred platform to join the meeting.

 meeting ID to join on their preferred platform.

On a Windows or Mac device, users will open the Zoom client or mobile app, sign in, and click or tap Join.

Desktop or mobile app join button

Then enter the meeting ID or Personal Link Name.

If using a browser to join, go to join.zoom.us and enter the Meeting ID or Personal Link Name.

For a more detailed description of how to join a meeting, see the Zoom Support article: Joining a Zoom Meeting.

To mute or unmute the microphone, click the microphone icon. Participants can click the arrow next to the Mute/Unmute button to choose a different microphone or speaker and to test the functionality of their devices.

Mute Unmute Start Video Buttons

Up Arrow Click Audio Settings

For more information on how to configure audio types, see the Zoom Support article Enabling Audio Type.

Clicking the Security icon located on the main meeting toolbar will open a list of security options that hosts can adjust for all participants.

Security Button

Security menu

Hosts can enable or disable various features, including:

  • Locking the meeting to prevent new participants from joining.
  • Enabling the waiting room, which moves new participants to a waiting area.
  • Hiding participant profile pictures.
  • Disabling or enabling participants' ability to screen share, chat, rename themselves, unmute themselves, start their videos, or annotate on shared content.

Hosts have the ability to take several actions, including:

  • Removing participants from the meeting.
  • Reporting participants.
  • Suspending participant activities, which disables video, audio, Zoom apps, and screen sharing for all participants. This action also locks the meeting.

Viewing Enabled or Disabled Security Measures

To check the status of enabled or disabled security measures, click on the green shield icon at the top left of your Zoom meeting window, and then select Security Settings Overview.

Security Settings Overview

Hosts can create polls by clicking on the Poll icon on the main menu toolbar.

  1. Click Create.
    Poll creation
  2. Choose Poll or Advanced Polls and Quizzing ( Advanced Polls and Quizzing allows for different question type formats like multiple choice, matching, short, and long answer questions; and the use of images and preset answer keys.)
    Choose polls or advanced polling
  3. If you click the Polls option, enter your poll questions and answers. By enabling the Breakout room setting in polls, hosts can create Breakout rooms based on participants’ answers. Click Save.
    Name poll and modify settings

  4. Launch your Poll or Quiz by hovering over the polls and clicking Launch.

To view a more detailed description of how to enable and launch polls, see the Zoom Support page Conducting Polls in Meetings.

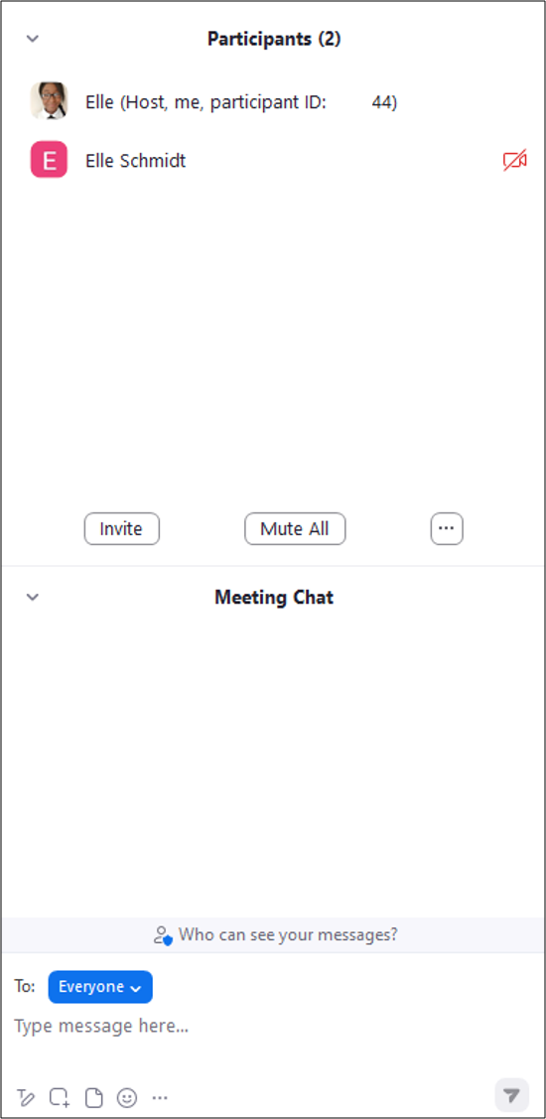
Clicking on the Participants and Chat buttons on the toolbar will open a side panel displaying a list of participants and their meeting status (audio/video on/off, raised hands, screen sharing), along with a scrolling chat log.

Participants and Chat panel buttons

Participants and Chat side panel

Hosts can invite participants directly by clicking on the Participants button and selecting "Invite" or by clicking "Invite" in the participant’s side panel.
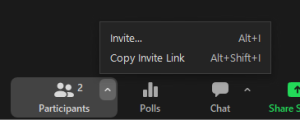
Invite link on menu bar

Hosts can mute all participants using the Mute all button at the bottom of the participants panel.

Invite and Mute all buttons in side panel

By clicking the three-dot icon next to the Mute All button in the participant's side panel, hosts can perform the following actions:

  • Send a request for all participants to mute themselves.
  • Automatically mute participants upon their entry to the meeting.
  • Allow or disallow participants to unmute or rename themselves.
  • Enable a sound notification when someone joins or leaves the meeting.
  • Activate a waiting room where participants will be held before the meeting officially starts.
  • Hide participant profile pictures.
  • Lock the meeting.

Participants can send rich text, screenshots, files, and emojis by using the chat-type icons to the left of the send arrow. 

Changing the To: drop-down menu, participants can send a chat to everyone in the meeting or only select individual participants.
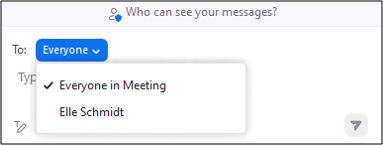
To Dropdown menu

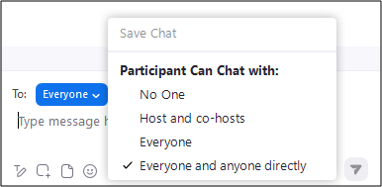
Hosts can modify who participants can chat with by clicking the three-dot icon in the chat panel.
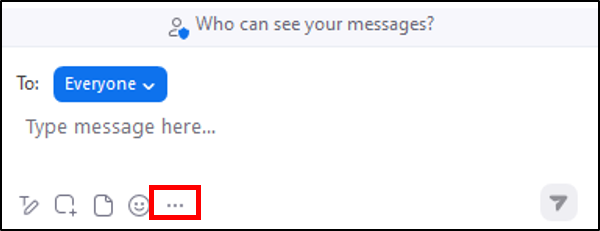
Three dot icon in chat side panel

Change chat to settings

For more information on how to chat in a meeting, see the Zoom support article: Chatting in a Zoom Meeting.

When screen sharing is enabled, participants can share their entire desktops, specific application windows, and mobile device screens. 

Sharing Sound

To share sound from your device, check the Share sound dialog box in the bottom left corner of the screen share window before clicking Share.

Sharing Files

To share files from cloud accounts (Dropbox, OneDrive, Google Drive, and SharePoint), participants can click on the Files tab.

Advanced Sharing

In the advanced settings, users can share PowerPoints as virtual backgrounds, a portion of the screen, content from a second camera, and audio or video files saved on their devices. During sharing, participants can annotate or add information to the screen, as well as annotate on a blank whiteboard.

Screen share settings

For more screen-sharing options go to Zoom’s Support page Sharing your Screen or Desktop on Zoom.

  1. Click the record button on the main menu toolbar.
    Record Button
  2. Choose the option to either Record on this Computer or Record to the Cloud.
    Record to cloud or device settings

    A message will be sent to participants that the meeting is being recorded. 

  1. Click the pause or stop buttons located to the right of the green shield icon in the top left corner of the Zoom meeting, or click the pause or stop icons that appear on the main menu toolbar. 
    Recording in process indicator
    Pause or Stop recording buttons
  2. If the Record to the cloud option is selected, you will be prompted to confirm that you want to stop recording. 
    Pause or stop recording buttons
    Confirm pause or stop recording

Locally Stored Recordings 

After the meeting has ended, your recording will be converted to an Mp4 file that can be found in the Zoom folder on your device. (for PC the path is: Users/[Username]/Documents/Zoom, for Mac:/Users/[Username]/Documents/Zoom)

Cloud Stored Recordings 

After the meeting has ended, recordings will be sent to the Zoom cloud where they can be downloaded or streamed in the browser. Hosts will receive a link through their email to the recording once it has been rendered. Hosts can then sign into the Zoom portal, click the recording link in the left side menu, and view Cloud and local recordings

For more information on how to record meetings, see the Zoom support article: Getting Started with Recording.

If captions are enabled, click the closed captions icon to turn on captioning.
Show captions button

Clicking on the up arrow next to Show Captions gives participants the ability to:

  • Change the caption language.
  • View a full transcript of the meeting.
  • Open Caption Settings to:
    • Adjust the caption font size.
    • Enable or disable screen reader alerts.
  • Adjust the chat display size.
  • Enable screen dimming when flashing images or visuals are detected.

Caption Settings

Caption Settings Full Menu

For more information on how to view captions in a meeting, see the Zoom Support article: Viewing Captions in a Meeting or Webinar.

Hosts can enable Breakout Rooms, which allows participants to join small sessions separate from the main meeting.

To create and launch Breakout Rooms, hosts can simply click on the Breakout Rooms icon.

Breakout rooms button

After selecting the desired number of Breakout rooms, hosts have three options:

  1. Automatic assignment: The rooms will be assigned automatically.
  2. Manual assignment: Hosts can assign specific users to each Breakout room.
  3. Participant choice: Participants can choose which Breakout rooms they want to join.

Additionally, hosts can configure various options to control the behavior of Breakout rooms. For example, they can determine whether participants can leave their assigned rooms and return to the main session before the host officially closes the rooms.

Breakout Rooms Options

If the host chooses to enable participants to select their own Breakout rooms, participants can join by following these steps:

  1. Once the host has opened the rooms, participants can see the available Breakout rooms.
  2. Participants can click on the room they want to enter.
  3. When prompted, participants should select Yes to confirm their choice and join the selected Breakout room.

Join Breakout Rooms

For more information on how to participate in Breakout Rooms see the Zoom article: Participating in Breakout Rooms.

If the host has enabled the reactions menu, participants can utilize reactions to express non-verbal communication during the meeting.

To access the reactions toolbar, click the up arrow located on the Reactions button.

Reactions button Reactions options

Participants have the option to choose from a variety of preset emojis or click on the three-dot icon to access an extensive list of emojis, which can be searched through.

Default reactions are:

  • Yes Yes reaction
  • No No reaction
  • Slow Down Slow down reaction
  • Speed Up Speed up reaction
  • I'm away I'm away reaction

Participants can use the Raise Hand/Lower Hand emoji to signal to the presenter that they have a question. This emoji will be displayed next to the participant's name in the participant list.

Raise and lower hand reaction

During meetings, users have the option to customize their video layout. When no one is screen sharing, there are four available video layouts:

  • Speaker view: Automatically switches to display the active speaker.
  • Gallery view: Shows thumbnails of participants in a grid pattern.
  • Immersive view: Allows up to 25 video participants to be displayed in a single virtual background.
  • Floating thumbnail window: Minimizes the main Zoom window and keeps a video thumbnail on top of other applications.

Users can also pin a participant's video which keeps the pinned video on screen whether the participant is actively speaking or not. 

To pin a video, click the three-dot icon in the top right corner of the participant’s video, then click on Pin.

Zoom Support page for Pinning participants’ videos.

Hosts can spotlight up to 9 participants, which tags them as primary active speakers. Spotlighting allows participants to see only those speakers. 

Zoom Support page for Spotlighting participants’ videos.

Additional Resources

For in-depth guides on how to use Zoom including outlines on the essentials, tips and tricks, and beginner to advanced skills training, visit LinkedIn Learning.

Zoom Essential Training

Zoom Quick Tips

Beginner to Advanced Collection


We value your feedback! Click HERE to suggest updates to an existing article, request a new article, or submit an idea.

Search Knowledge Base

Submit a Service Request