The process for uploading a file in most areas of AsULearn is the same. These steps are for adding a resource file to your course.
See Upload File from Google Drive for those steps.
Step-by-step guide to Add a File
Method 1: Drag directly into your course
When adding files, there are two options.
Drag and drop
...
- From the main course page click the gear icon (top right) then
- Turn editing on.
- Browse to the file to be added on your comptuer.
- PC :
...
- right-click the Windows button in the lower left hand corner >
...
- File Explorer (or use any of the other ways to open the File Explorer)
- Mac:
...
- from the dock, open a Finder window
- from the dock, open a Finder window
...
- Select a single file or multiple files from your computer.
- Drag the selected files to the
...
- topic section in AsULearn and release the mouse key.
...
- You may see a spinning icon as it transfers the file, but the file link should appear on the AsUlearn page.
...

Method 2: Upload the file
- From
...
- the main course page
...
- click the gear icon (top right) then Turn editing on.
- Click
...
- the +Add an activity or resource link in a topic section.
- Under Resources, select File, and click the Add button.
- Enter a Name for the link.
- In the
...
- General area > Select file click the Add
...
- ... button (page icon in the image below). The File picker window will display.

-
- Alternatively, you can drag and drop a file (as described in Method 1) from your computer into the Files field (blue arrow), then skip to step 9.
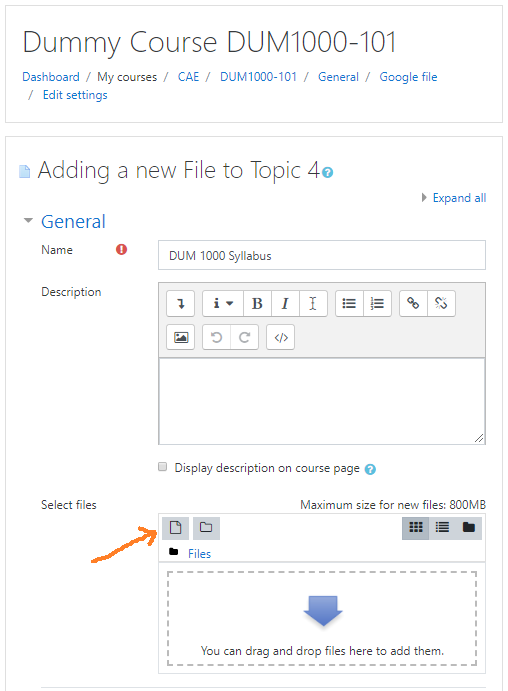
- Alternatively, you can drag and drop a file (as described in Method 1) from your computer into the Files field (blue arrow), then skip to step 9.
- From the File picker screen, click Upload a file on the left, then click the Choose File button. Browse
...
- to a file from your computer, select a single file, then click Open.

- Change any properties for the uploaded file if you want.
Click the Upload this file
...
button; or click the × in the top right to close the File picker and cancel the upload.
Info For large files you may need to wait for the file to upload. When the upload is complete, the File picker window will close. For files dragged into the field, wait for the file name to appear in blue text.
- Specify any other options on the screen. Click the blue question marks
 on the screen for help with the options.
 - Click Save and return to course, and a link to the file should now be displayed on the main course page; or click Cancel to abandon adding the file altogether.
...
| Info |
|---|
What happens when the file link is clicked depends on settings in the Appearance section as well as how the browser is set up to handle links. File types may be handled differently. |
Support category: Resources
Related Articles
| Content by Label | ||||||||||
|---|---|---|---|---|---|---|---|---|---|---|
|