...
- From your main course page select Grades from the drawer menu on the left (hamburger icon top left to open) or select Gradebook from the gear menu (top right).
- Select the Import tab. Click the blue
 buttons for help on the individual options.
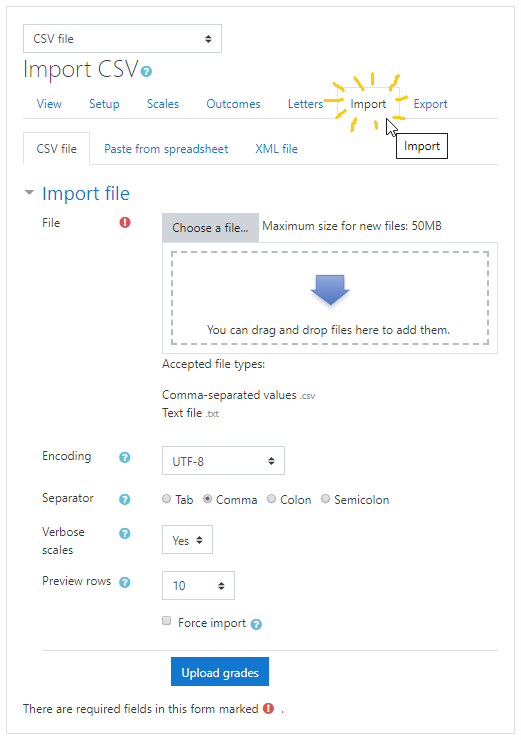

- Drag and drop the prepared file (see above) from your file explorer to the blue arrow region; or click Choose a file.... to open the File picker:
- Click Upload a file on the left.
- Click the Choose file button to select a file from your computer.
- Click Upload this file.
- Wait for the file to upload. When the upload is complete, the file name will be displayed in blue text in the drag-and-drop region. Wait for it to turn blue.
- For Separator:
- Leave the option set to Comma for a comma-separated values (CSV) file
- Leave other settings at defaults.
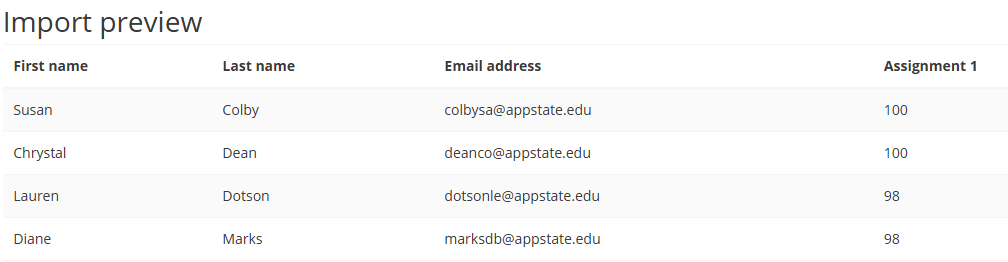
- Click Upload grades. The Import preview screen will open.
If the upload was successful, a preview of the first 10 rows* will be displayed. Verify the uploaded data.
Info title TIPS - You can *change the number of preview rows on the previous Import CSV screen (step 2 above).
- To scroll the preview left or right, scroll down below the Grade item mappings section to reach the horizontal scroll bar. Close the mapping sections to see more of the preview.
- To see more of the preview zoom the view out: in a Chrome browser click the 3-dot menu (top right), lower the Zoom percent.
- If the upload failed, an error message will be displayed. Make adjustments to your prepared file and upload again.
- NOTE: In the Import Preview the data should appear in columns with headers above each column. If data is not displayed in a table with columns and rows, this indicates a problem with reading the file. Make sure the file is saved in the correct format and then repeat the upload making sure the same format is selected in step 5 above.
- Below the preview rows, open the Identify user by section (click the label) to match the unique identifiers in your spreadsheet to students in AsULearn.
- To match users by Banner ID, set the Map from (column in the preview) to the column header with the Banner ID numbers and Map to (field in gradebook) to ID number (default).
To match users by email address, set the Map from to the header for the column with the email address and Map to to Email address.

Info If you started with an Export gradebook file, the field names should match. Be sure all records (rows) in the imported spreadsheet have data for whichever column you use.
- The Grade item mappings section is where you match columns in your spreadsheet to grade items in AsULearn. The column headings from your imported file will be listed at left, with a dropdown menu to the right listing existing grade items in the course gradebook.
- To import a column of grades to an existing grade item, select the activity name from the grade item mapping dropdown. This will overwrite any existing grade data in the gradebook for this activity for each student in your spreadsheet: a grade cell left blank in the spreadsheet will delete the grade for that student.
It is possible to add a New grade item (at top of dropdown list in the Others section) by mapping to it, but doing so has limitations. The grade value for a New grade item is 100 points. The grade item will only be visible in the gradebook. Feedback for the New grade item must be imported with a second import after the grade item is created so you can map to the Feedback for that item.
- To skip a column, and not import its data, leave the dropdown menu set to Ignore. You can ignore First Name, Last Name, ID Number, Email Address—you don't want to replace those values in AsULearn.
- To import written feedback for a grade item, map the spreadsheet column to the Feedback for a grade item (Feedback is grouped at the bottom of the grade item mappings dropdown) not to the grade item itself, nor as a New grade item.
- To import the file with your settings click Upload grades at the bottom of the screen. The import will begin. If the import is successful, you will see a message: Grade import success.
- A problem with the import will be display a failure message instead: follow any recommendations on the screen, modify your import file if necessary, repeat the import from step 2, and modify your settings as necessary.
- A problem with the import will be display a failure message instead: follow any recommendations on the screen, modify your import file if necessary, repeat the import from step 2, and modify your settings as necessary.
- Click Continue to return to the Grader report view of your gradebook. Make sure the new data is properly inserted in the appropriate columns of your gradebook.
| Widget Connector | ||
|---|---|---|
|
Related Articles
| Content by Label | ||||||||||||
|---|---|---|---|---|---|---|---|---|---|---|---|---|
|
Search Knowledge Base
Submit a Service Request
We value your feedback! Click HERE to suggest updates to an existing article, request a new article, or submit an idea.
| Page properties | ||
|---|---|---|
| ||
|
...