What can you do with Shared Drives?
Shared Drives is a shared space where teams can easily store, search, and access their files anywhere, from any device.
Unlike files in My Drive, files in a Shared Drive belong to the team instead of an individual. Even if members leave, the files stay exactly where they are so your team can continue to share information and get work done.
Not sure whether to use My Drive or Shared Drives?
Ask yourself these questions:
- Are the files of interest to most or all members of a particular project shared?
- Do the files share a consistent theme?
A "yes" to both questions means creating a new Shared Drive is a good idea. If the files and folders are for many different projects, create multiple Shared Drives.
More Information
For more on when to use Shared Drives, see this Guide for Best Practices
Set up a Shared Drive
- Open Google Drive.
- In the left sidebar menu, click Shared Drives.
- At the top, click the New button.
- Enter a name and click Create.
Members of a shared drive will have different access to files and folders depending on the member type you set up for them. As the owner of the Shared Drive, you will automatically be granted the manager access level. When you add new members, they’re given Content manager access automatically but you can change a member's access level.
- Manager: Can manage members, and upload, edit, move, or delete all files and folders.
- Content manager: By default, can upload, edit, move, or delete all files.
- Contributor: Edit all files and upload new files, but can’t move or delete files.
- Commenter: Can only comment on all files.
- Viewer: Can only view all files.
Managing Permissions
Note: Each level has a different set of permissions, managers have full access to create, edit, or delete Shared Drives. Give members who need to edit files in Drive File Stream Content manager access.
For a complete list of what each access level allows, review the Google Learning Center guide How File Access Works in Shared Drives.
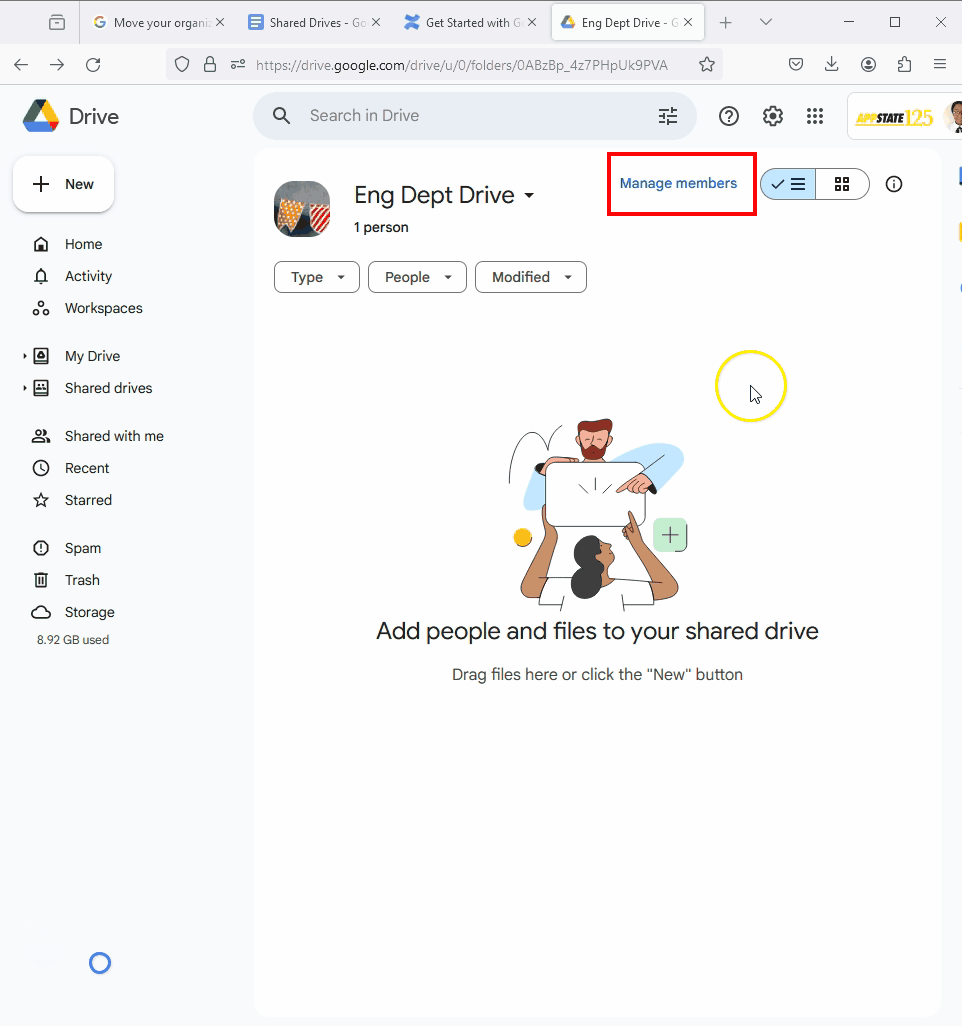
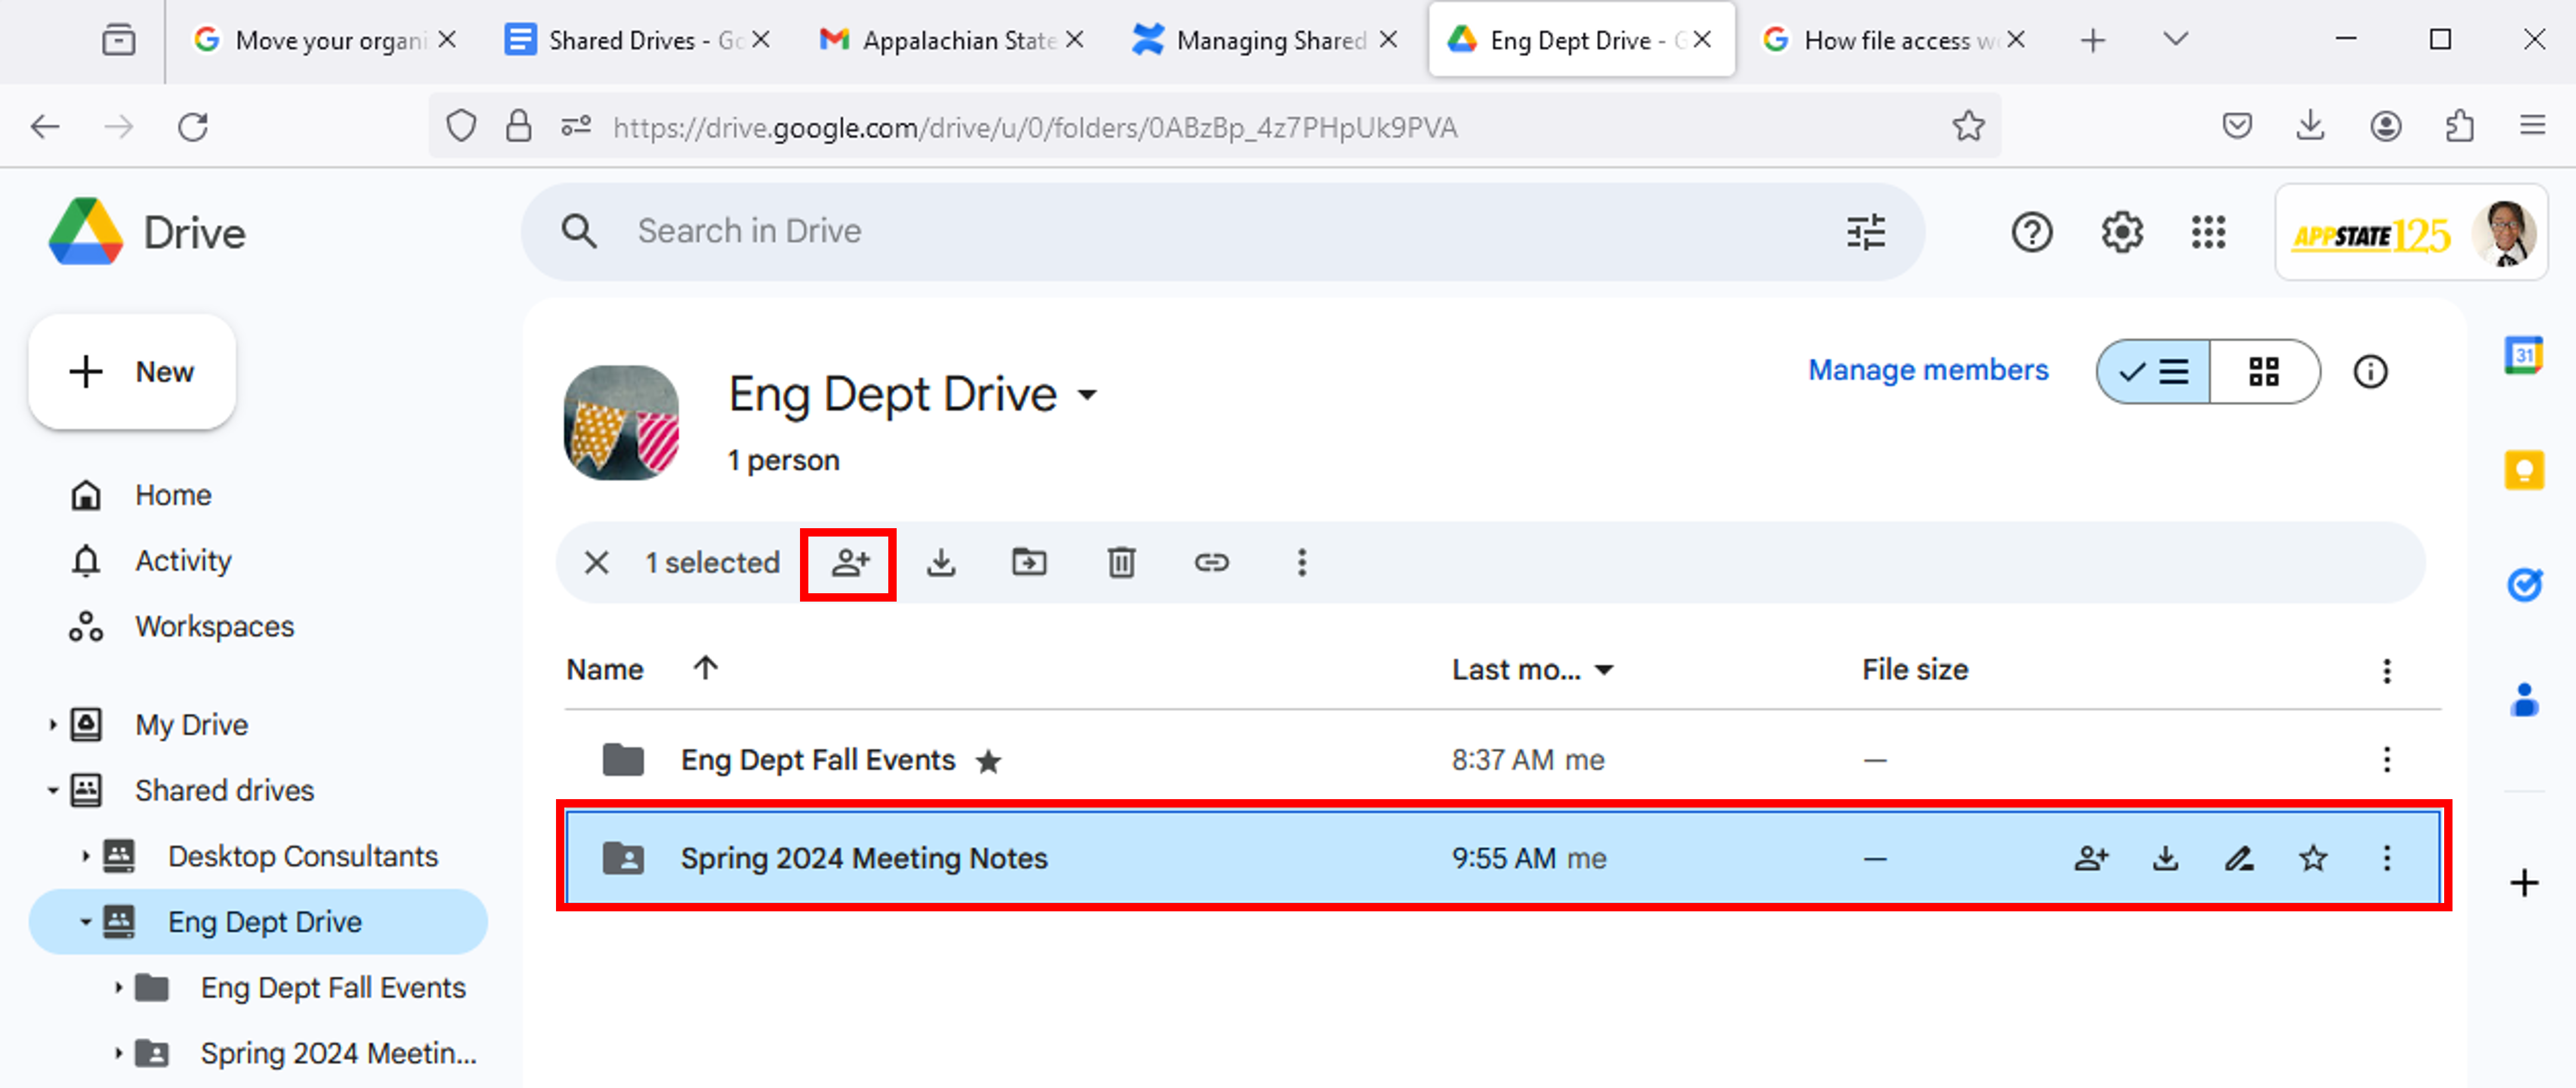
Users who are managers can add members and set access levels:
- In the left sidebar menu, click the Shared drives button and double-click on one of your shared drives.
- Click the Manage members button at the top of the Shared Drive.
- Search for users to add or click the plus sign next to a user's name.
- Enter a message when adding a new member or, if you don't want to send a notification, uncheck the box that says notify people.
- To change the access level, click the down arrow next to Content manager and change the user to a different access level.
- Click Send.
You own files and folders that you create. When you share access to files and folders it can get complicated. Ownership of folder contents becomes mixed if creators or owners move content to a Shared Drive, leave the university, lose access to their account, etc.
Example:
- You are working on a group project. You create a project folder and share it with your collaborators.
- In the project folder, you add a document.
- Then your collaborators each add documents.
- Your group is using one of the strengths of Google Workspace: a single space for all of you to easily collaborate on a single project.
- Now look at the ownership of the contents. You can see this in the list view, or by highlighting a specific file and clicking the View Details icon in the toolbar (an "i" surrounded by a circle) to see a detailed view.

Preventing Orphaned Files and Managing Ownership
If users transition to a new position or leave the university, it may be necessary to change ownership of files, folders, or a Shared Drive. This will preserve the continuation of access for other users.
If ownership of a file or folder is not changed before separation from the university:
- Files will become read-only.
- You can make a copy of the file or files and move them back to a shared drive location (Only one member needs to do this because only one copy is needed for the group.)
Users who are managers can remove users from the drive or change their access levels.
- On the left, click a Shared Drive.
- Click the Manage members button at the top of the Shared Drive.
- Next to a member's name, click the down arrow and select a new access level, or click Remove Access to remove the user from the shared drive completely.
- Click Save.

Creating and Adding Files and Folders
- In the left sidebar menu, click on Shared drives, then click on a specific shared drive.
- Click the New button, then click New Folder.
- Enter a folder name and click Create.
- In the left sidebar menu, click on Shared drives, then click on a specific shared drive.
- On your computer, drag an existing folder into the shared drive or, click the New button, then Folder upload. Navigate to the folder and click Upload.
- You will be prompted to confirm upload from Google, click Upload.
Only users with Contributor permissions and higher can move folders into a Shared Drive and any subfolders must have the same permission as the top-level folder.
Adding and editing files
- Requires at least Contributor access.
- Users must have manager access to both the file and the shared drive to add the file to the drive or edit it.
- Files or folders cannot be moved into shared drives if the shared drive already exceeds the 100 GB storage space limit or if you do not own the file you are attempting to move.
- Any files you add are then owned by the team. If you leave the Shared Drive, your files will remain accessible to the Team.
- If you don't own the file but have Can Edit access in Drive from the owner, you can move the file or folder to a Shared Drive if the owner has enabled this option.
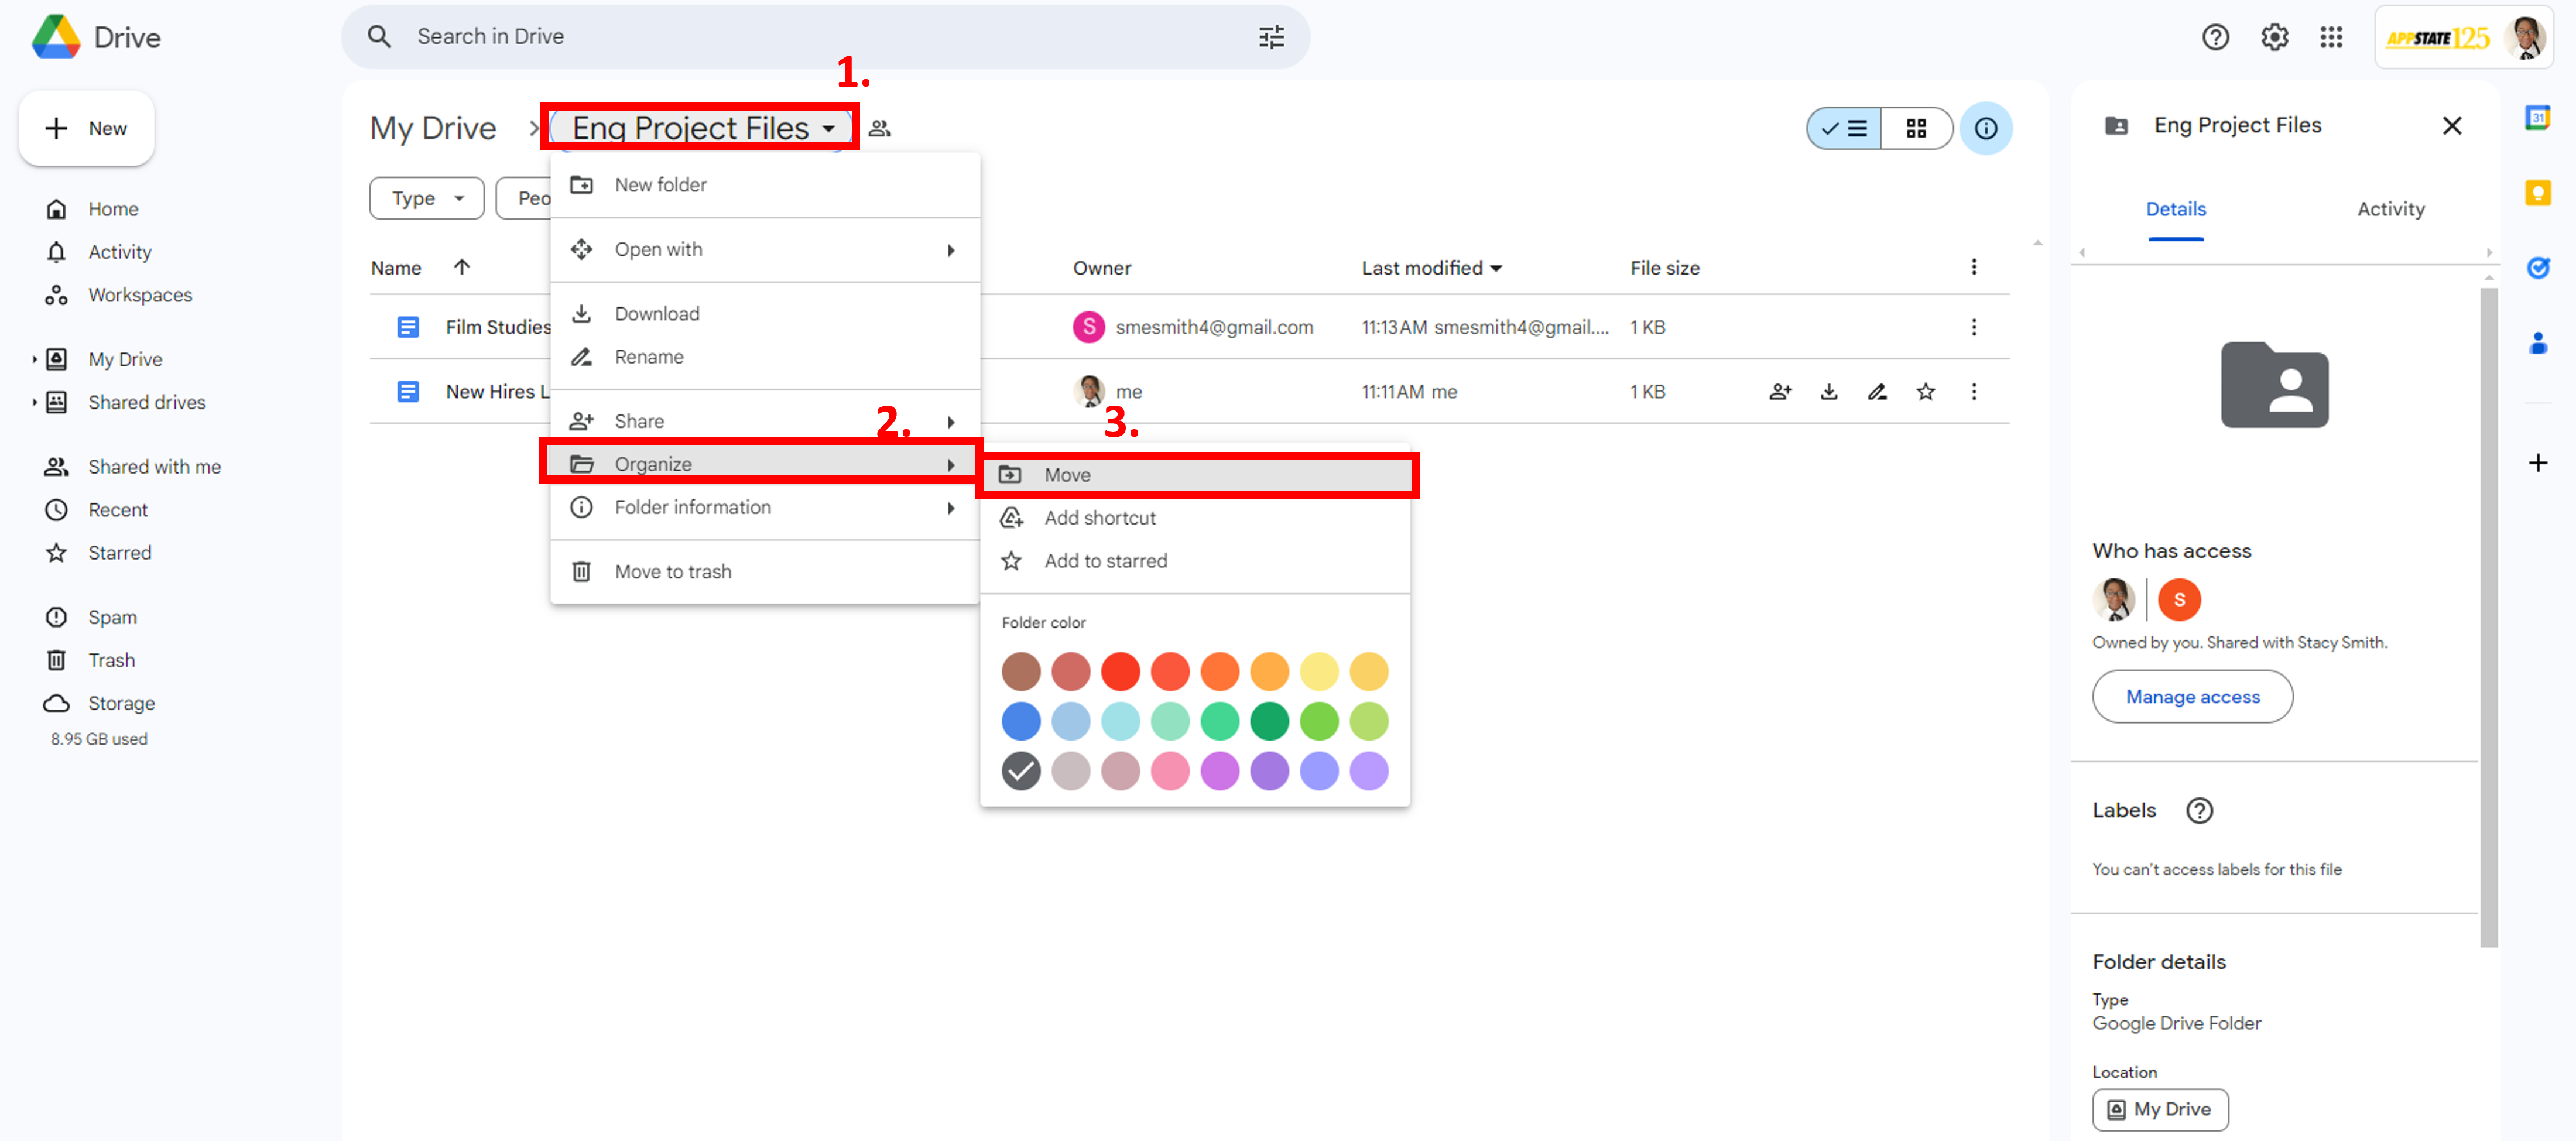
- Locate the file or folder you want to move into your Shared Drive.
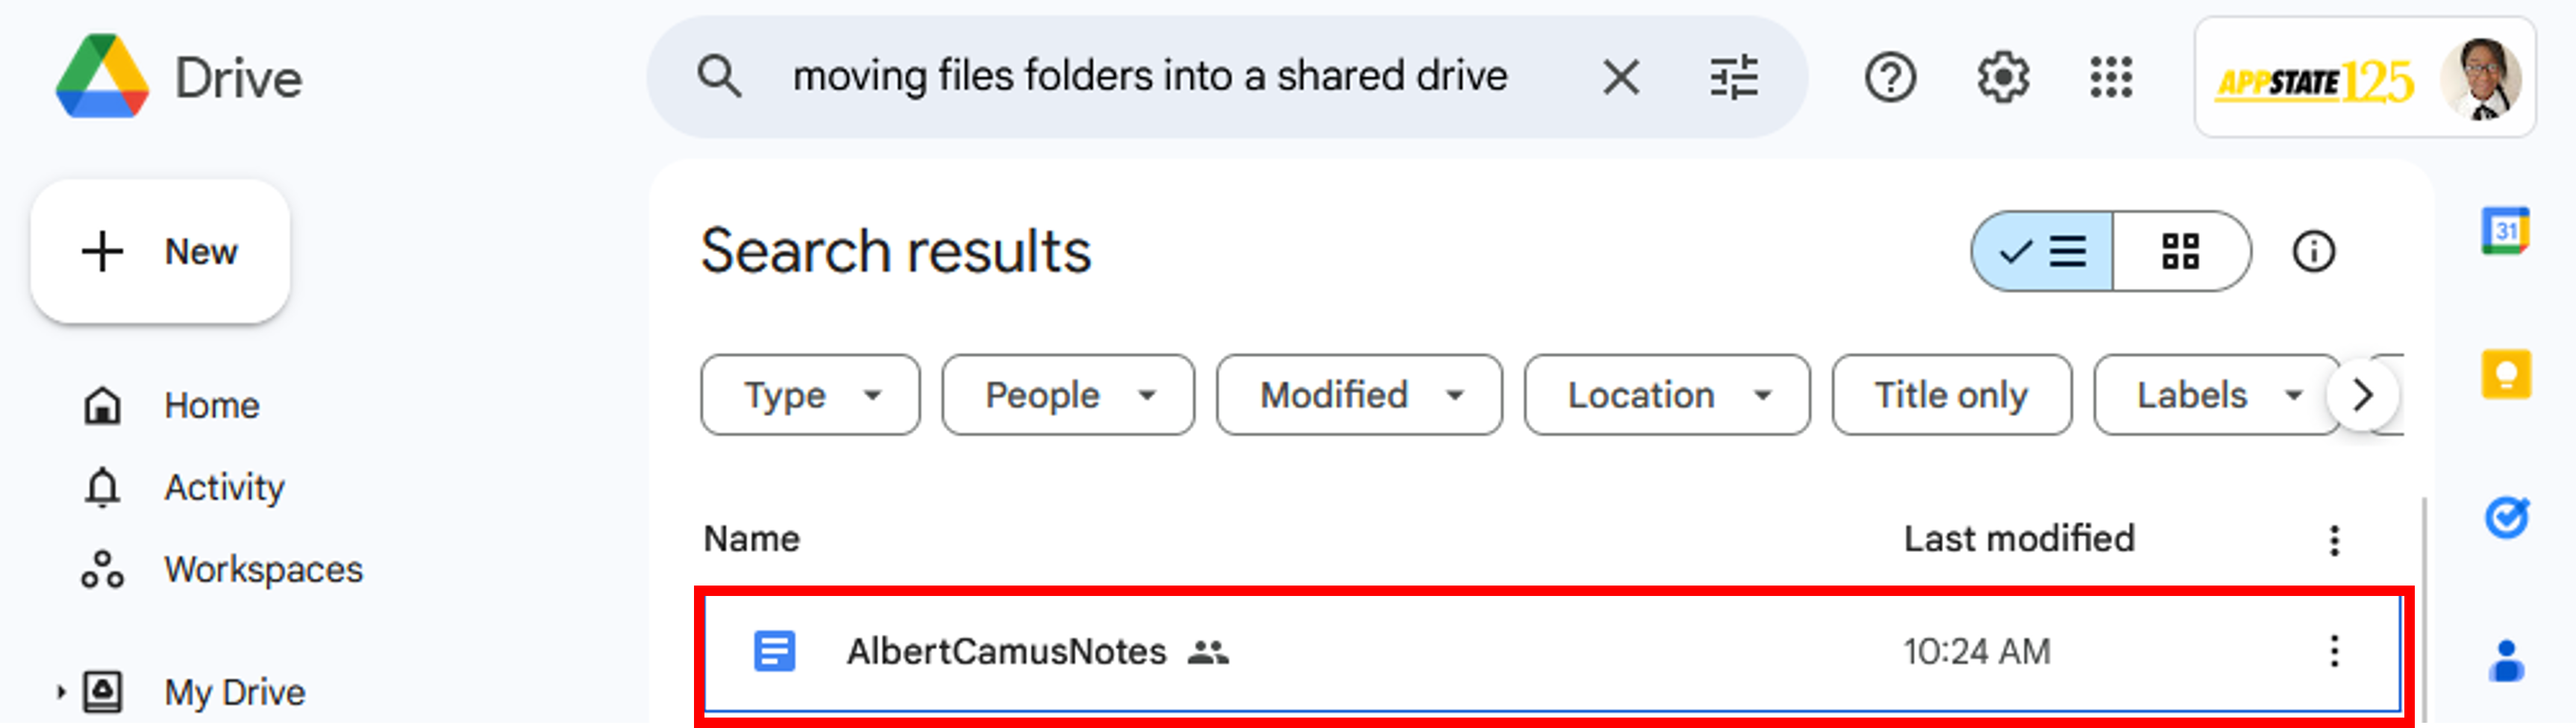
- Click the three-dot icon next to the file or folder, then click Organize, then click Move.
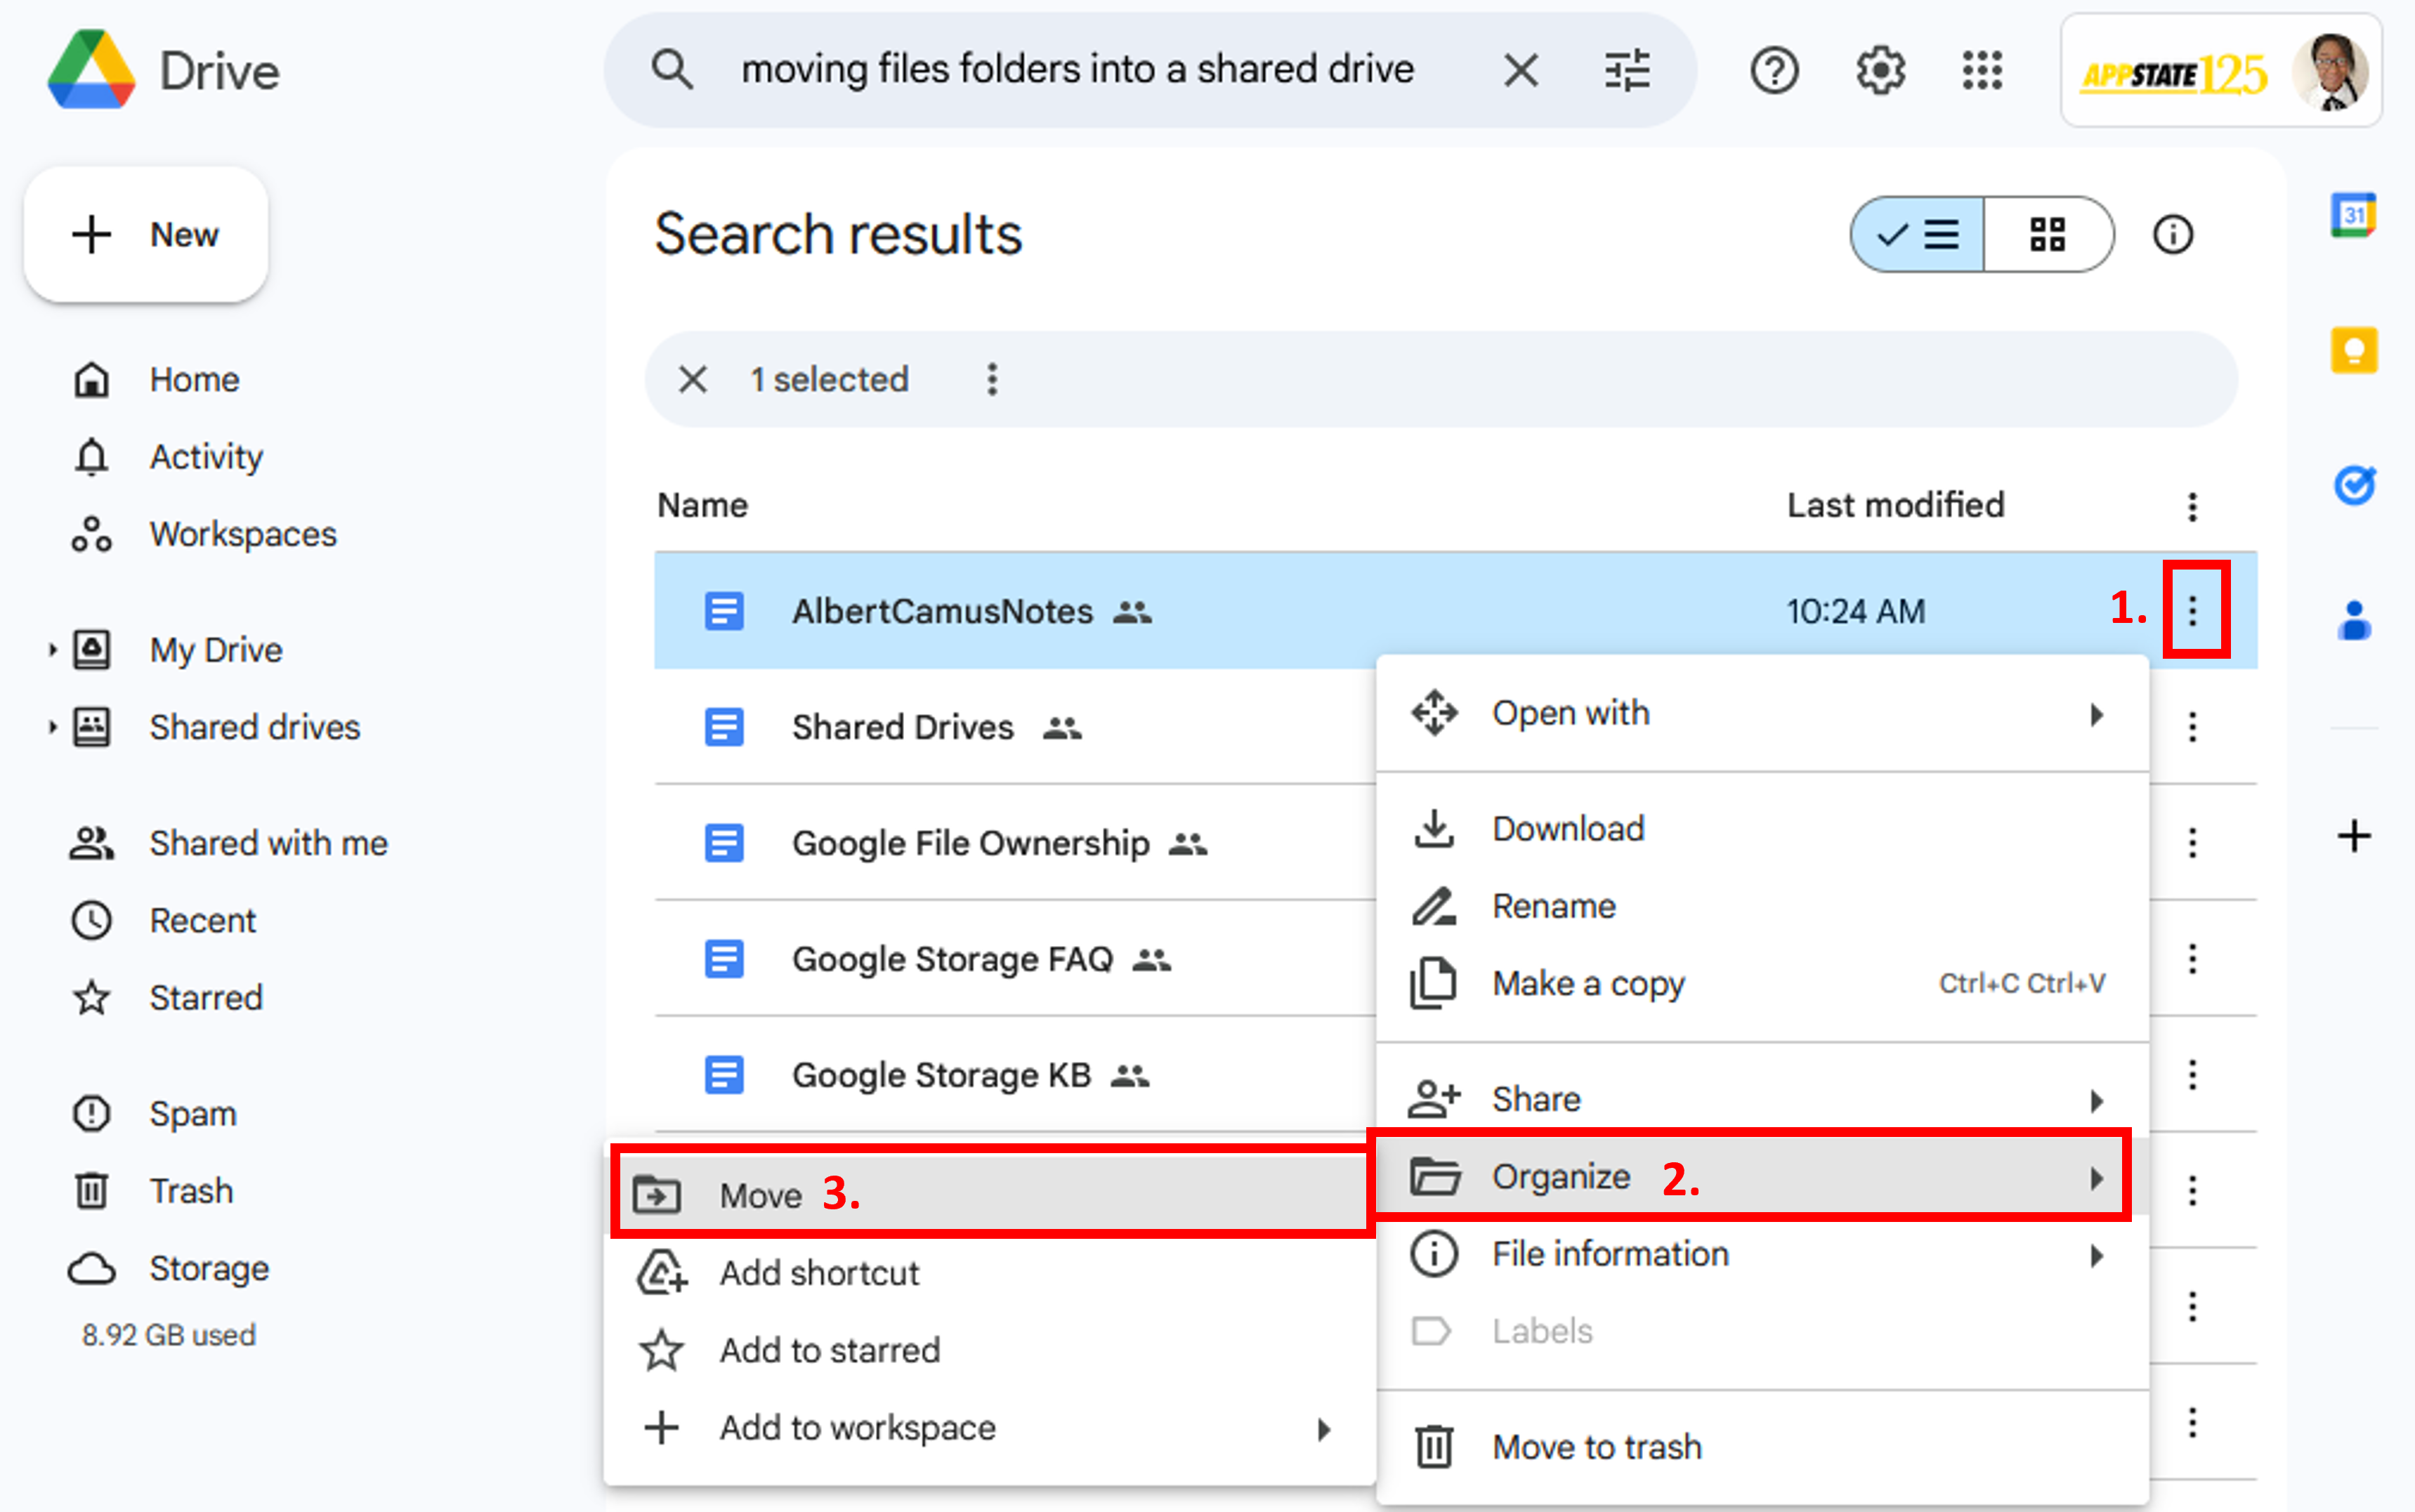
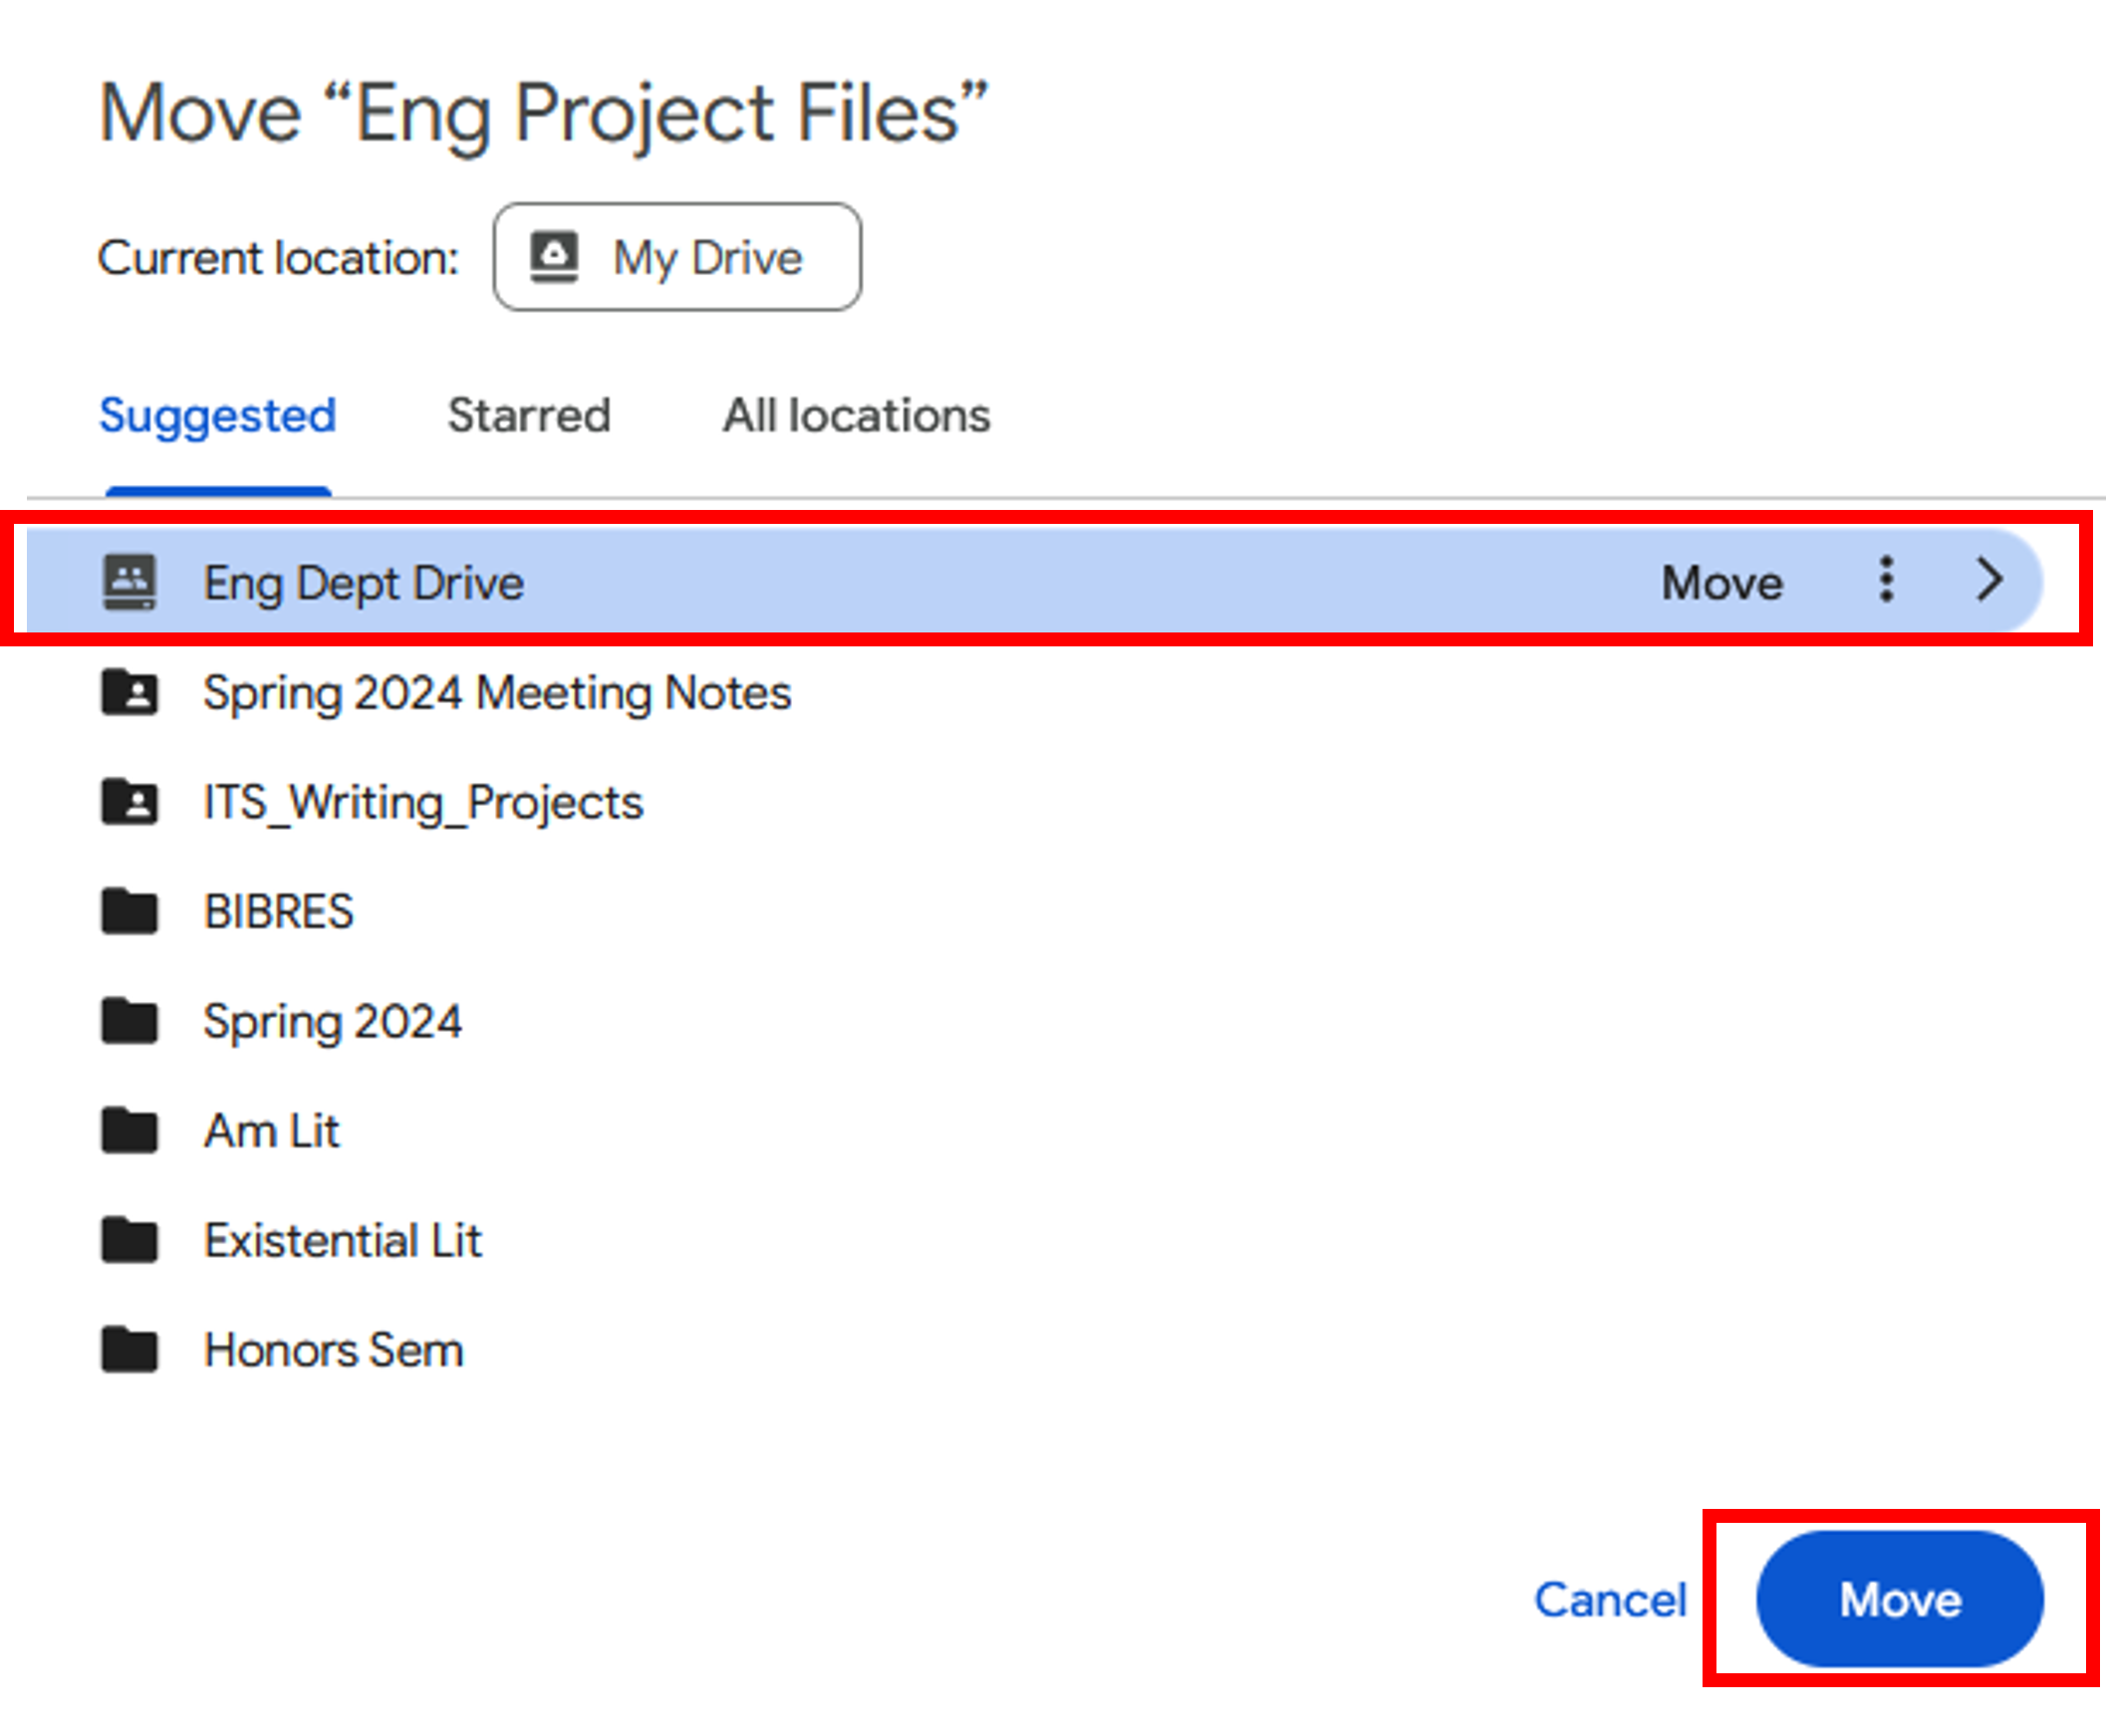
- Click the All Locations tab.
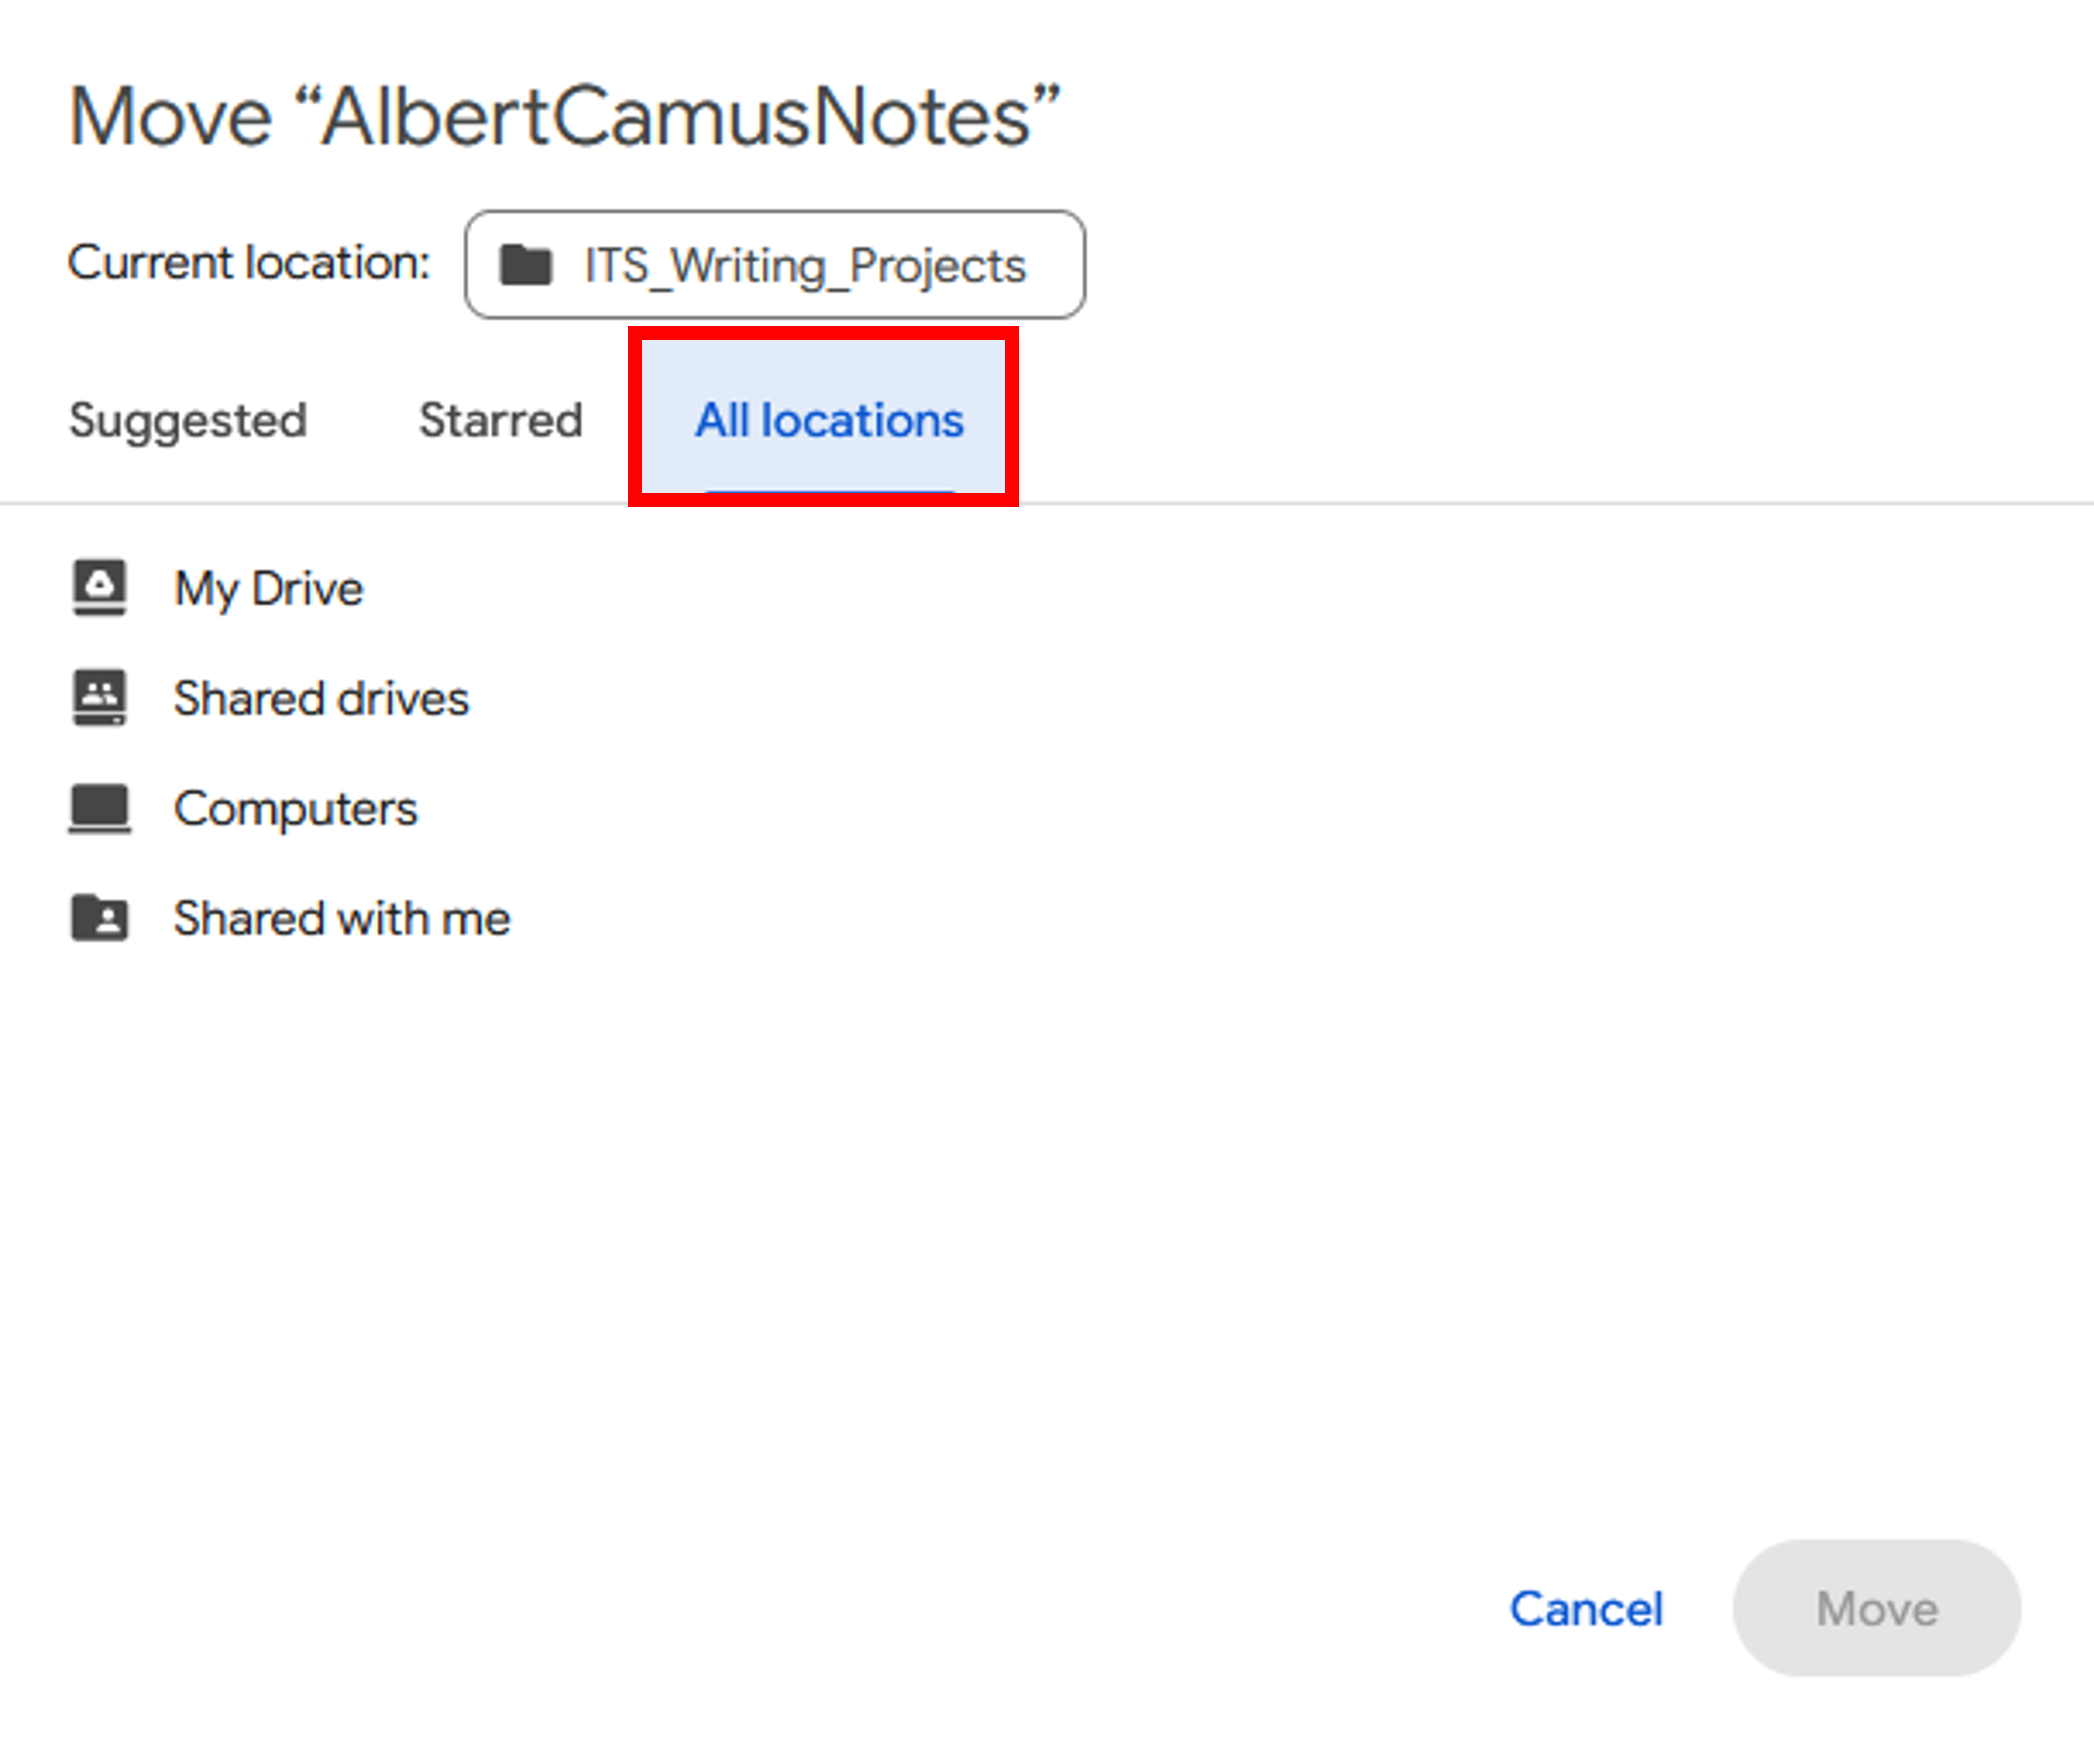
- Then click the right arrow to the right of Shared drives.
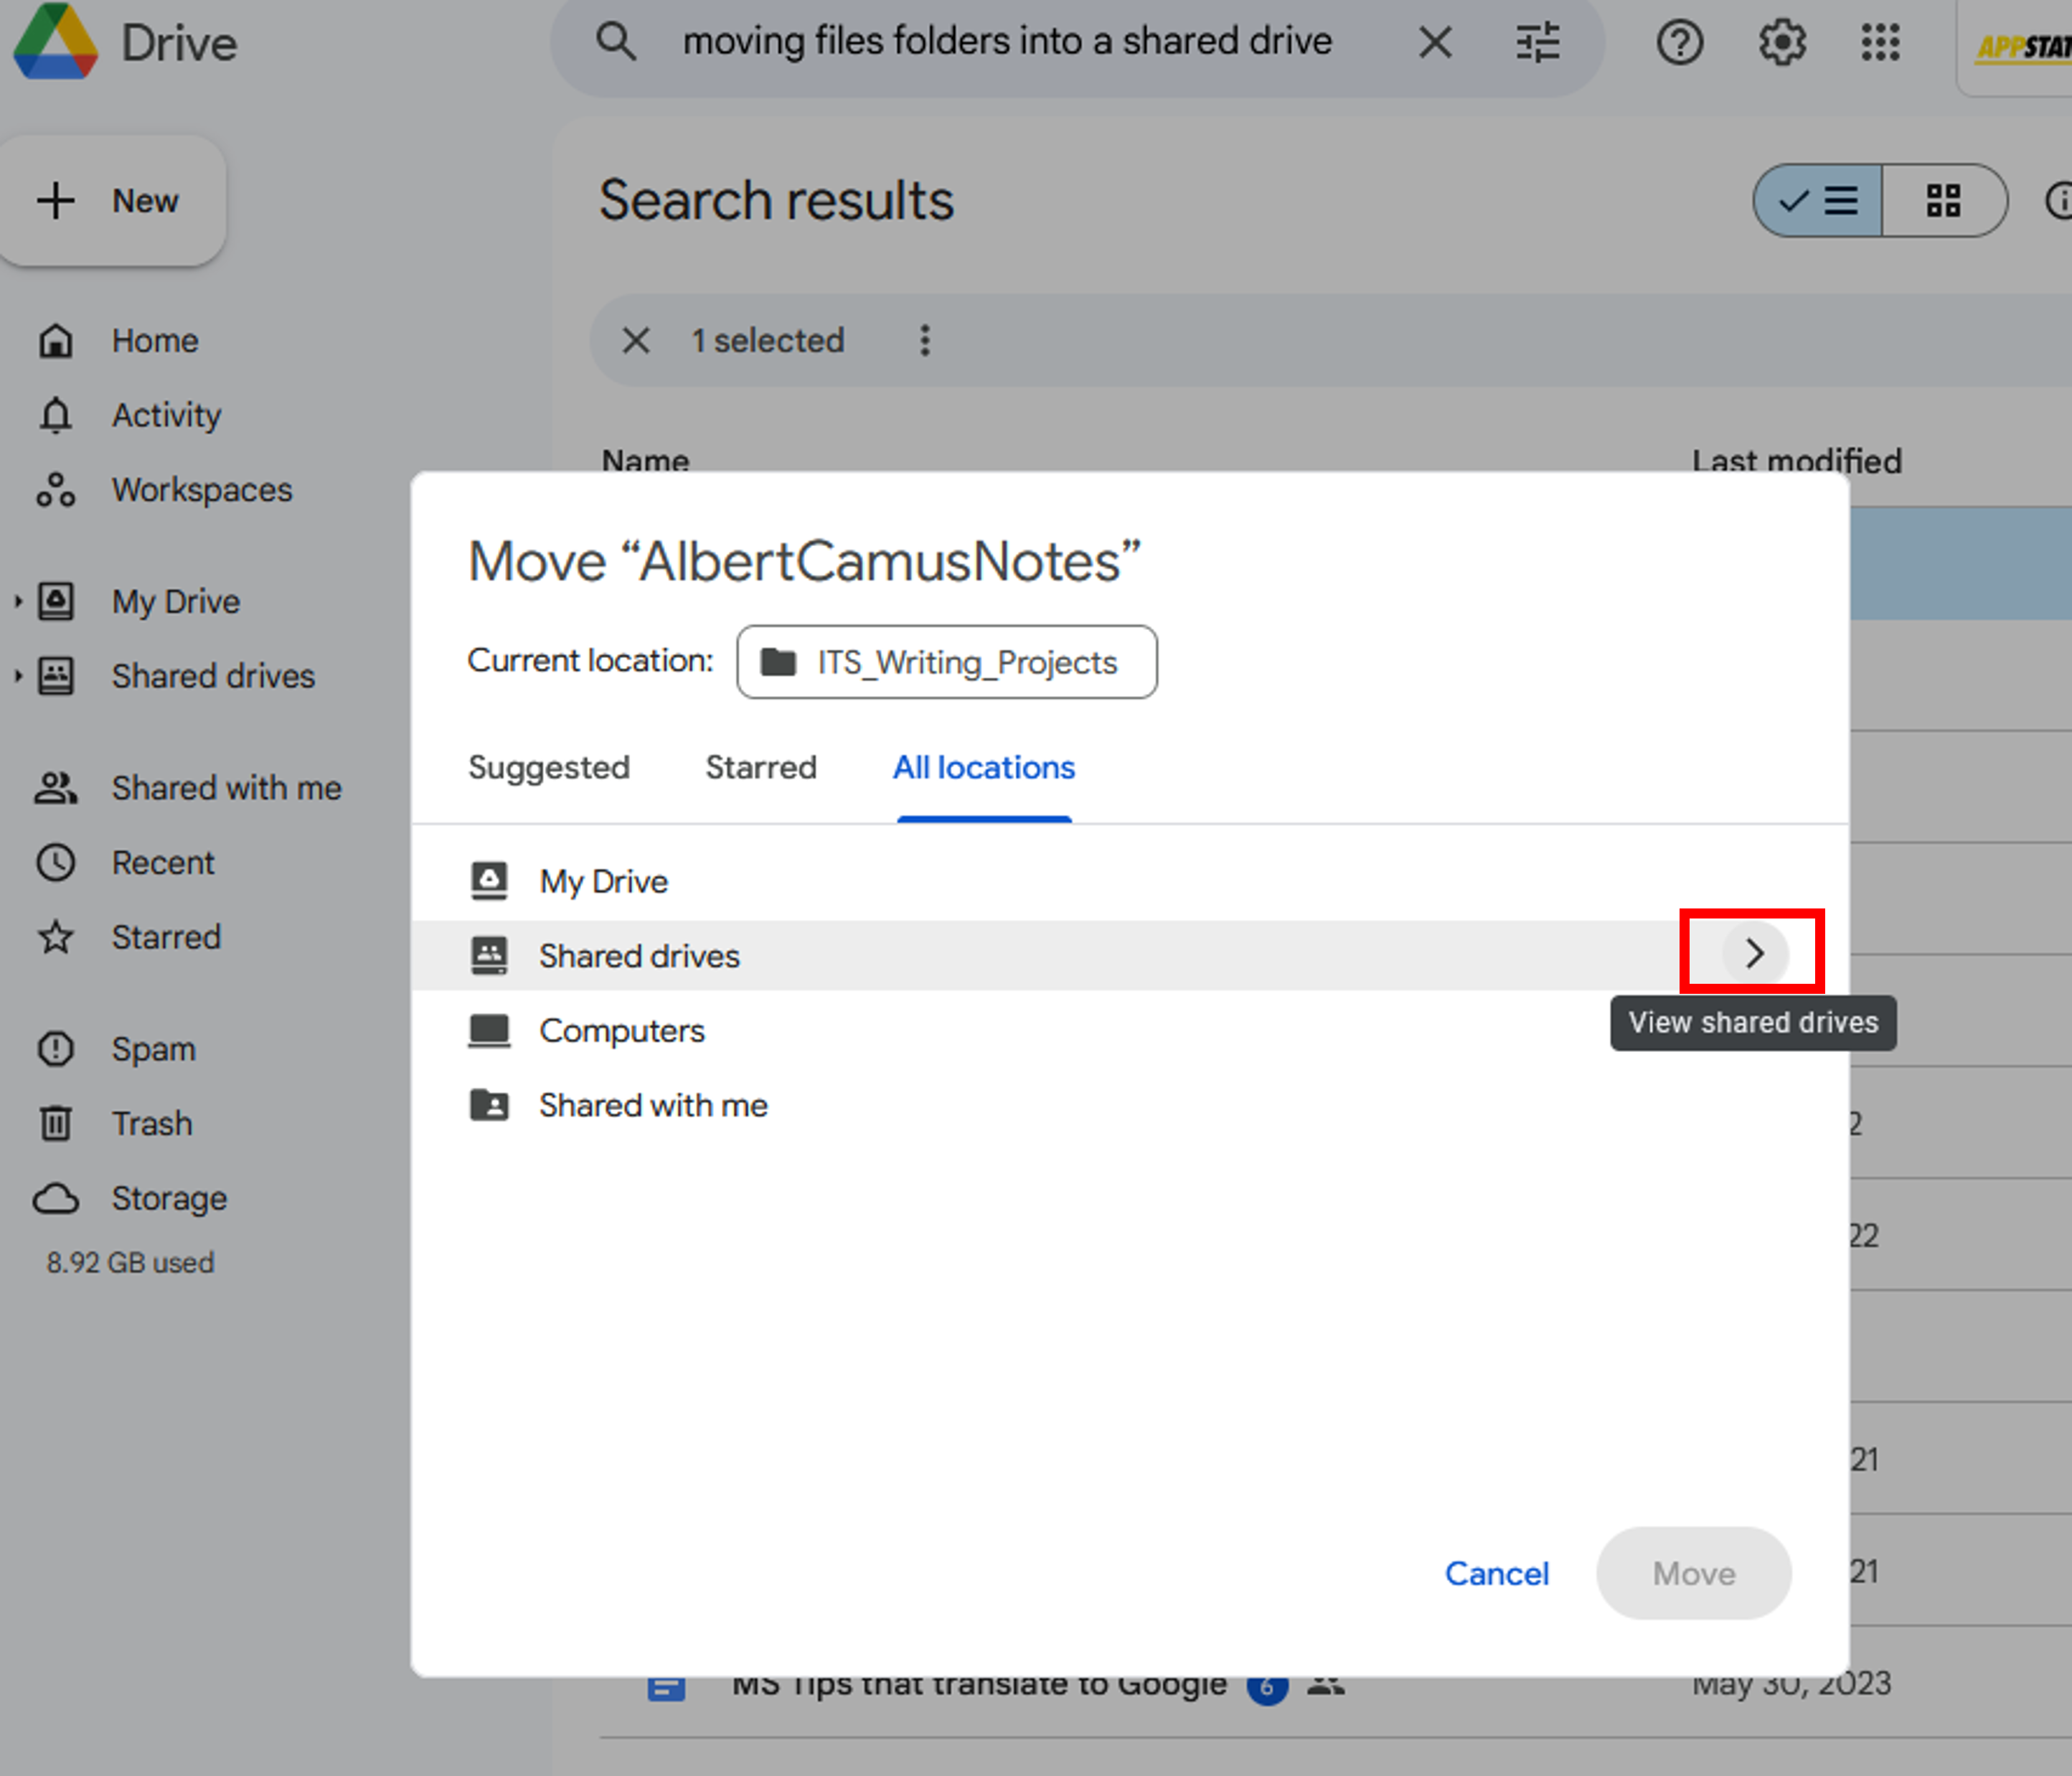
- Select the Shared drive that you want to send the file or folder to, then click Move.

- You will get a warning about users with access to the drive having access to this file or folder. Click Move.

Once the file or folder is moved to your Shared drive, it will consume shared drive space.
Managing Shared Drive Files and Folders
Star important files or folders to find them quickly later.
- Right-click a file or folder.
- Click the Organize drop-down menu.
- Select Add to Starred.
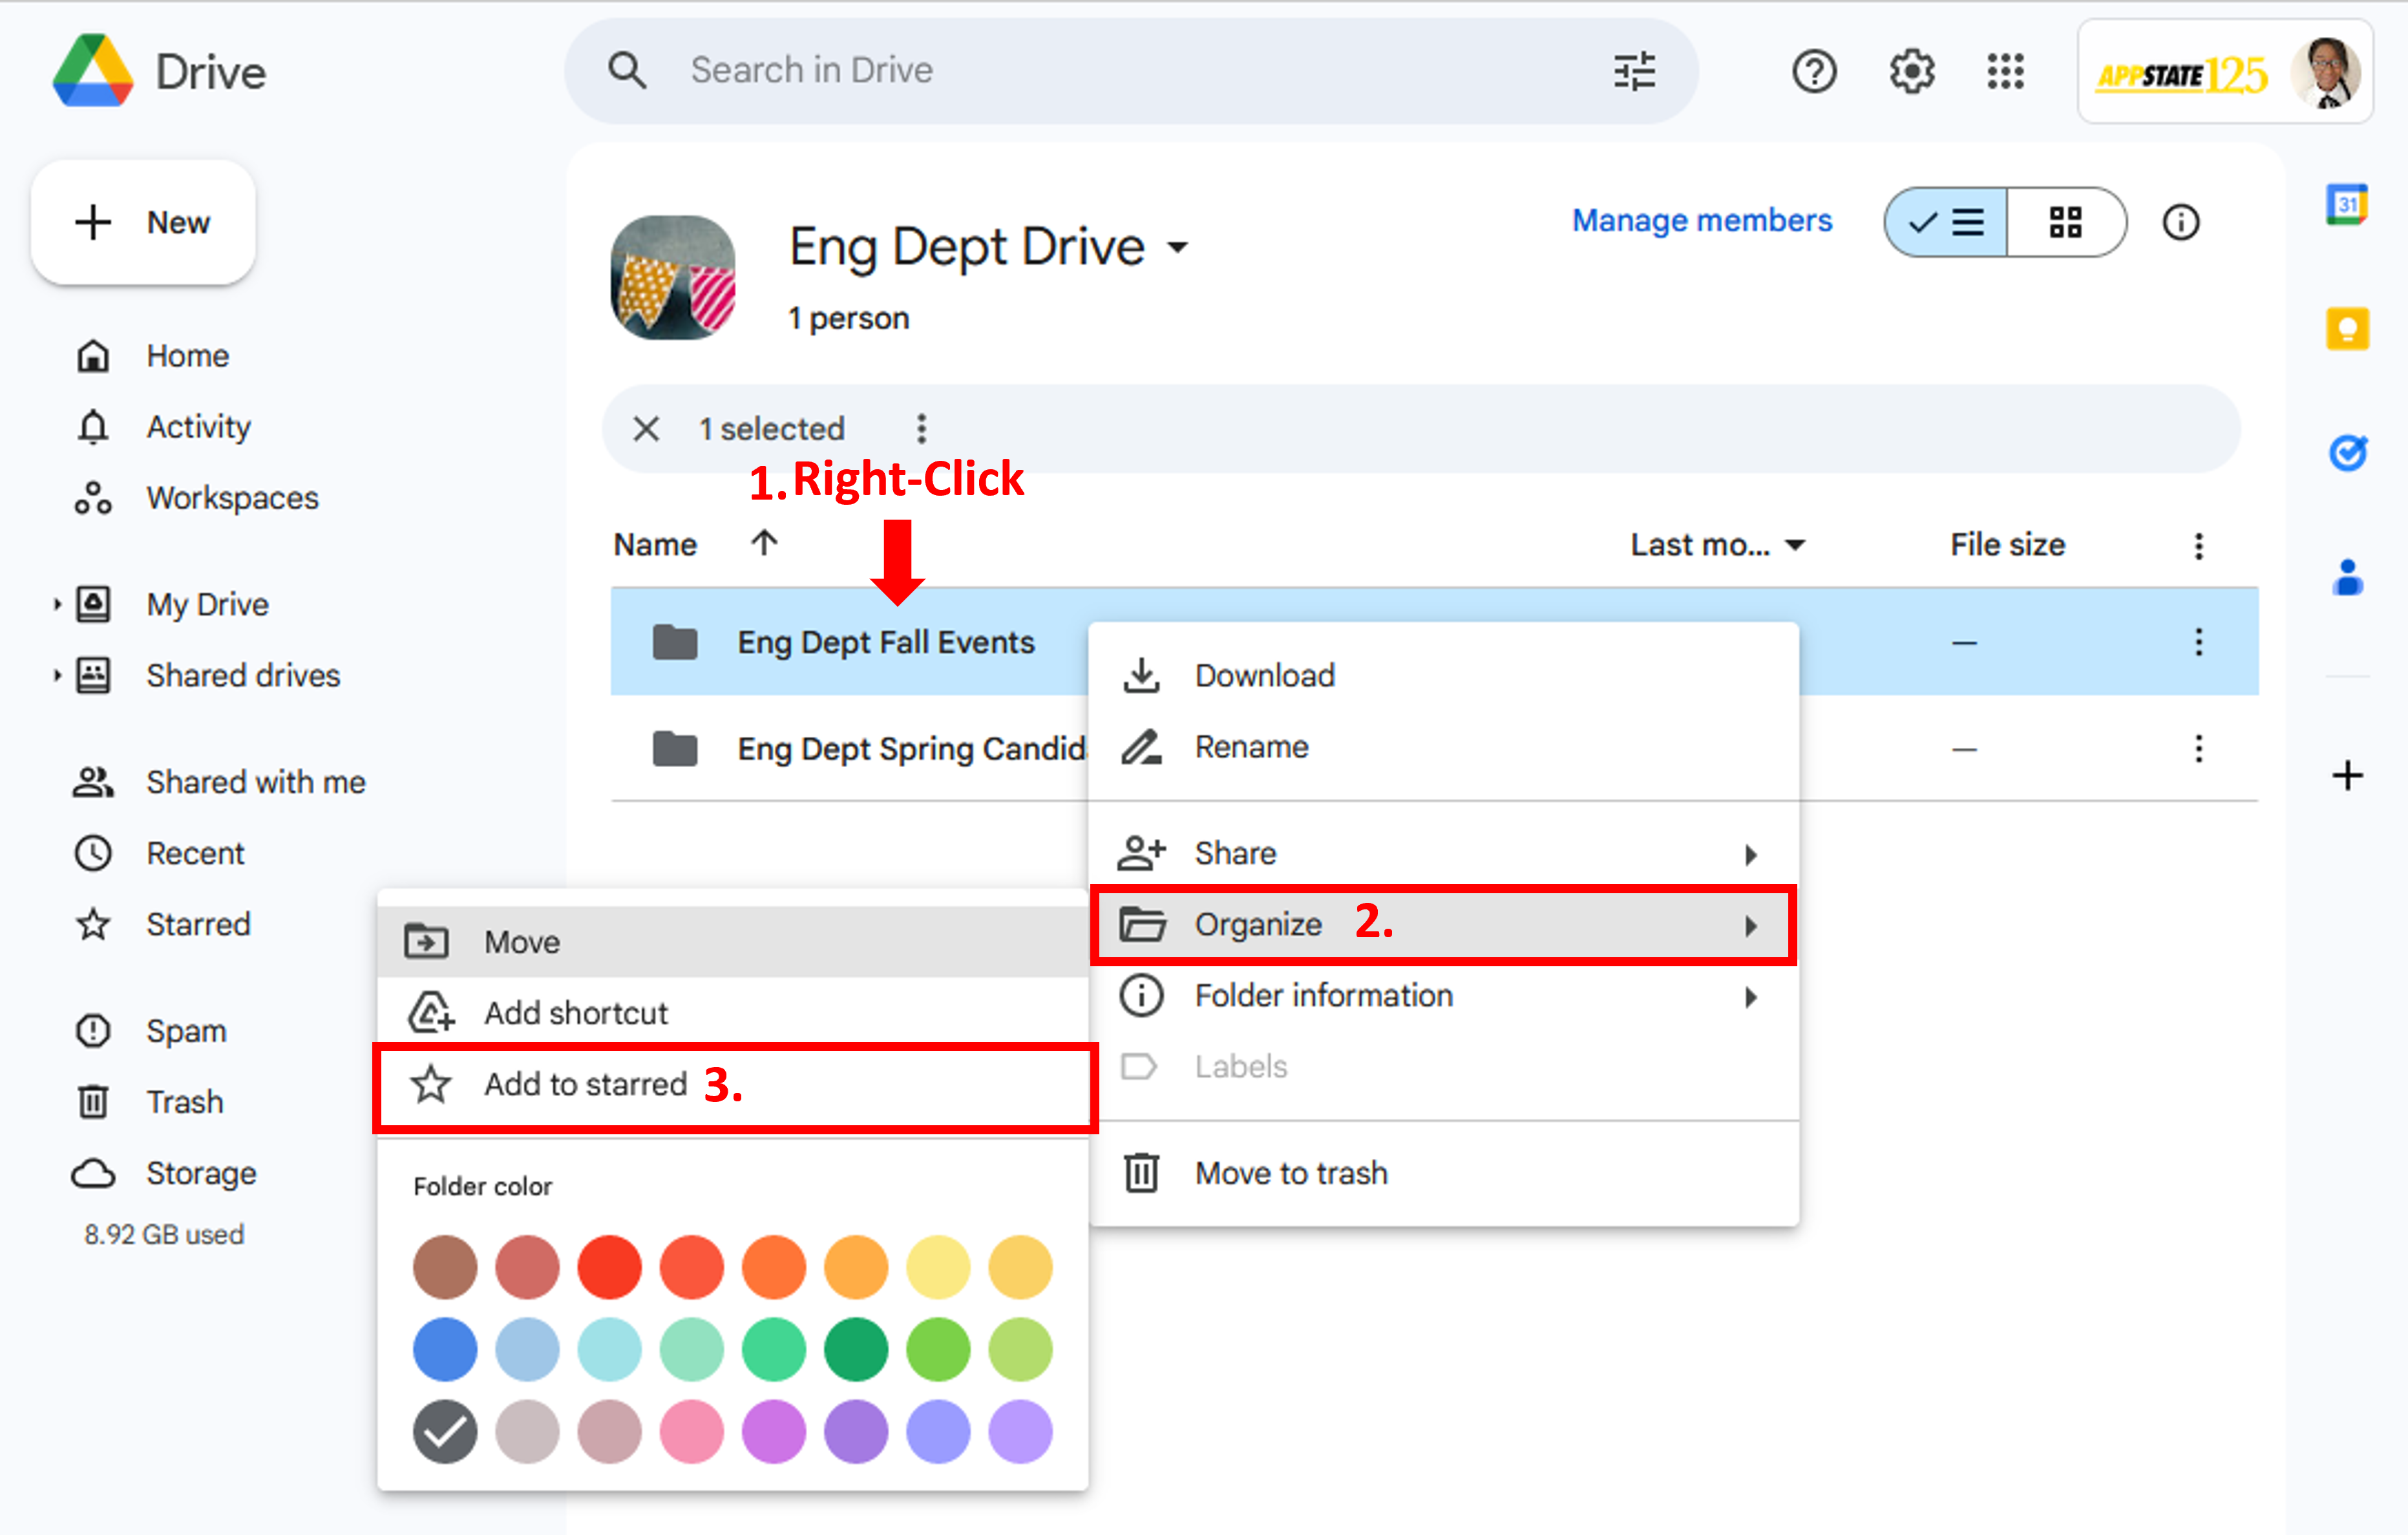
To see all your starred files and folders, click Starred in the left sidebar menu.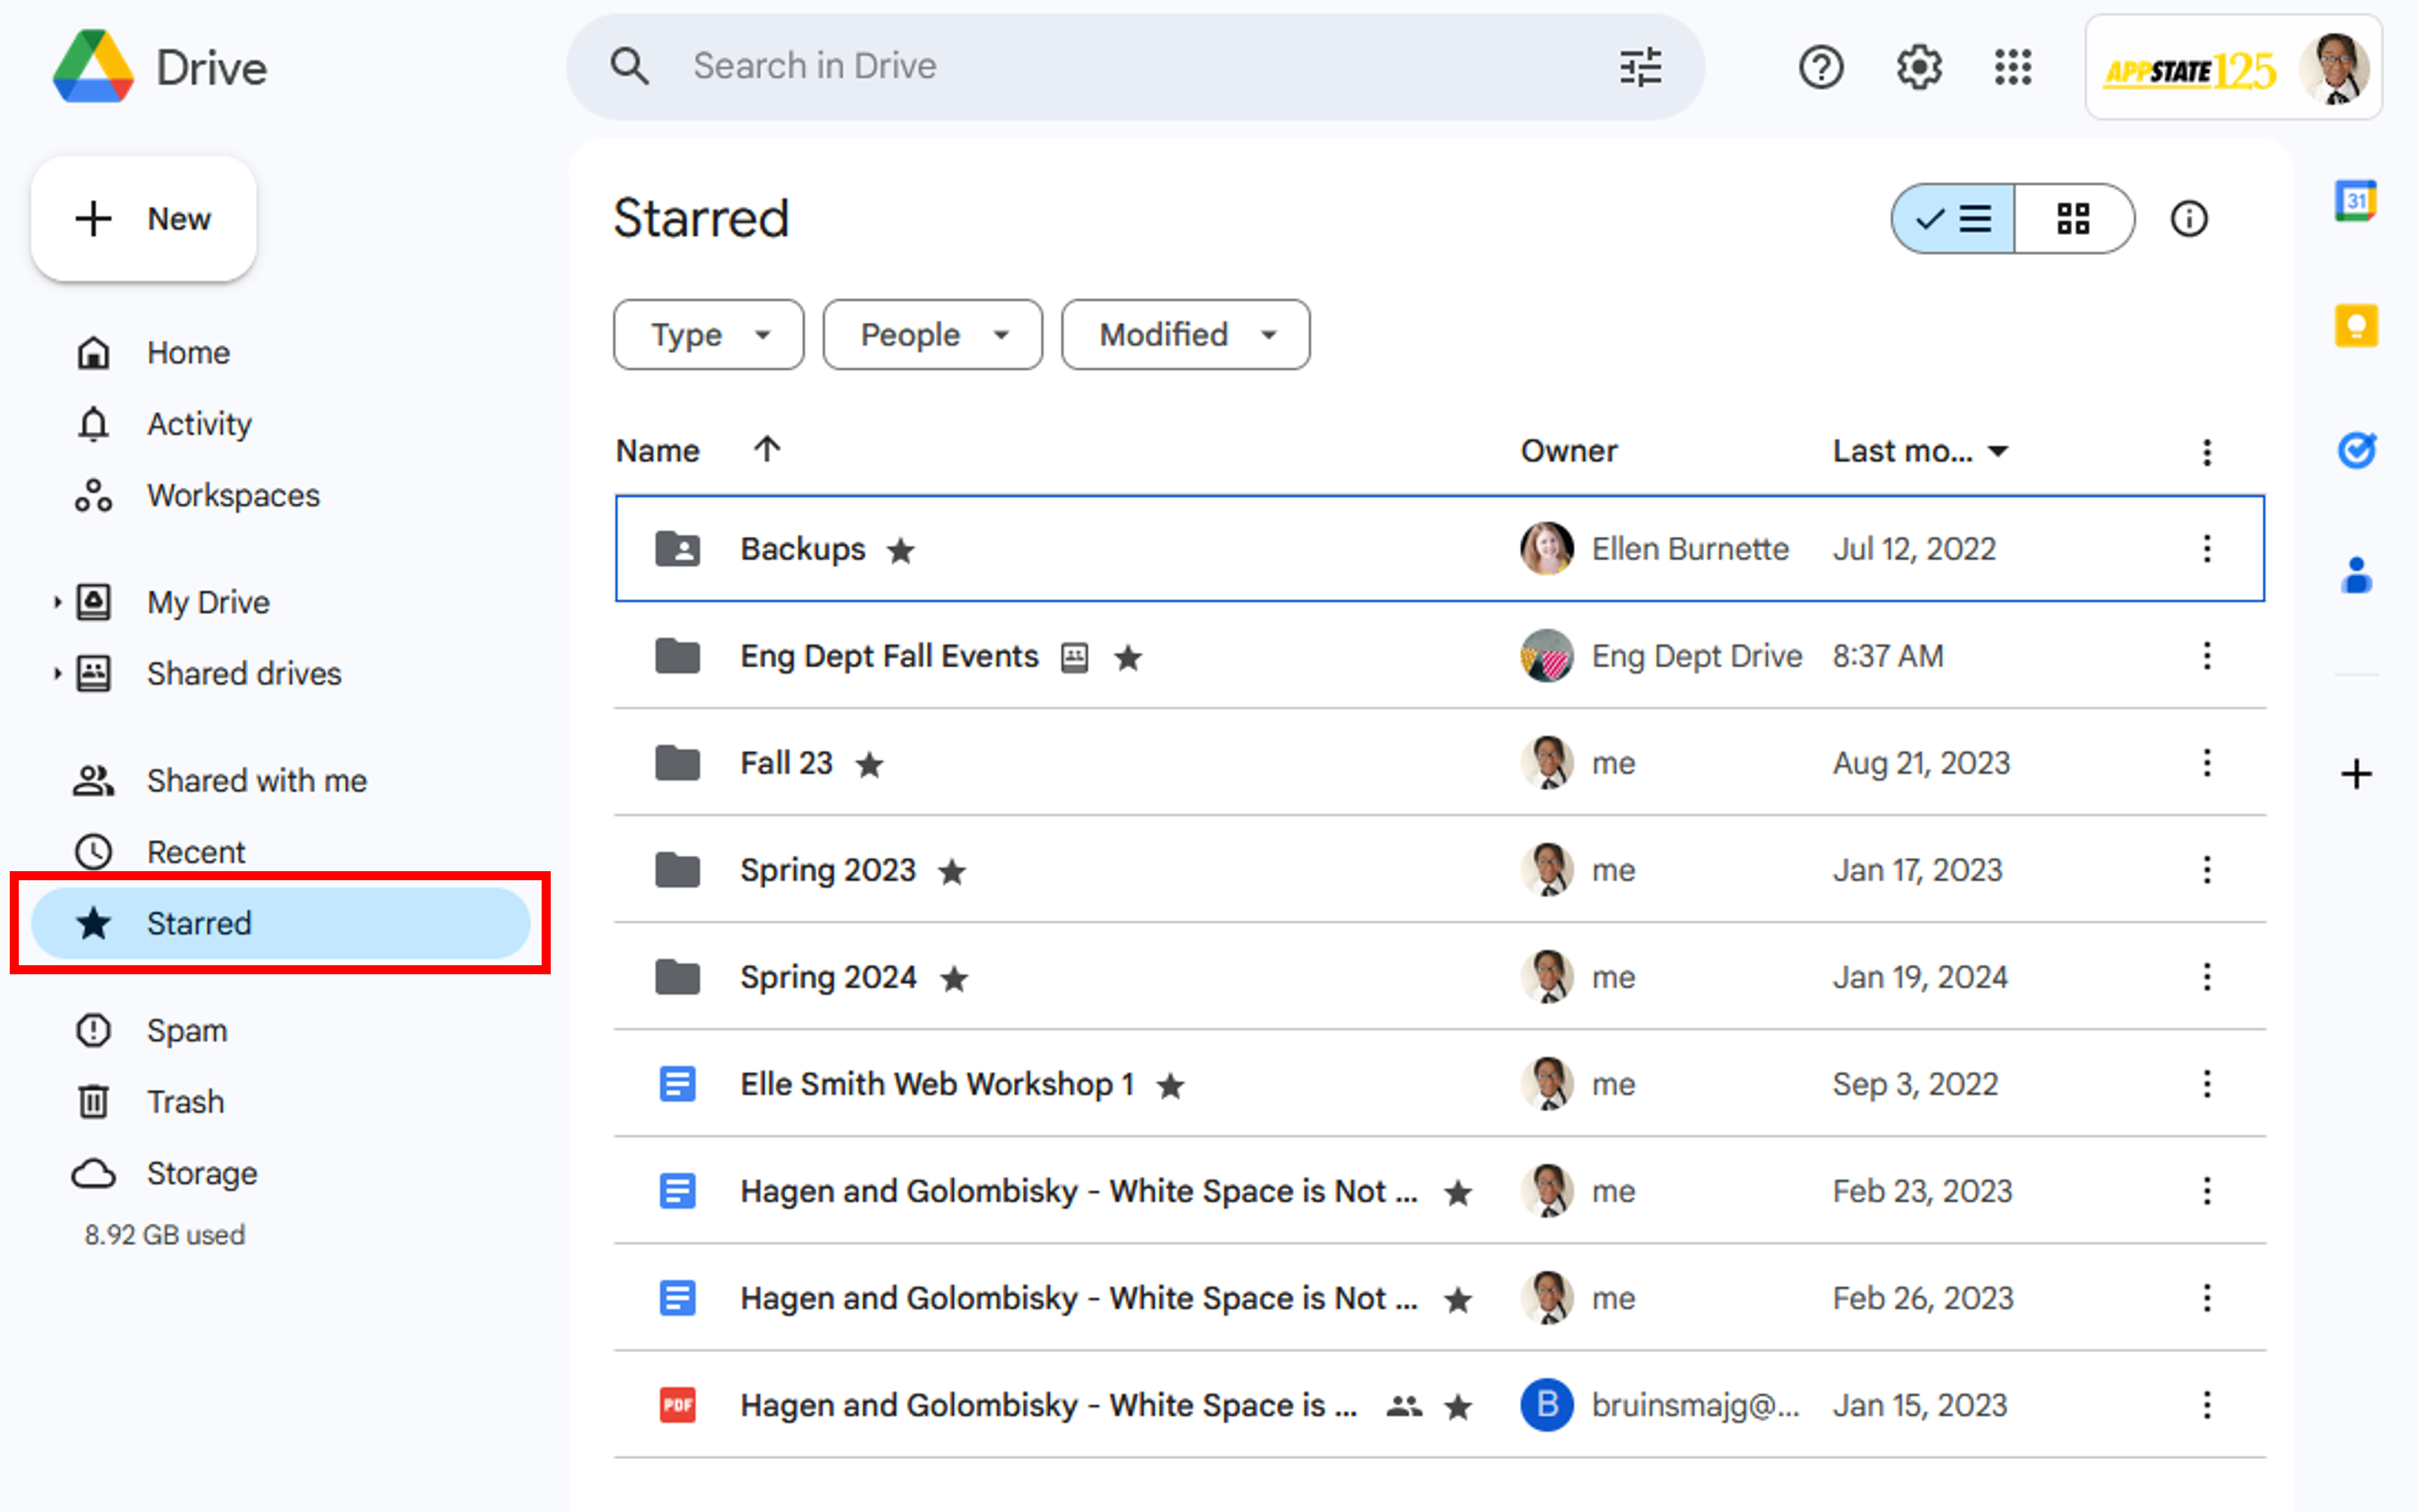
To move files between Shared Drives, you need Manager access to the original Shared Drive and at least Contributor access to the destination Shared Drive.
- Click on the file or folder you want to move to select it.
- Click and hold the file or folder.
- Drag the file or folder over your Shared drives and hover.
- This will open the Shared drives drop-down, drag and drop the file or folder into the Shared drive you want to move it to.
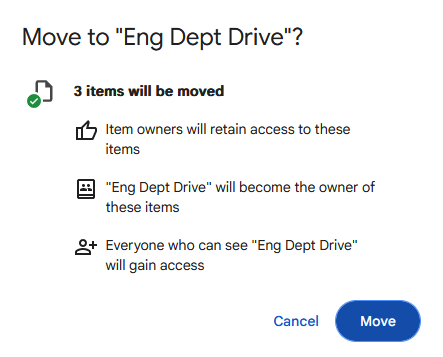
- You will get a prompt telling you what items are being moved, who will gain access to the file or folder, and specifying the transition of file or folder ownership.

You can move any file you own into a Shared Drive, whether it’s from another Drive location or your computer or mobile device.
If you’re not the owner of a file in My Drive, but you have Edit access to the file, you might be able to move that file into a Shared Drive, if:
- The file owner has enabled this option.
- The file owner is a member of the Shared Drive where you want to move the file.
Otherwise, ask the owner to move the file into the Shared Drive.
To move files between Shared drives, you must have at least Contributor permissions for both drives.
Attempting to move files that you don't own to a shared drive will fail, as will trying to move folders containing unowned files.
To see which files in a folder are owned by other users follow the steps below.
- Navigate to the folder you want to move. You will be able to see the owner of the files in the folder.

- Click on the folder settings drop-down, click Organize, then click Move.
- Select a shared drive and then click Move.
- Drive will review all the items in the folder to determine if you have sufficient permissions to move each item.

- Moving the entire folder will fail if any of the files are not owned by you or if you do not have permission to move those files. Click on the link to Download item list (CSV) to get a list of the files in the folder that cannot be moved.
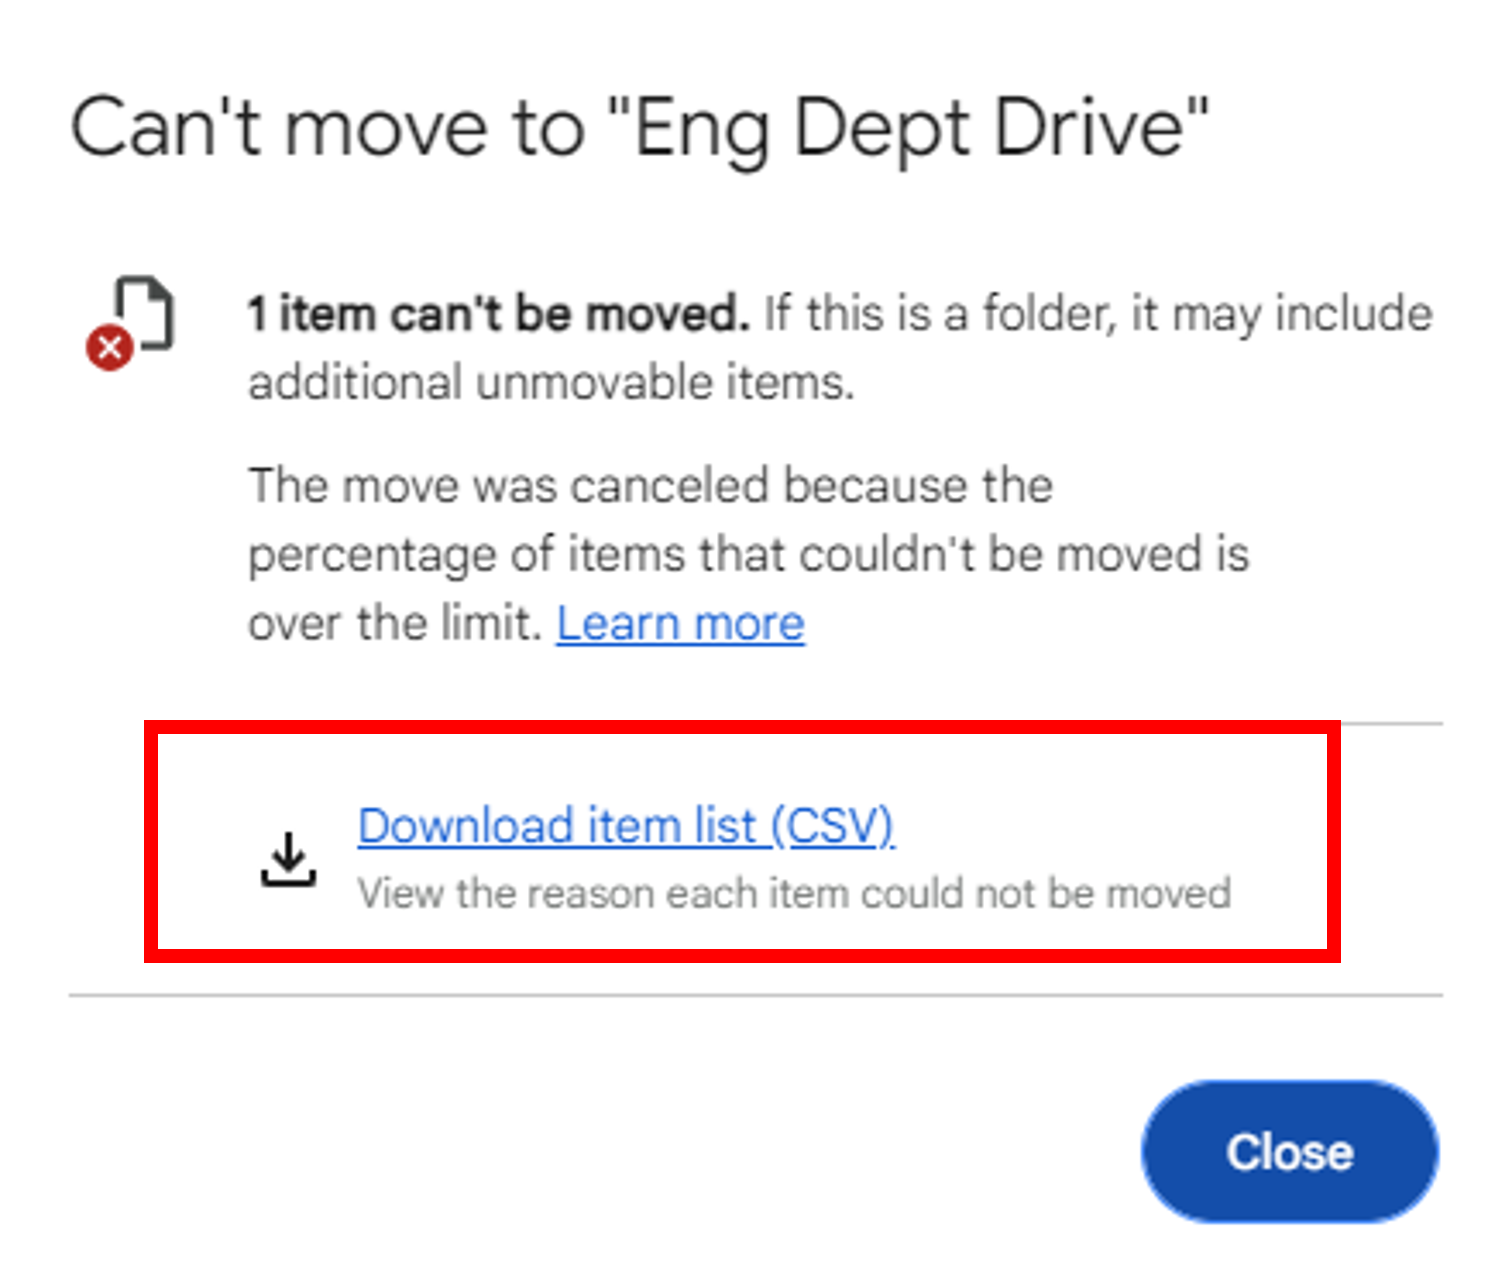
- Open the Excel file to view the name of the files that can't be moved, a direct URL to the file in Drive, the reason the file can't be moved, (owned by another user, moving files blocked by the organization, files are already in the destination drive, etc.), and the username of the owner of the file.

You can ask the owner if they can move the file to the shared drive or update permissions so that you can move the file to the shared folder.If you need further assistance submit a support ticket by entering a Google Assistance Request through the Appalachian Technology Service Desk.
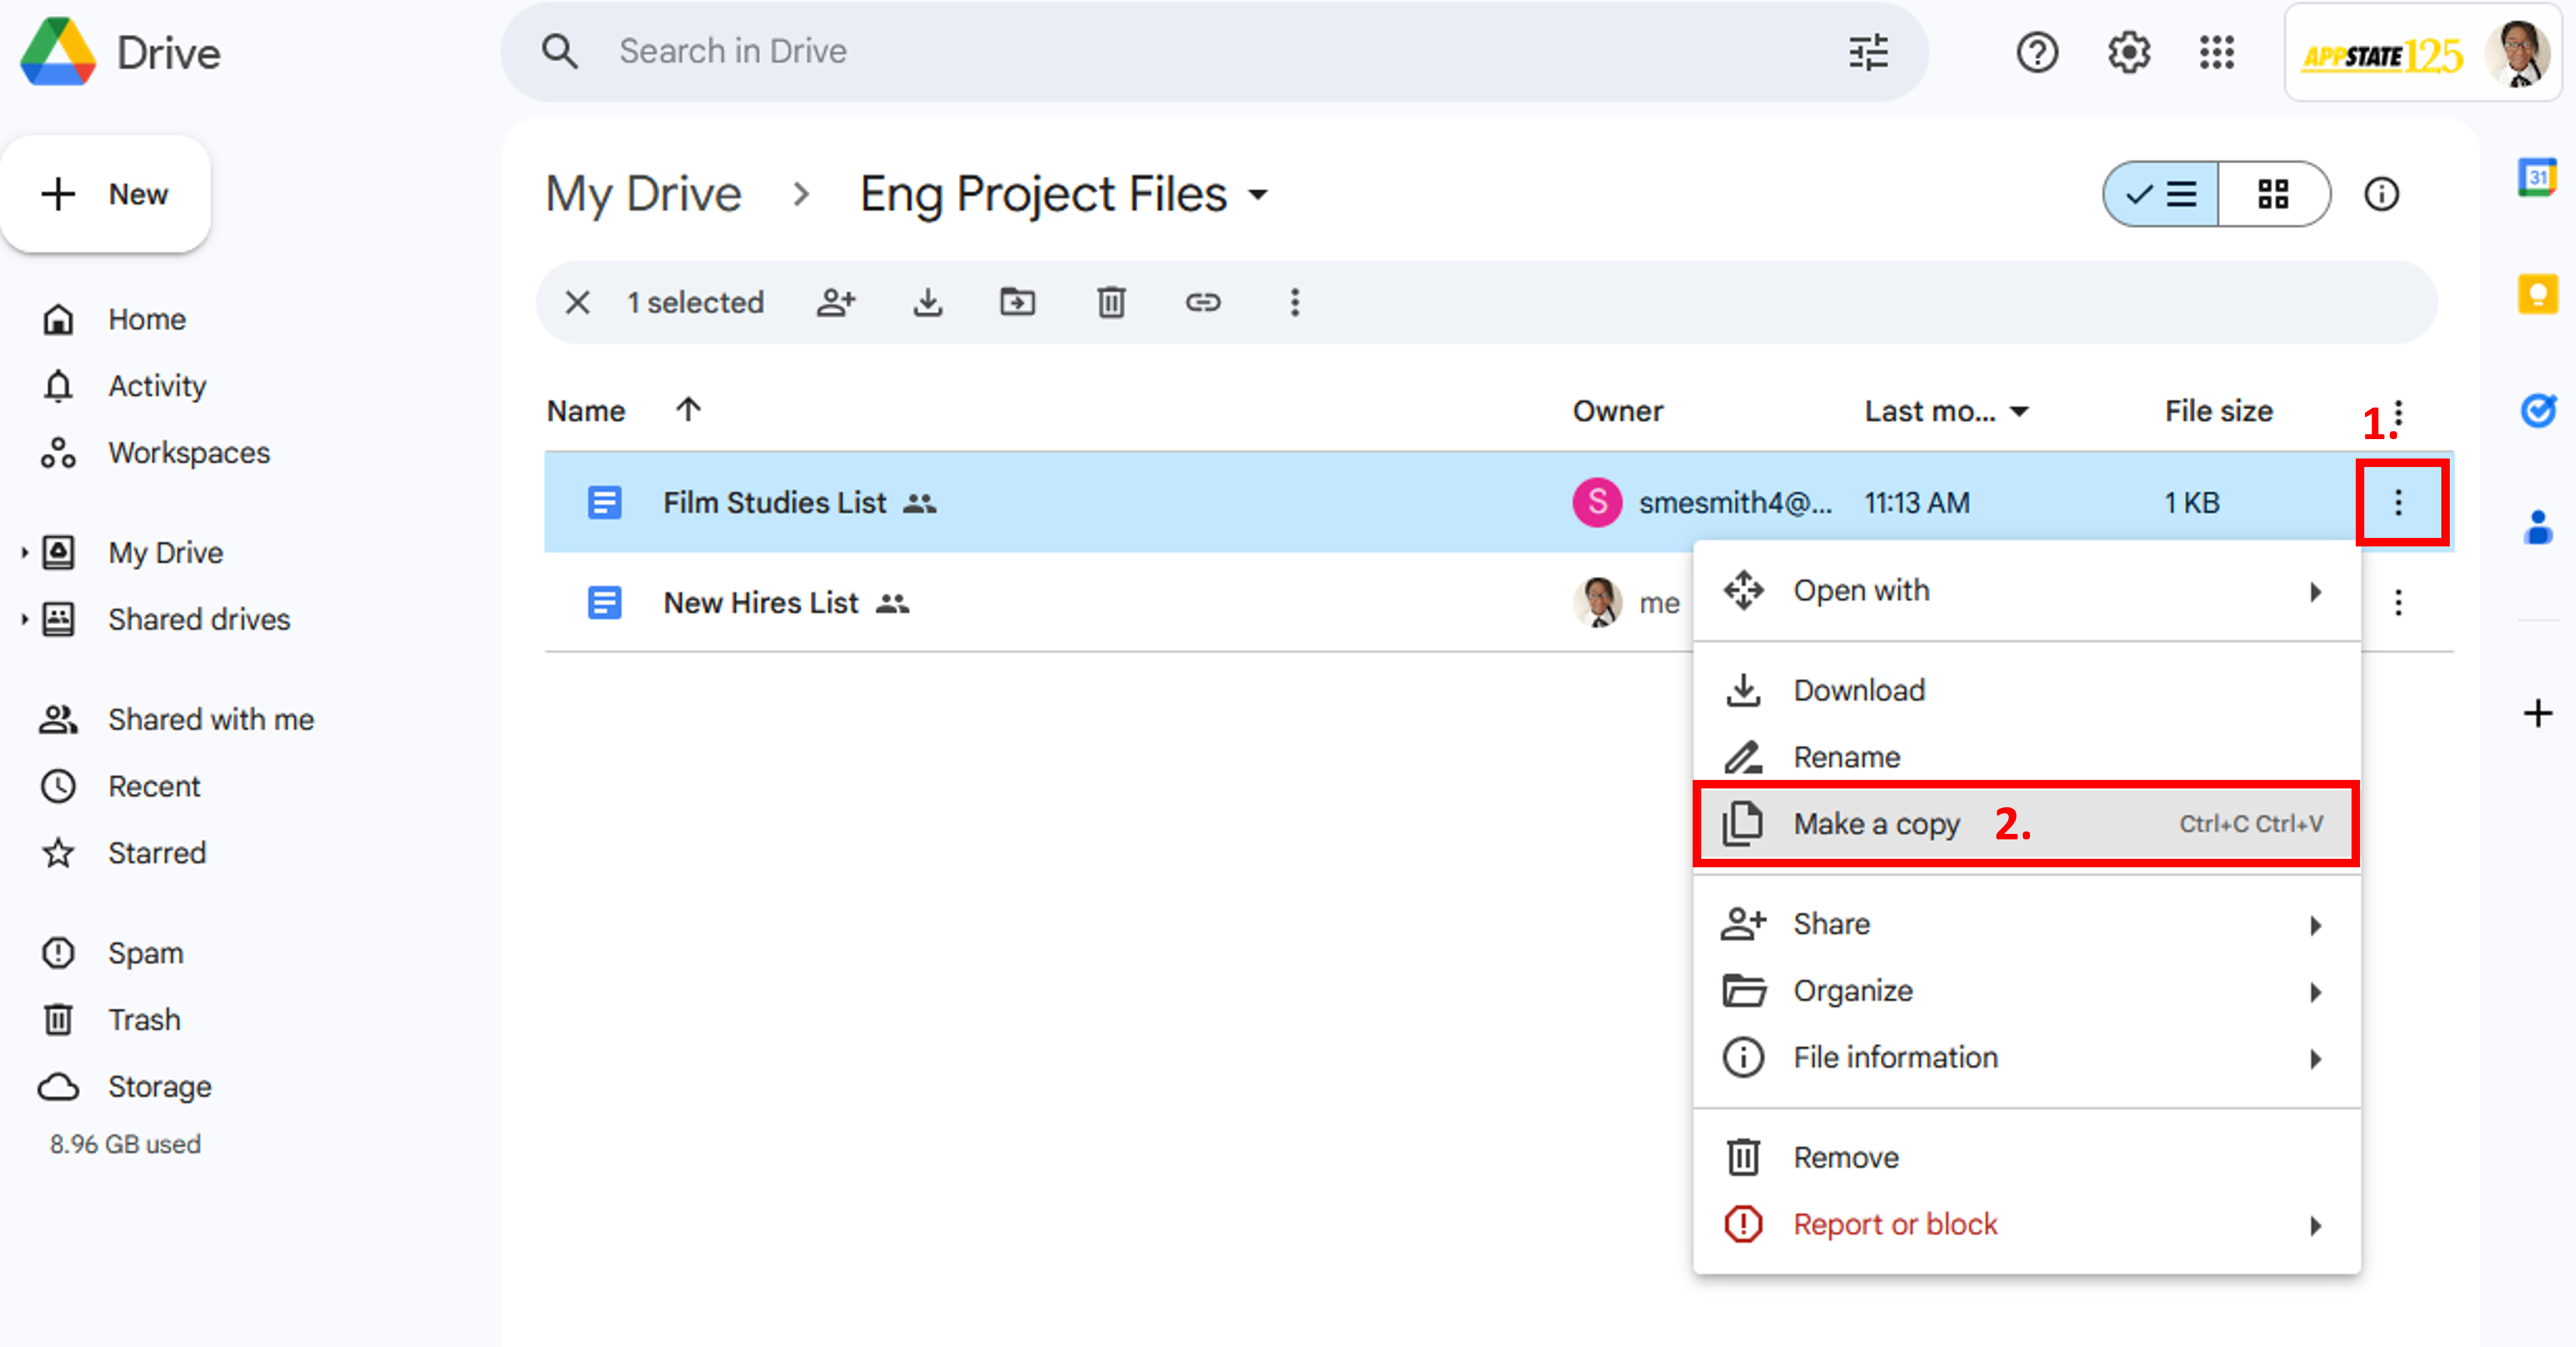
If you cannot move the file but you do have copy permissions you can make copies of the unowned files, delete the originals, and then move the folder to a shared drive.
- Make a copy of the file that is owned by another user by clicking on the three-dot icon to the right of the file’s name, and then clicking Make a copy.
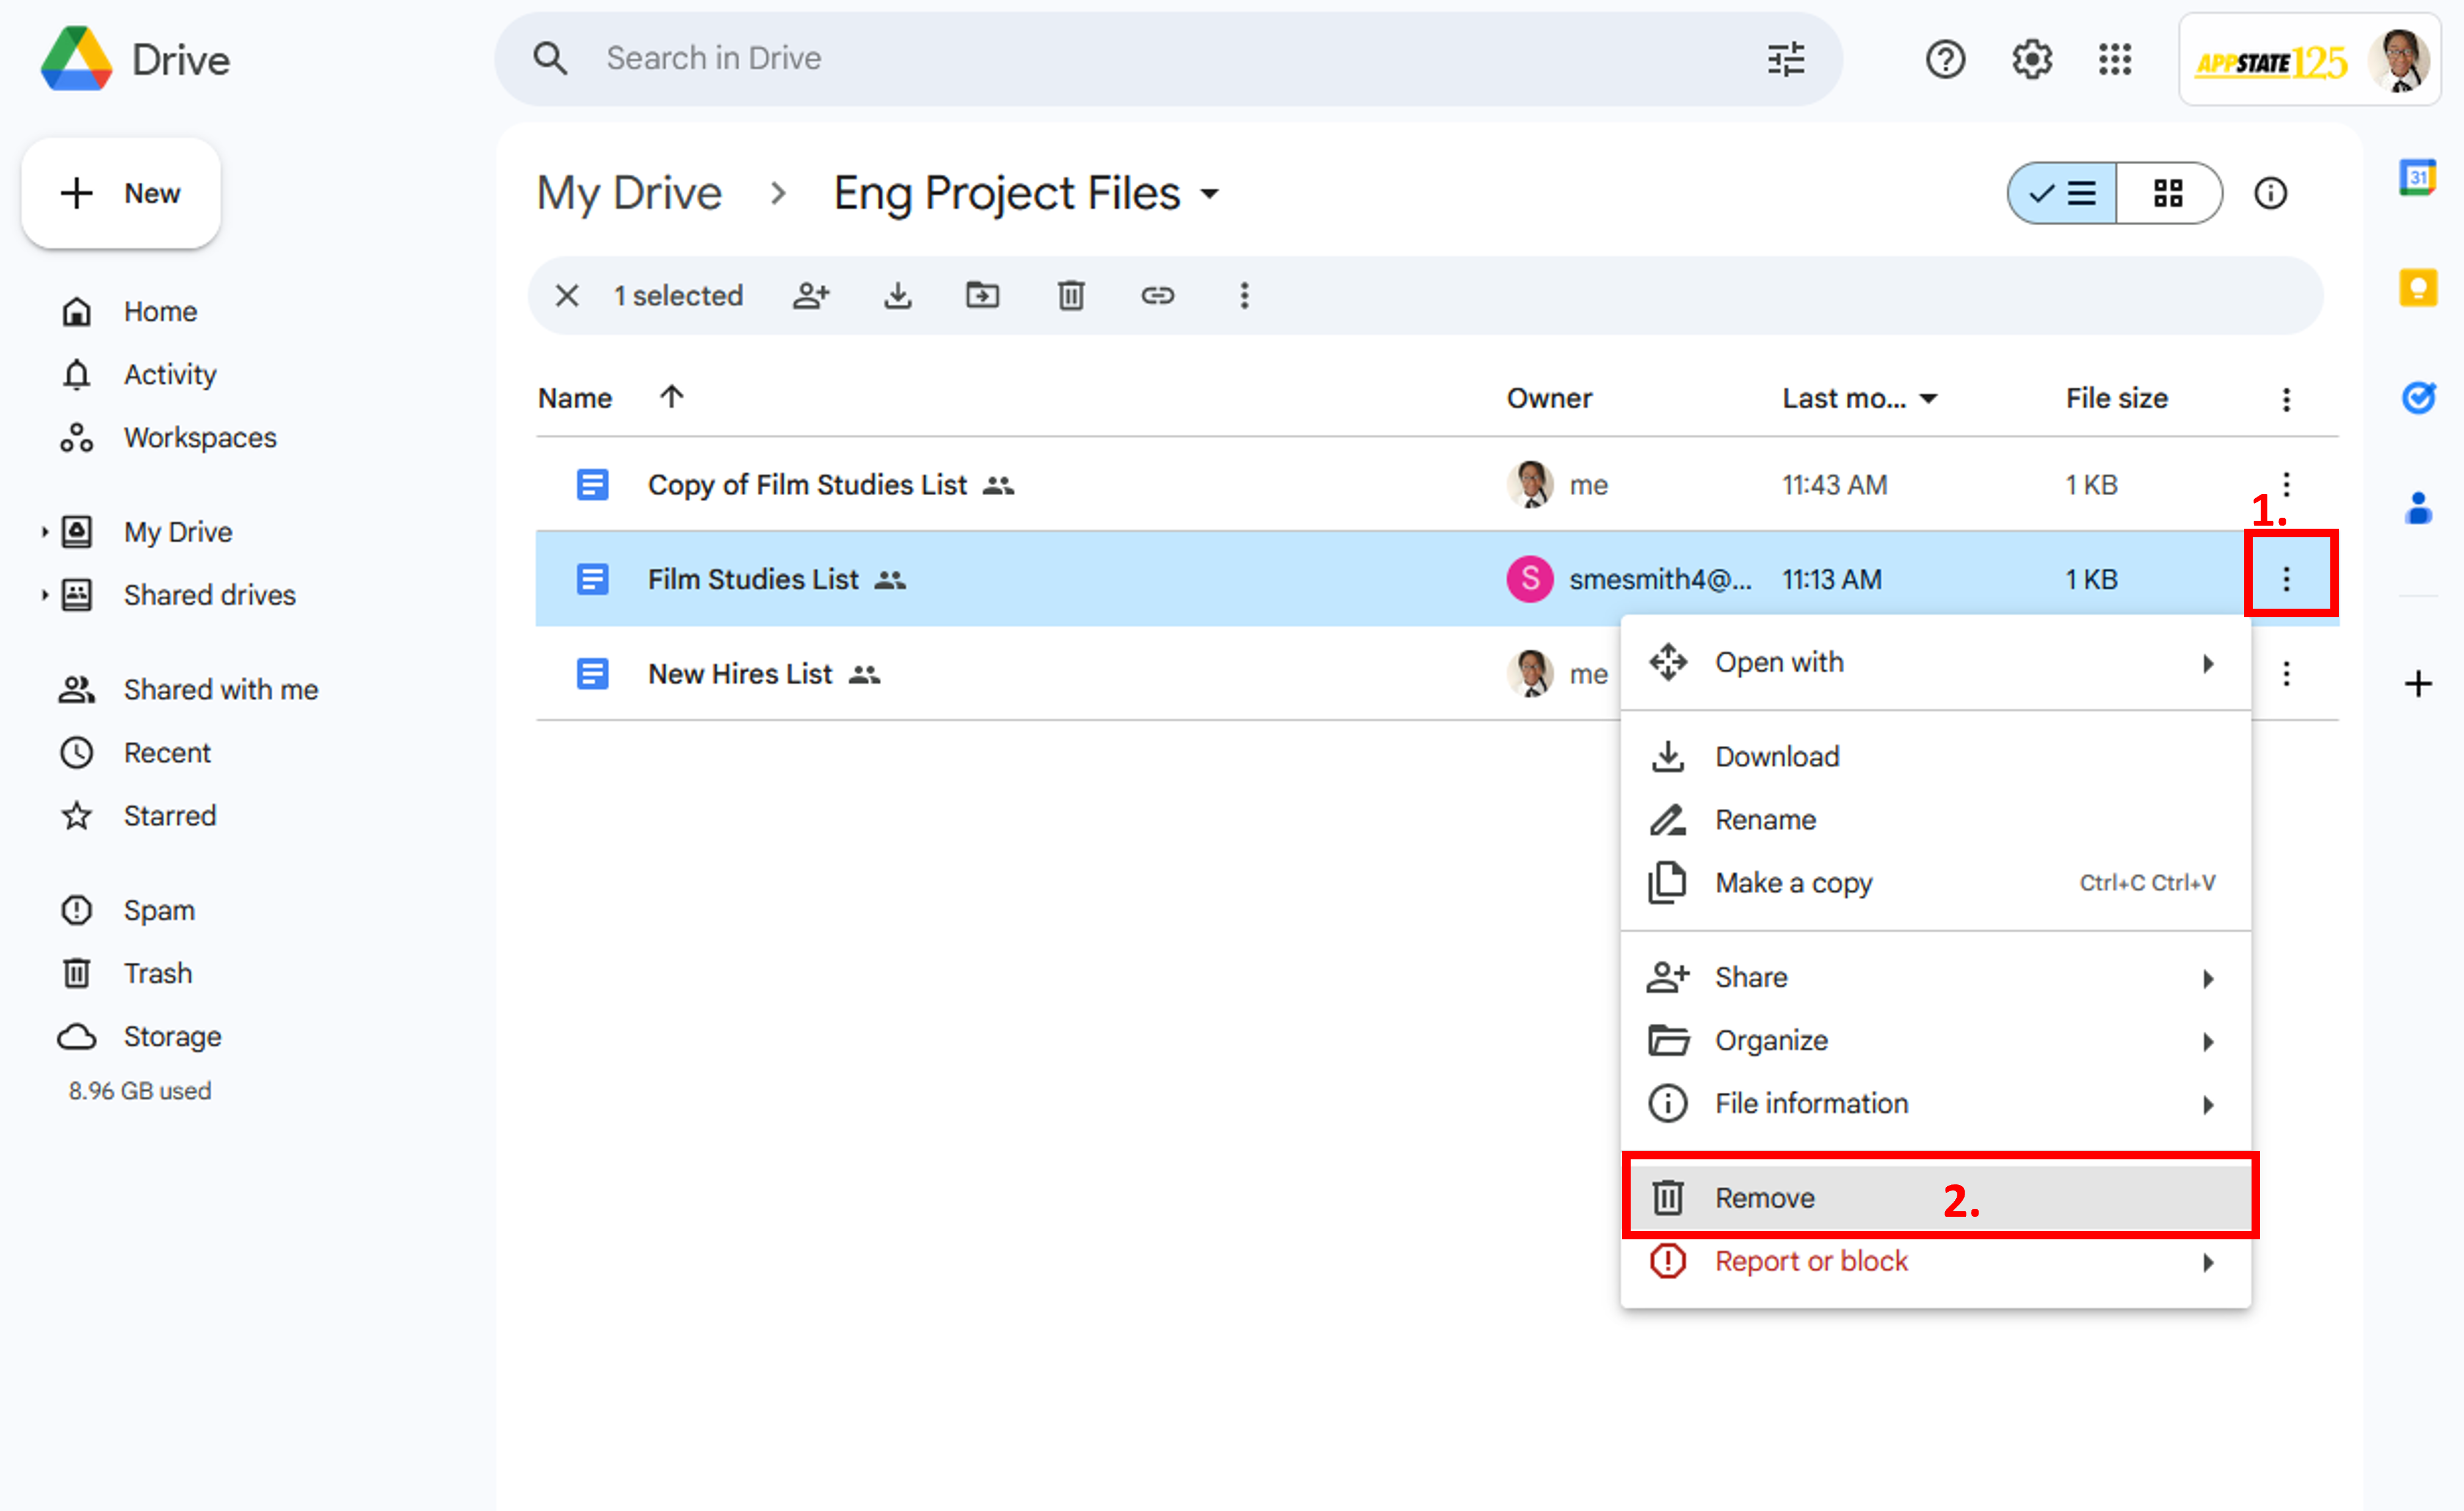
- Remove the original file by clicking the three-dot icon to the right of the file’s name, and then clicking Remove.
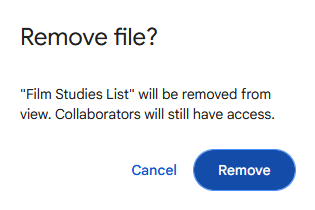
- Confirm file removal by clicking Remove.
- You can now move the entire folder to the Shared Drive by clicking on the folder settings drop-down, clicking Organize, then clicking Move, and selecting a shared drive to move the folder to.
- You will now be able to move the entire folder including the copy of the unowned file. Click Move to confirm.
The pre-move dialog items count will be different than the number of items you see in the folder. The deleted item still exists but is hidden from your view and will now not affect the move.
See the Google Help Center Move Files & Folders into Shared Drives Article for more information about how file access changes when content is moved and for a complete list of error codes that may be received when trying to move files.
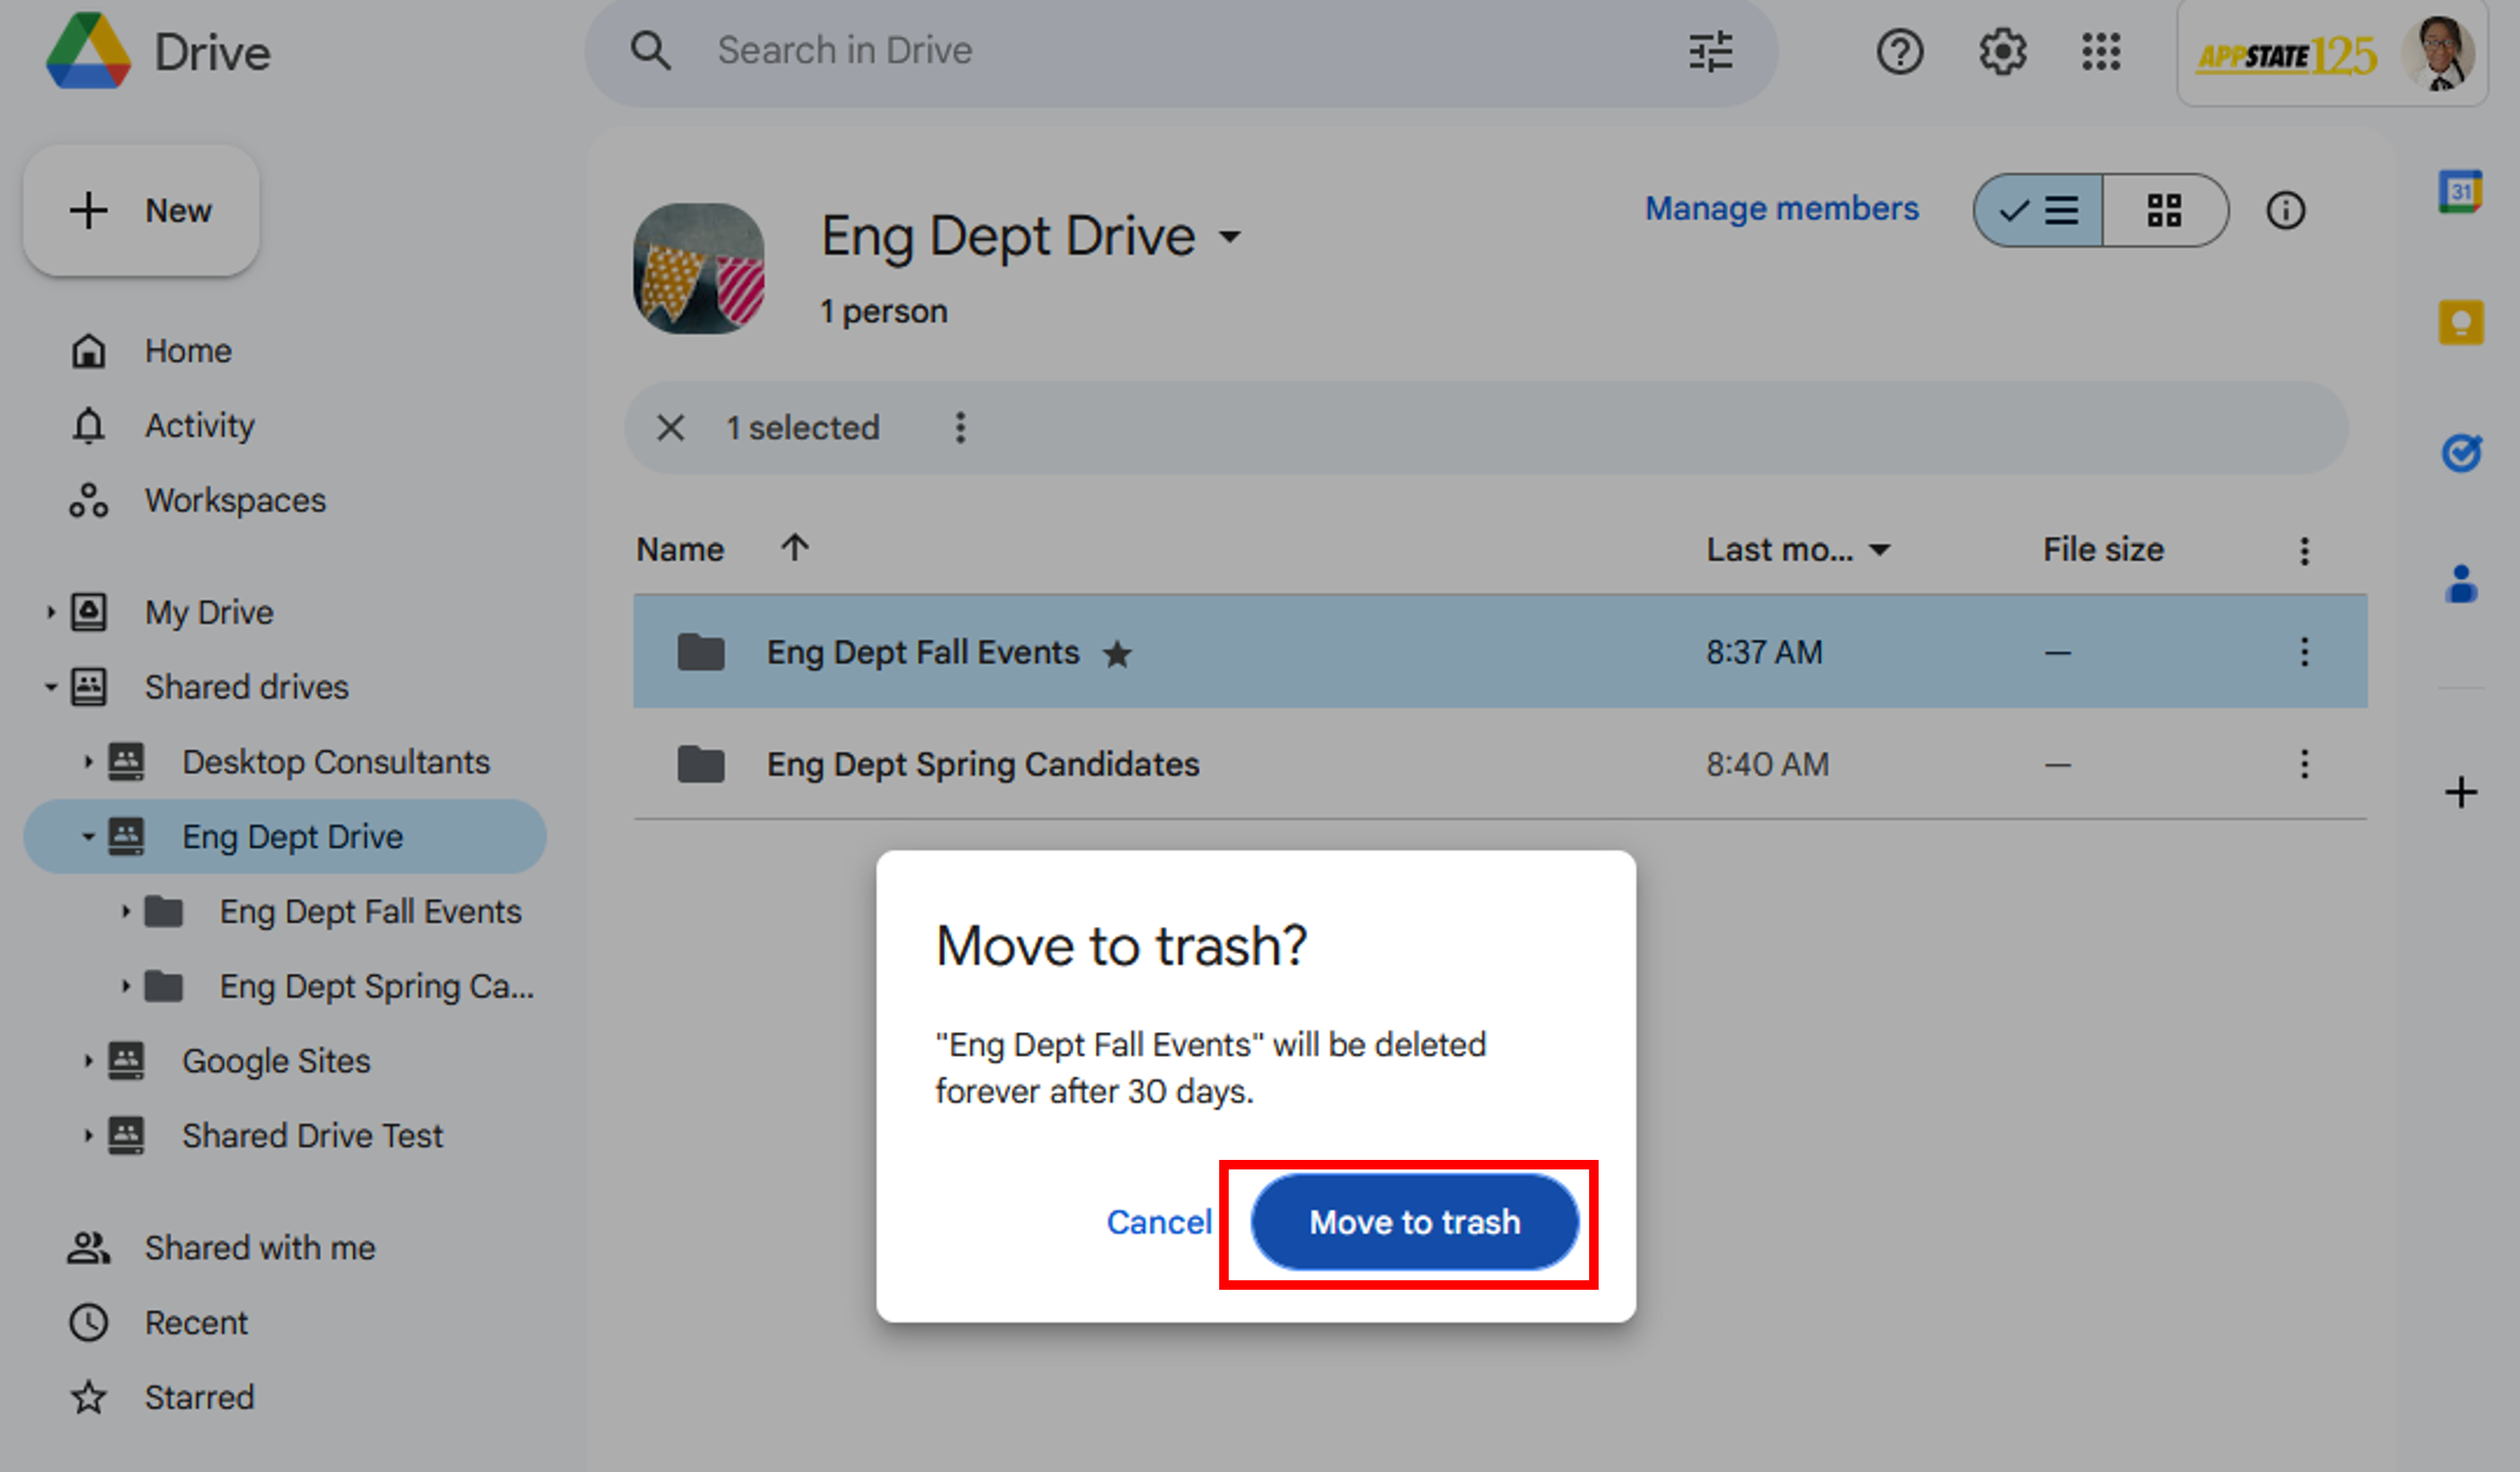
Moving a file to trash requires at least Content manager access.
- Right-click the file you want to delete, then (2) click Move to Trash.

- You will be prompted to confirm deletion. Confirm by clicking Move to Trash.
Auto Delete
Files in a Shared Drive’s Trash folder are automatically deleted after 30 days.
You must have Manager access to permanently delete files and folders.
In the Trash folder, right-click the file you want to delete and (2) select Delete forever.
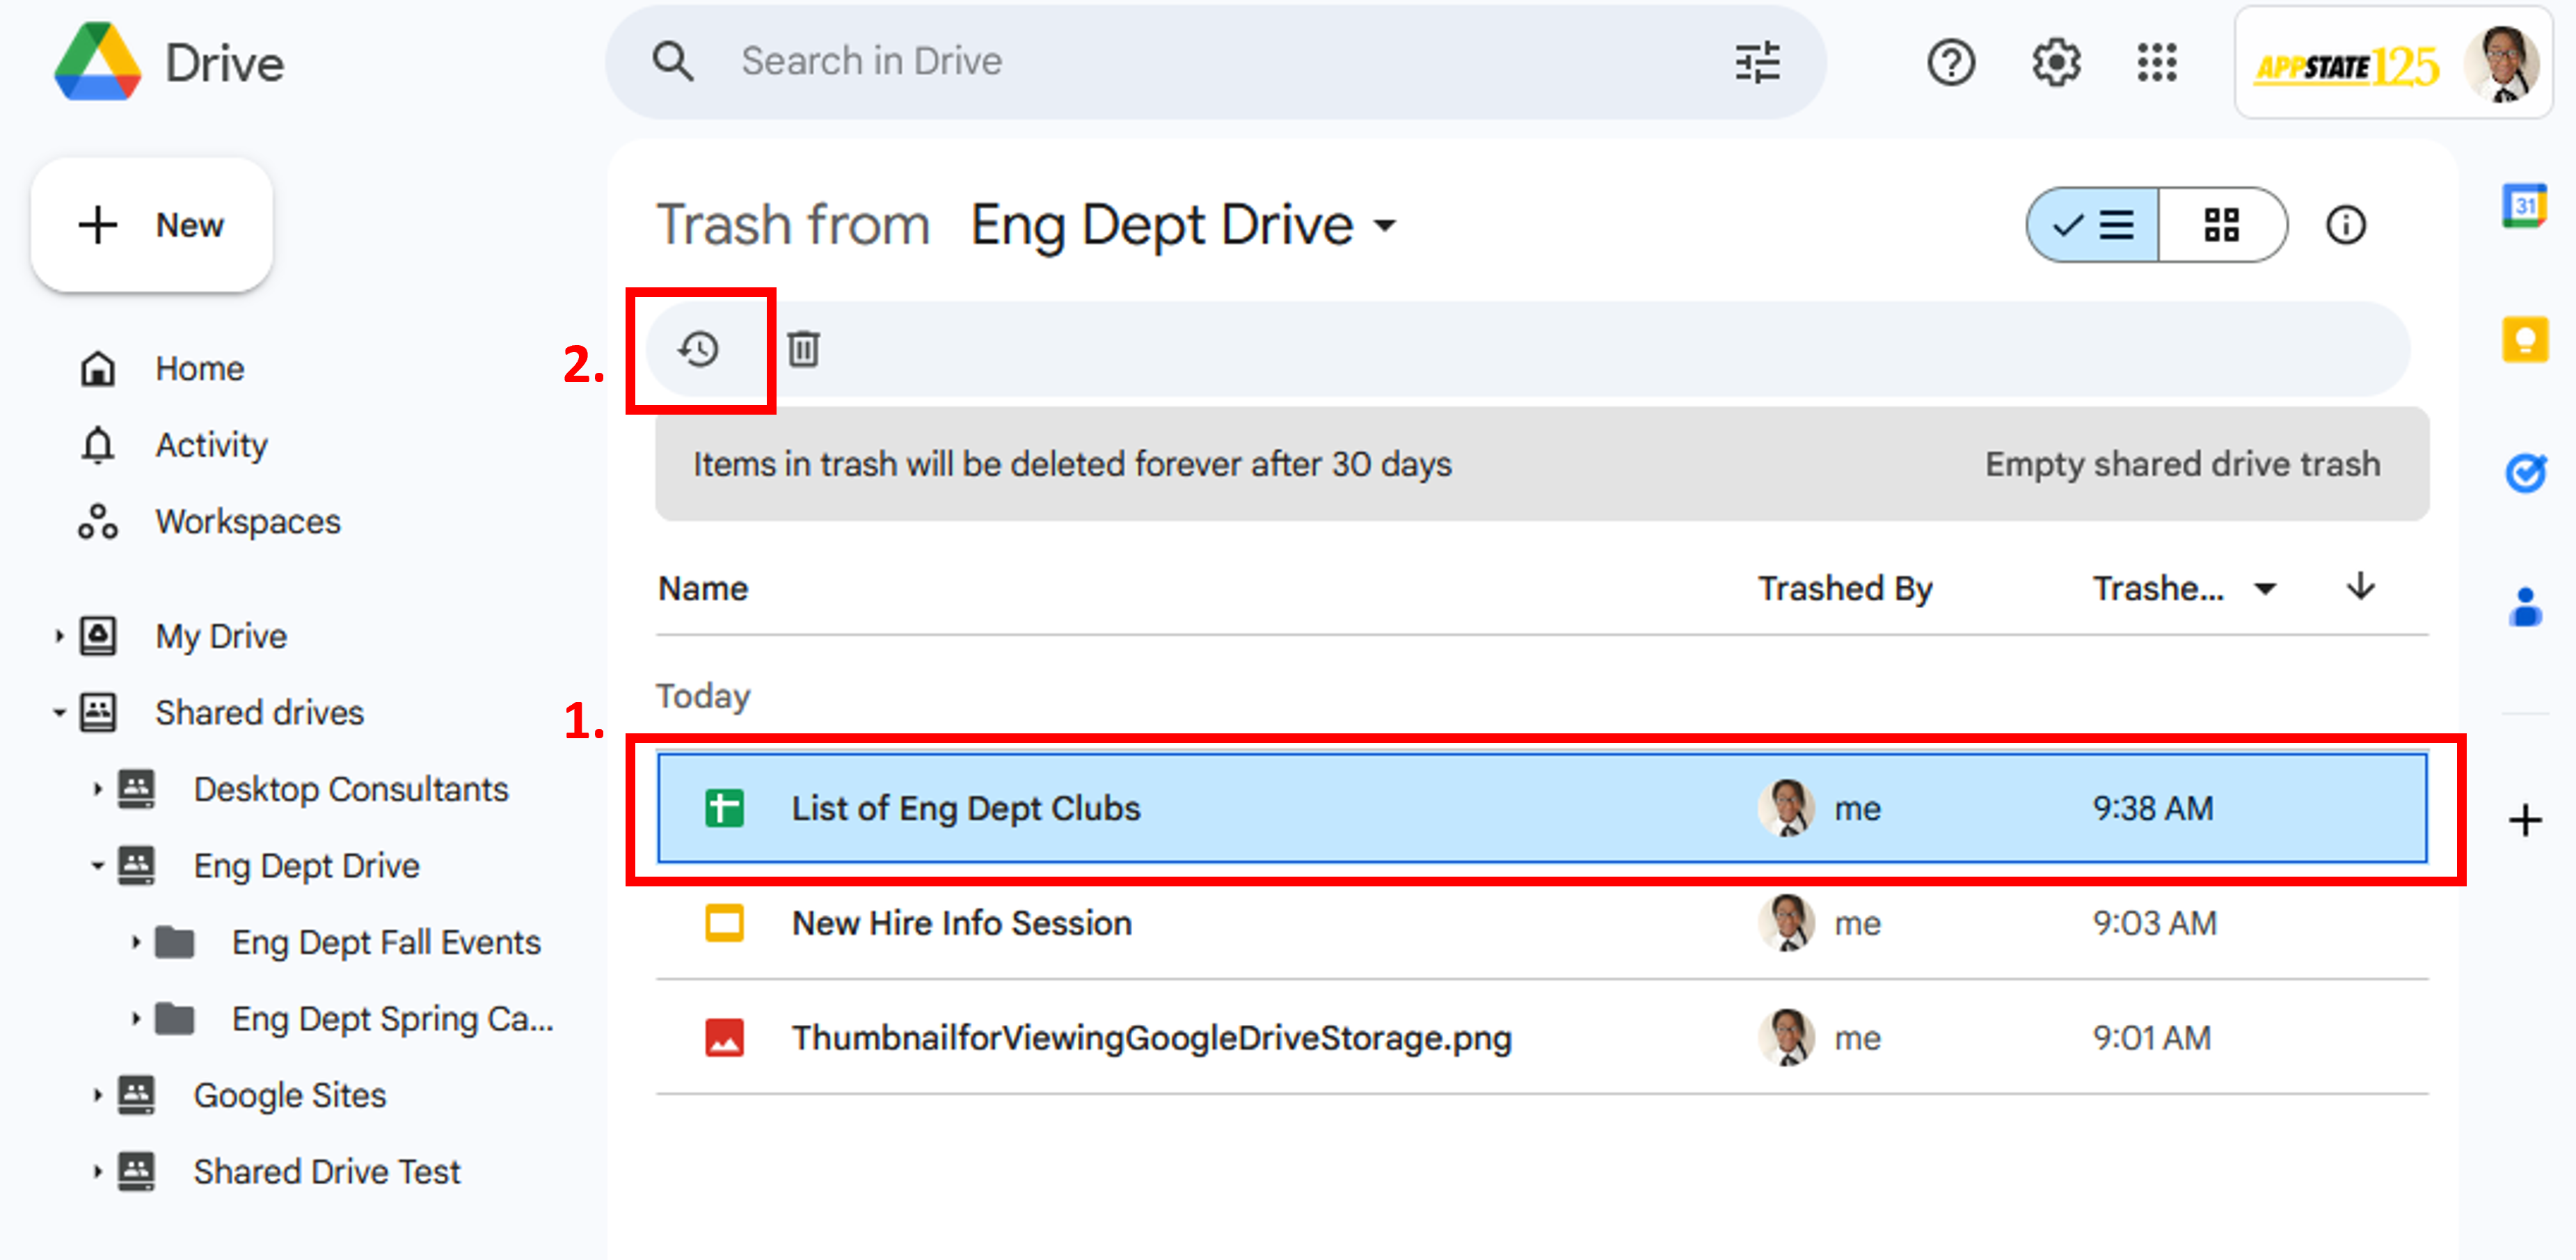
You must have at least Contributor access to restore files that have been moved to the trash.
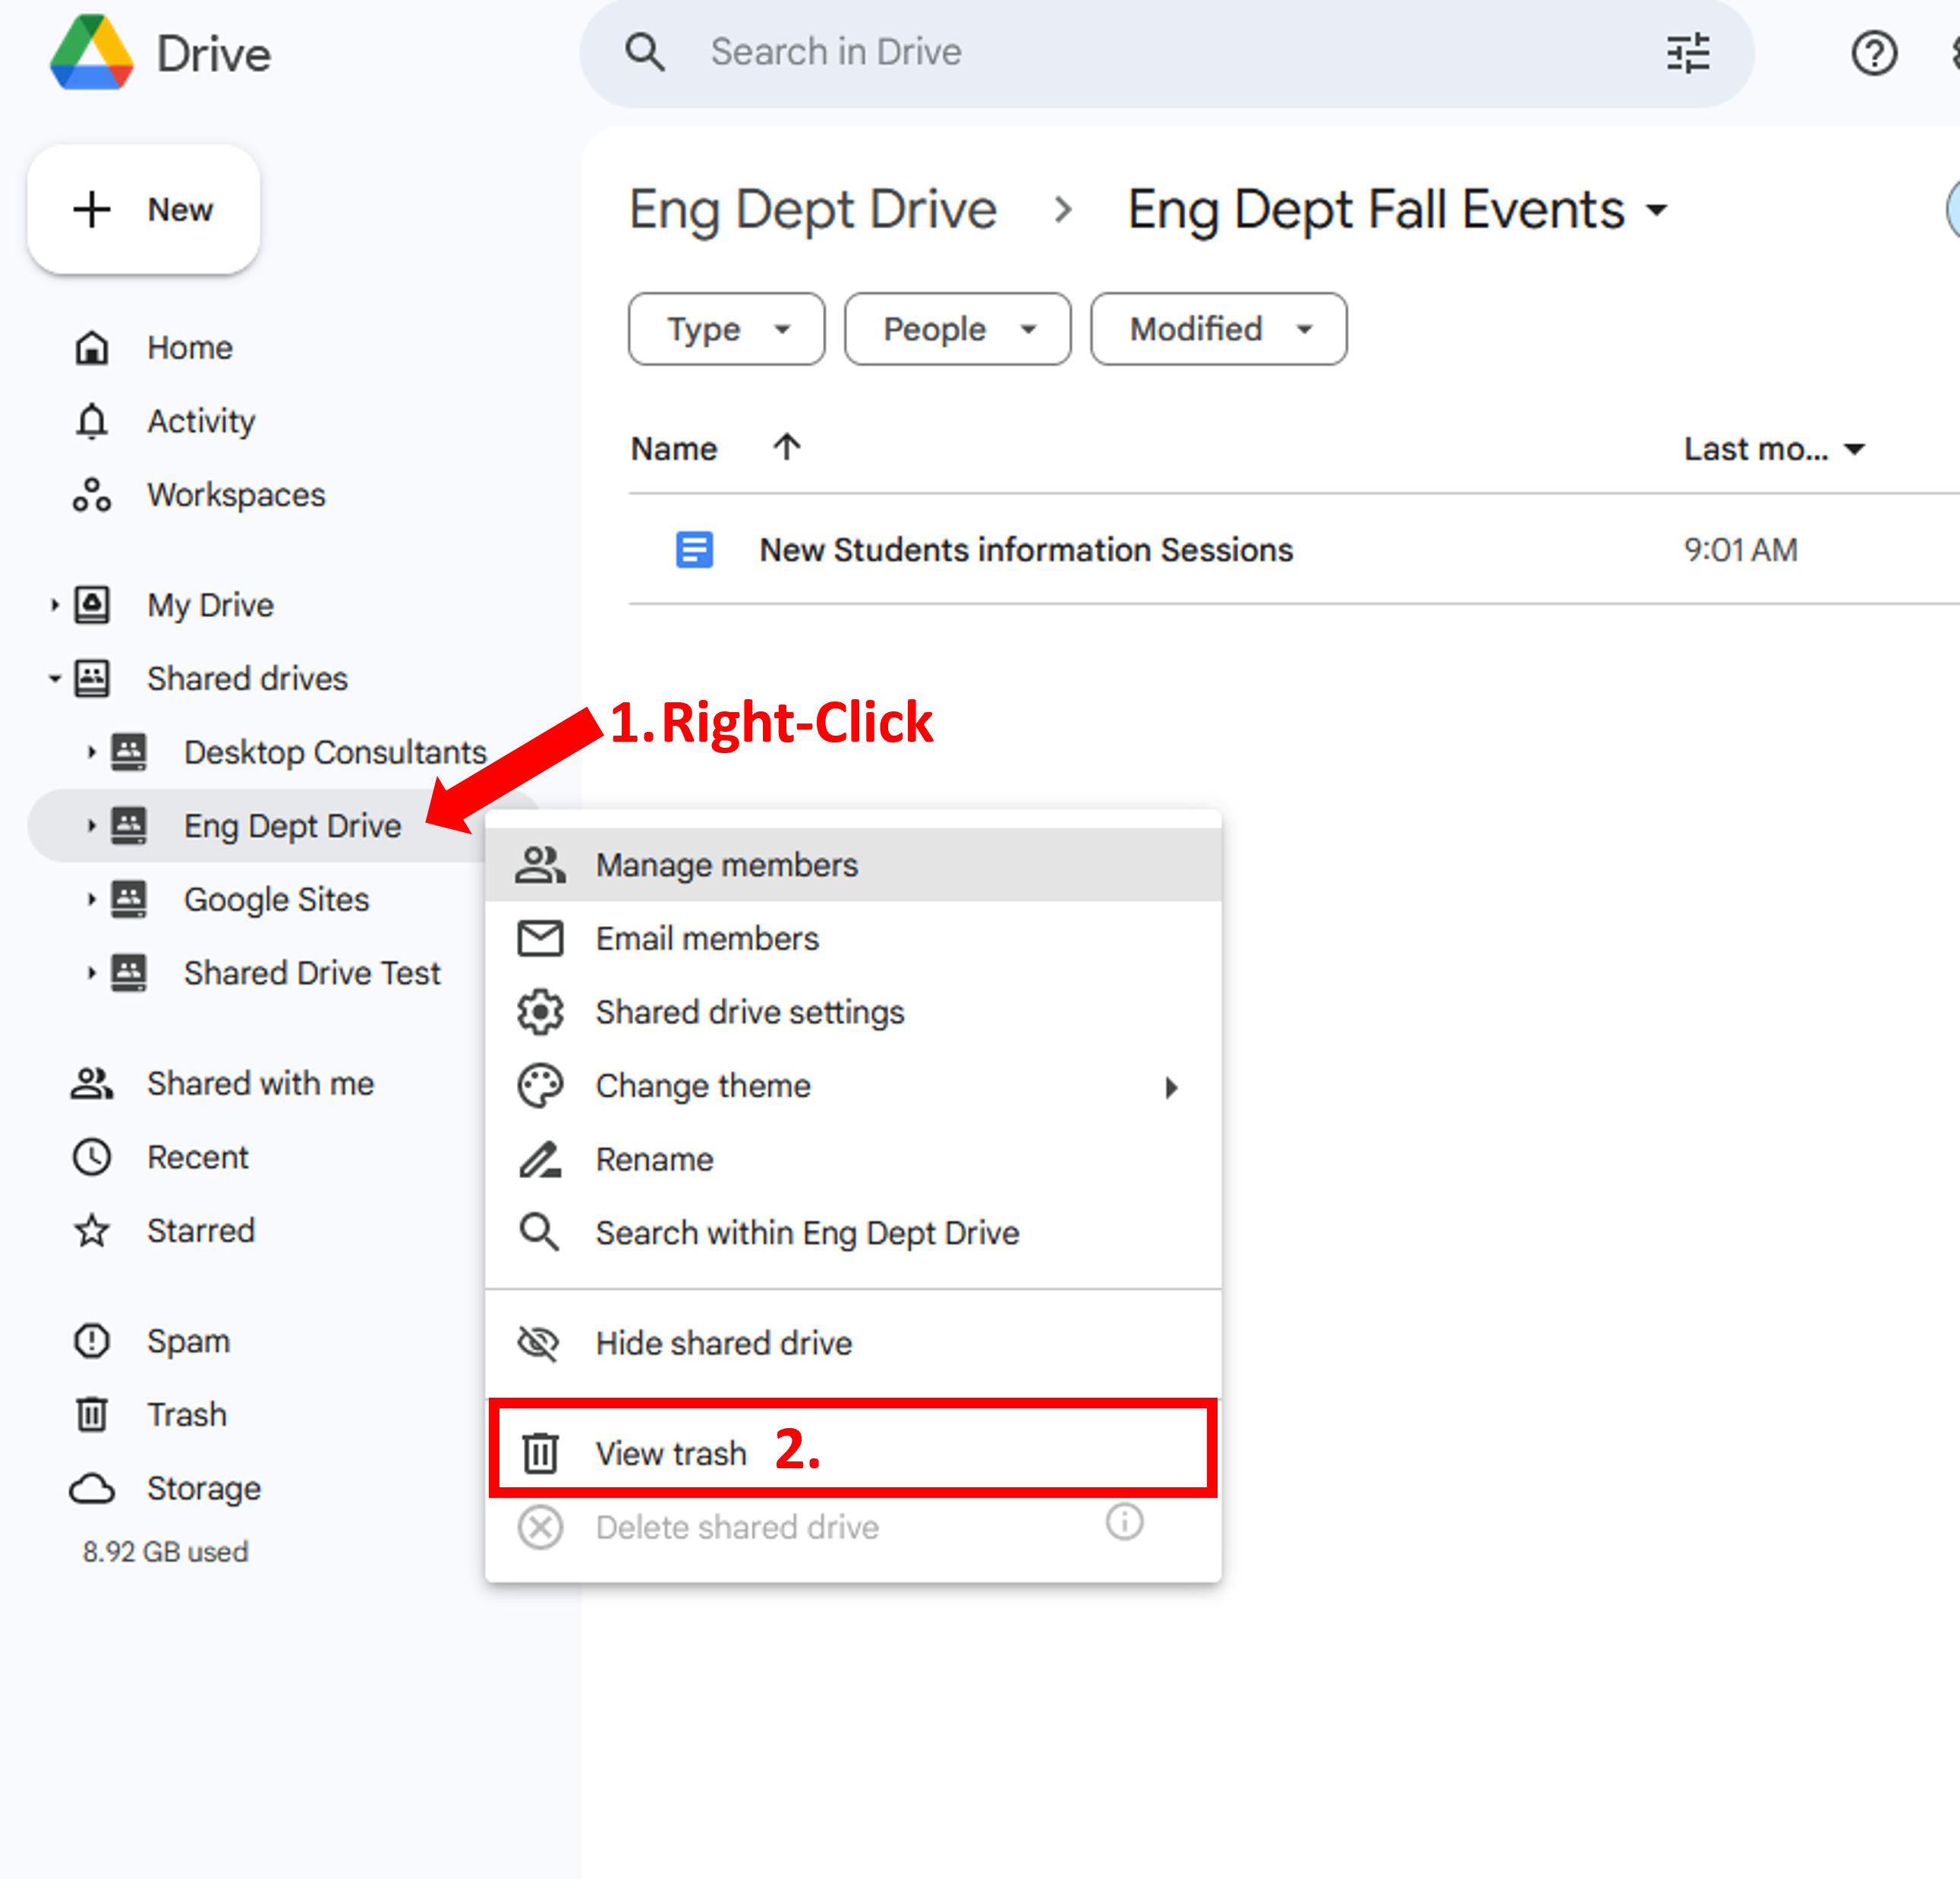
- In the left sidebar menu, right-click on a Shared drives name, then click View trash (or just navigate directly to the Trash tab).
- Right-click the file, then click the Restore icon.
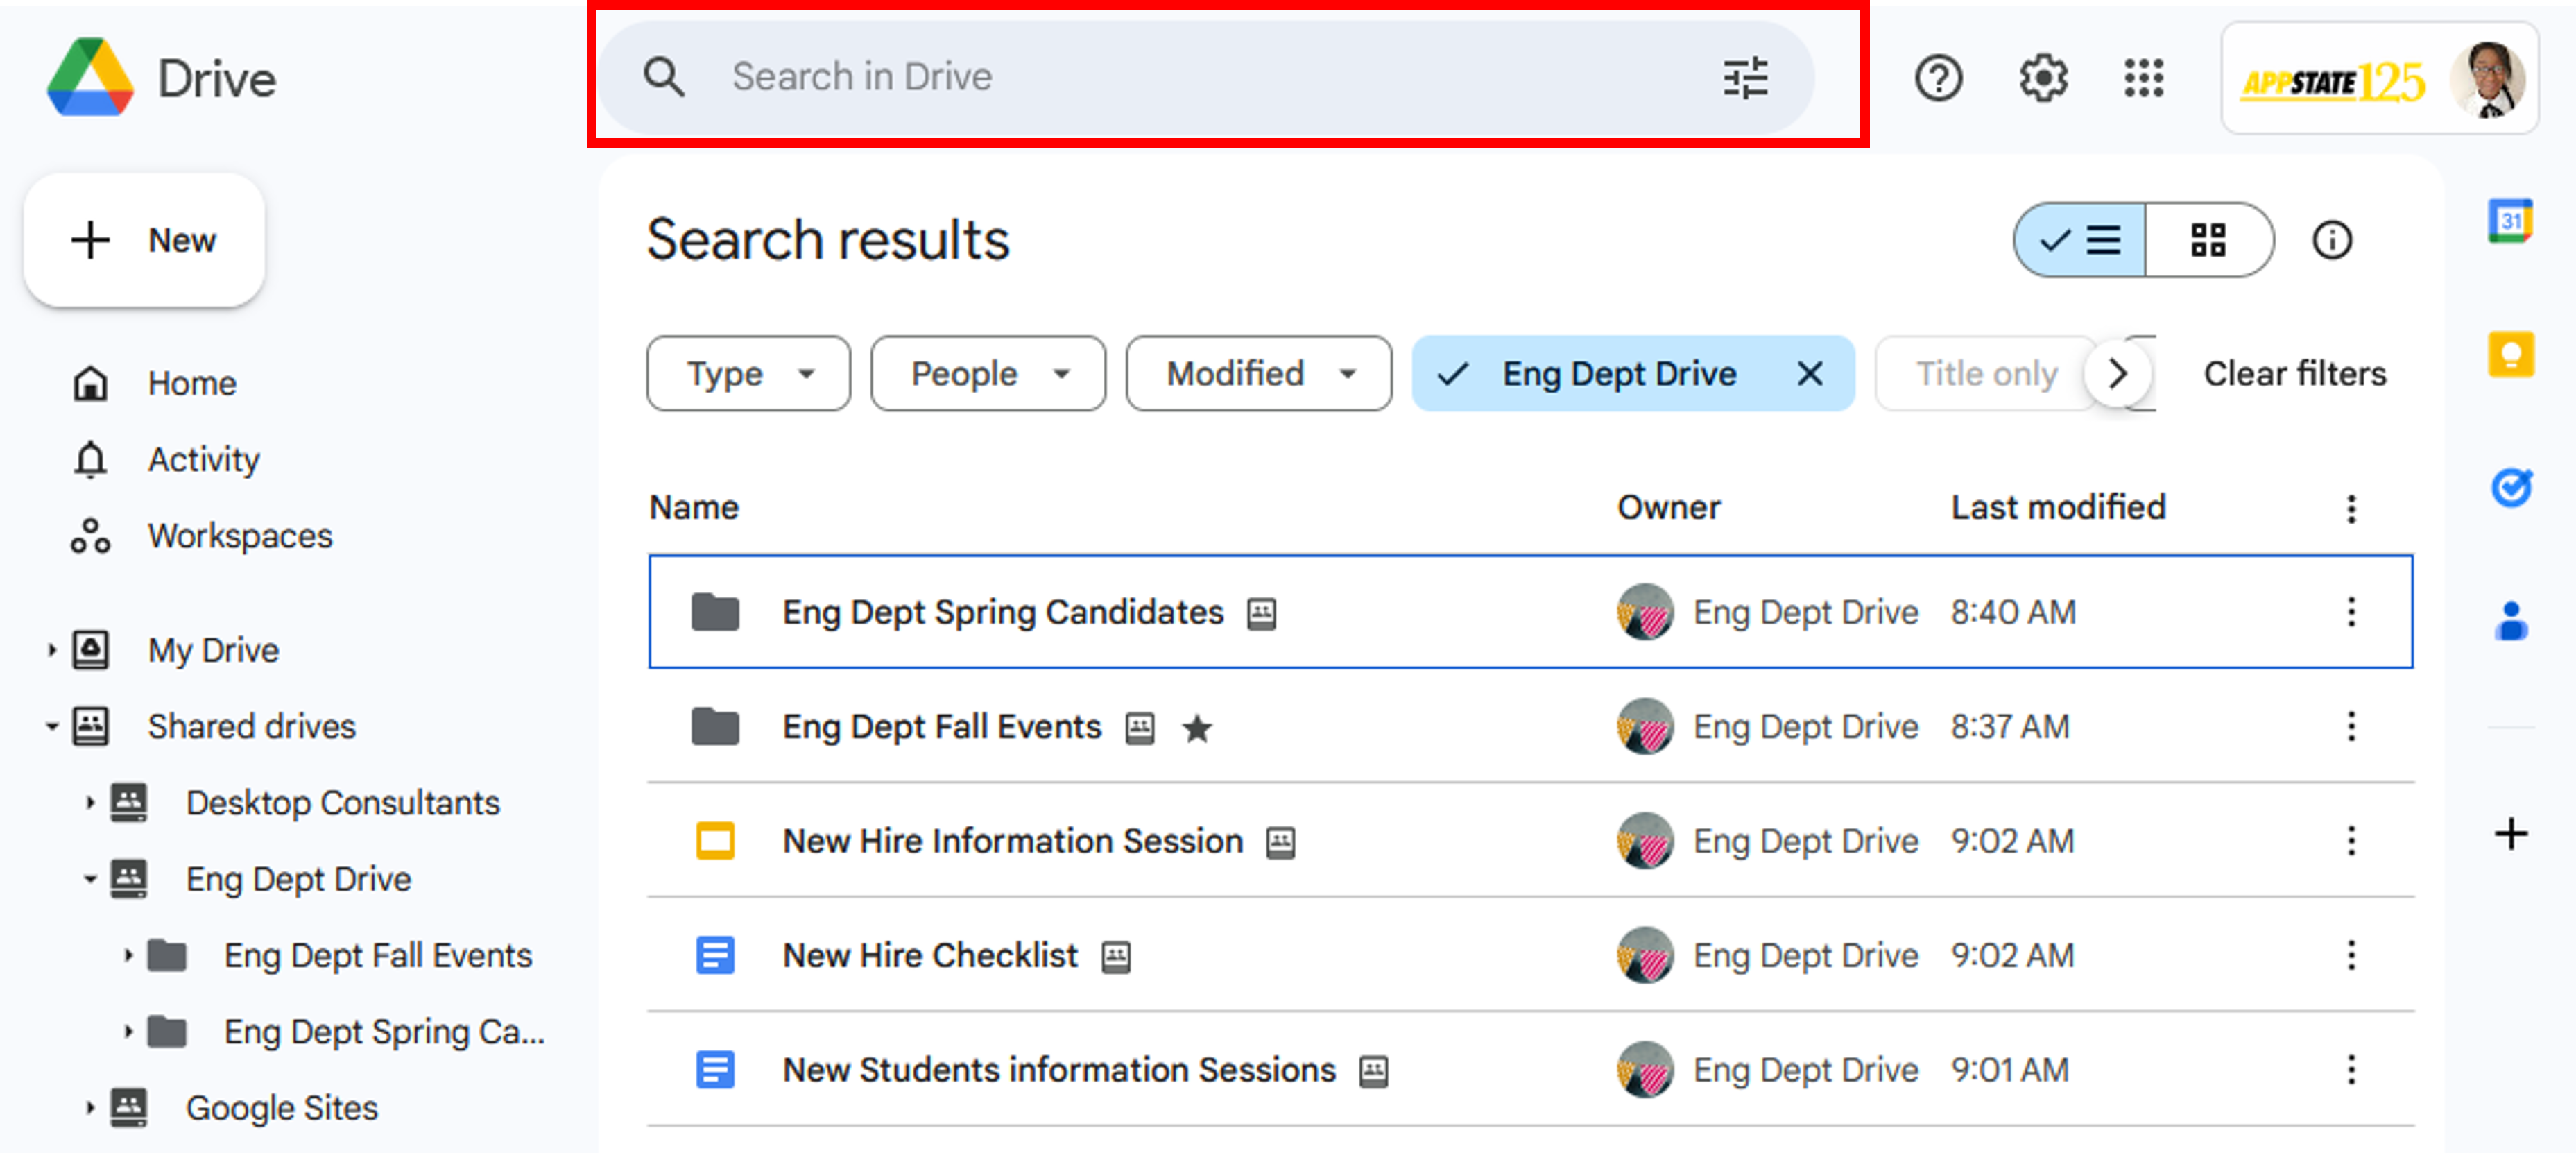
Search for items that are only in a Shared drive.
- Right-click a Shared Drive and click Search within Shared Drive name.

- In the Search box, enter your search term and press Enter.
Share and Collaborate
You must have at least Contributor access to share files.
Just like in Drive, there are different ways to share files in Shared Drives with people who aren't members of the Shared Drive.
Your ability to share files might be limited by permissions set by the owner of the Shared Drive.
To share files with individuals are groups who are not a member of the Shared Drive
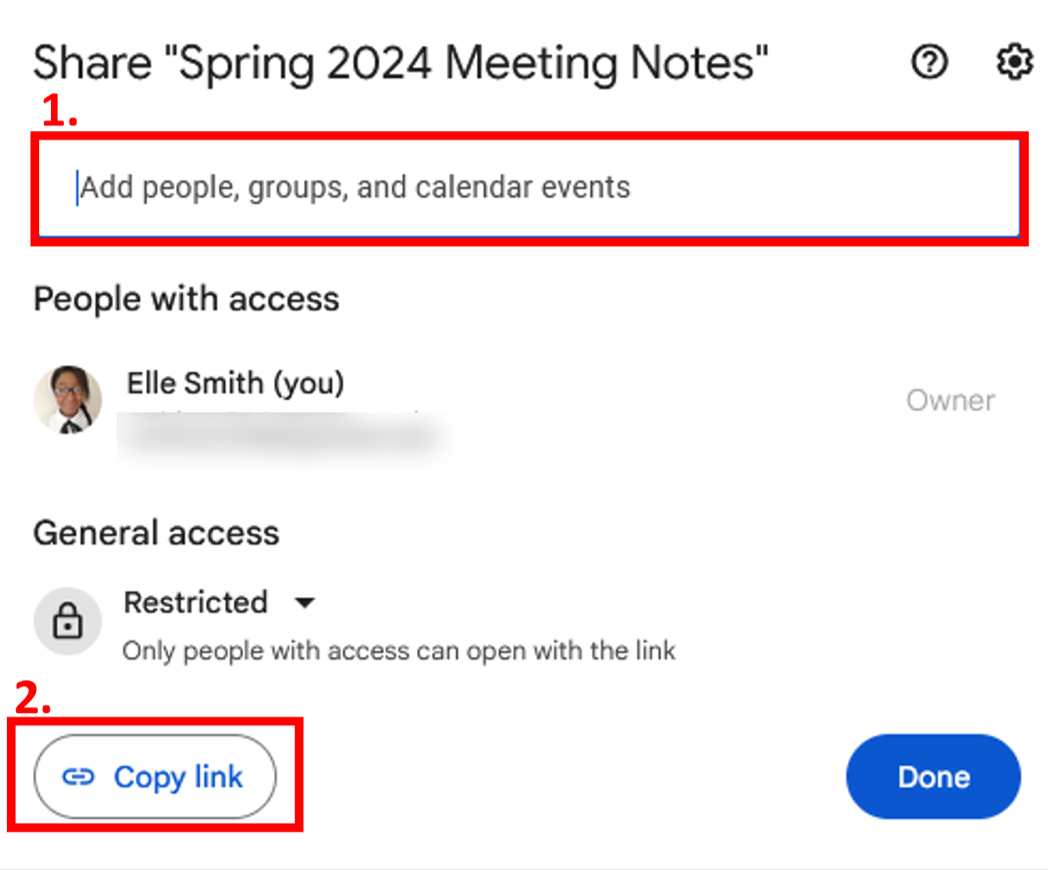
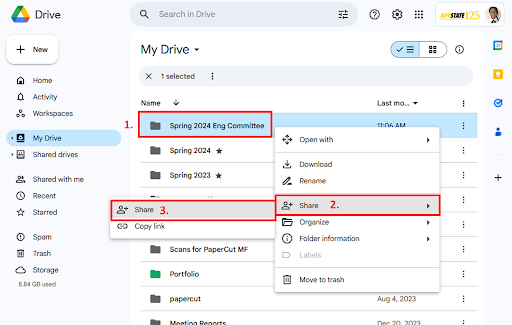
- In a Shared Drive, click the file or folder you want to share, then (2) click the Share icon.
- Add names, email addresses, or groups from Google Groups to the search bar.
Copy Link Option
To make a file widely accessible and avoid managing access in your organization, you can share the file with a link. Anyone in your organization who gets the link can access the file. Optionally, you can let other users share the link with people who are not in your organization.
Click (2) Copy link to copy a link that can be pasted directly into an email or chat.
- After entering a name or email, you can add a message and/or change the permissions.
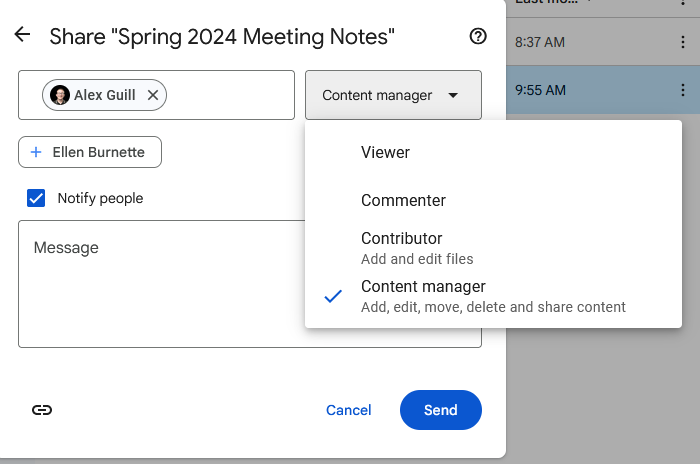
- If you don't want to send notifications, uncheck the Notify People box.
- Click Send.
Managers can opt to limit sharing options, see Restrict sharing options on sensitive Drive files.
- In a Shared Drive, right-click the file you want to unshare. (2) Click Share in the drop-drop menu, then (3) Click Share again.
- Click the permissions drop-down to the right of the user’s name, then click Remove access.

- Click OK to confirm.

4. Click Save.Group settings can override individual settings. So, if you try to unshare a file with a person who belongs to an organization or group with access to the file, this person can still access the file.
You must have Manager access to alter the following settings.
To protect all files in a shared drive
- In the left sidebar menu, click the Shared Drive that contains the files you want to protect.
- At the top of the Shared Drive, next to the Shared Drive name, click the down arrow, then click on Shared Drive settings.
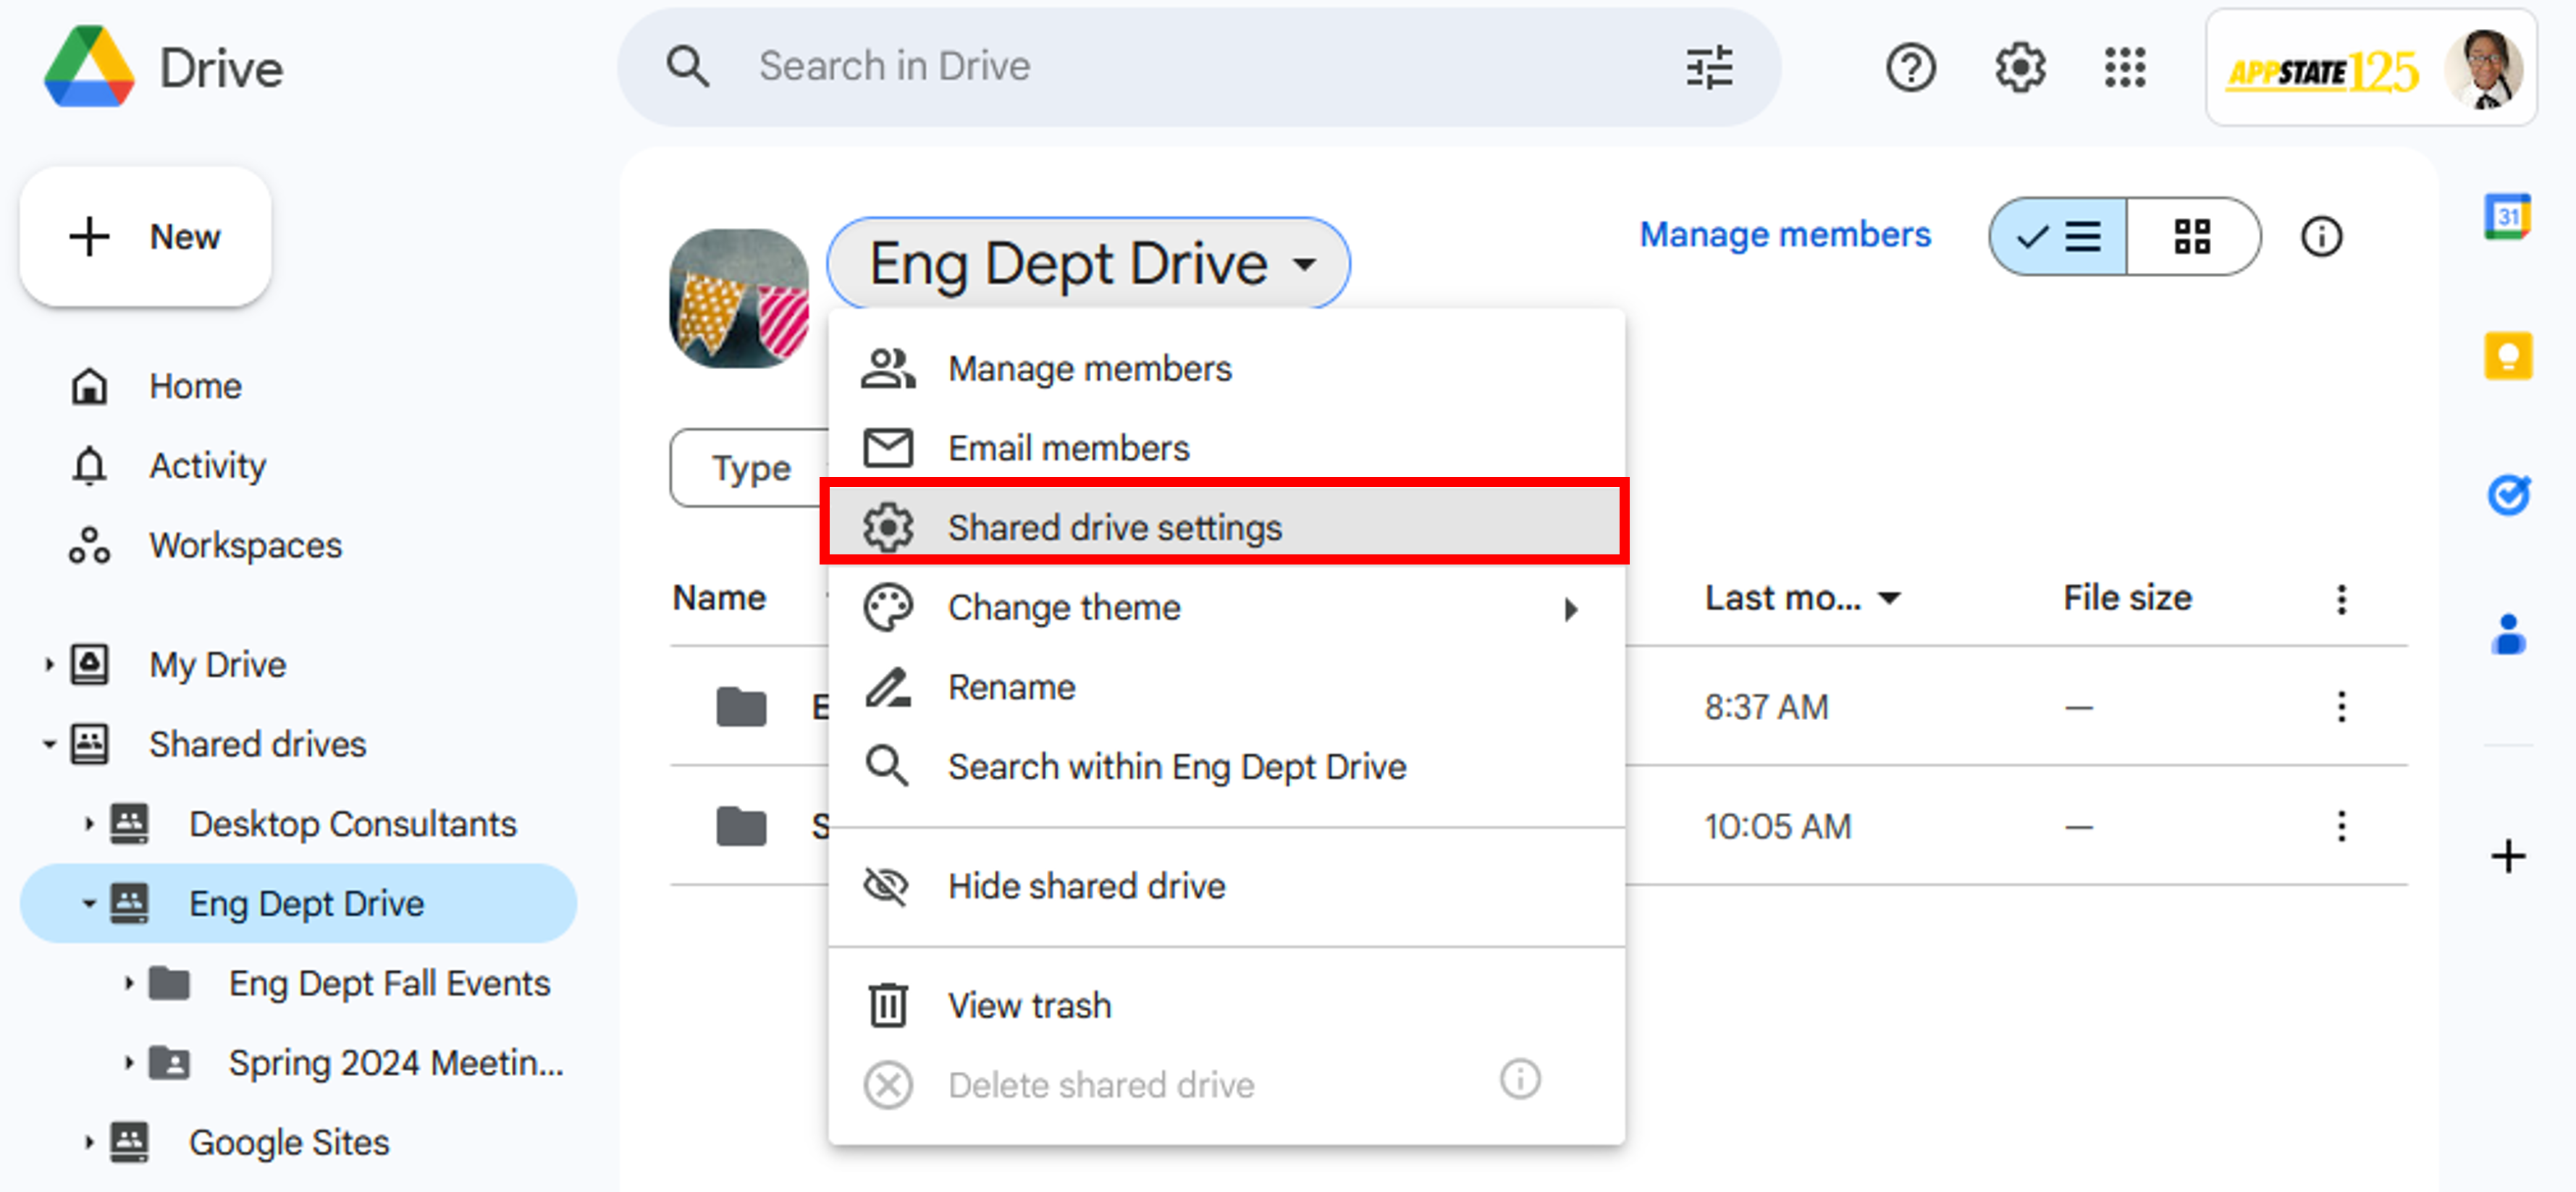
- Check or Uncheck to set any of these permissions:
- Allow people outside of App State to access files
- Allow people who aren’t members of the shared drive to access files
- Allow content managers to share folders
- Allow viewers and commenters to download, print, and copy files
4. After you make your selections, click Done.
- Open your Shared Drive.
- At the top, next to the Shared Drive name, click the Manage members button to see a list of members and their access levels.

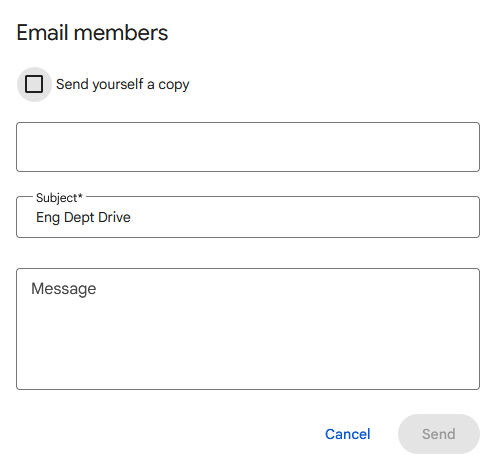
- Open your Shared Drive.
- At the top, next to the Shared Drive name, click the down arrow, then click Email members.
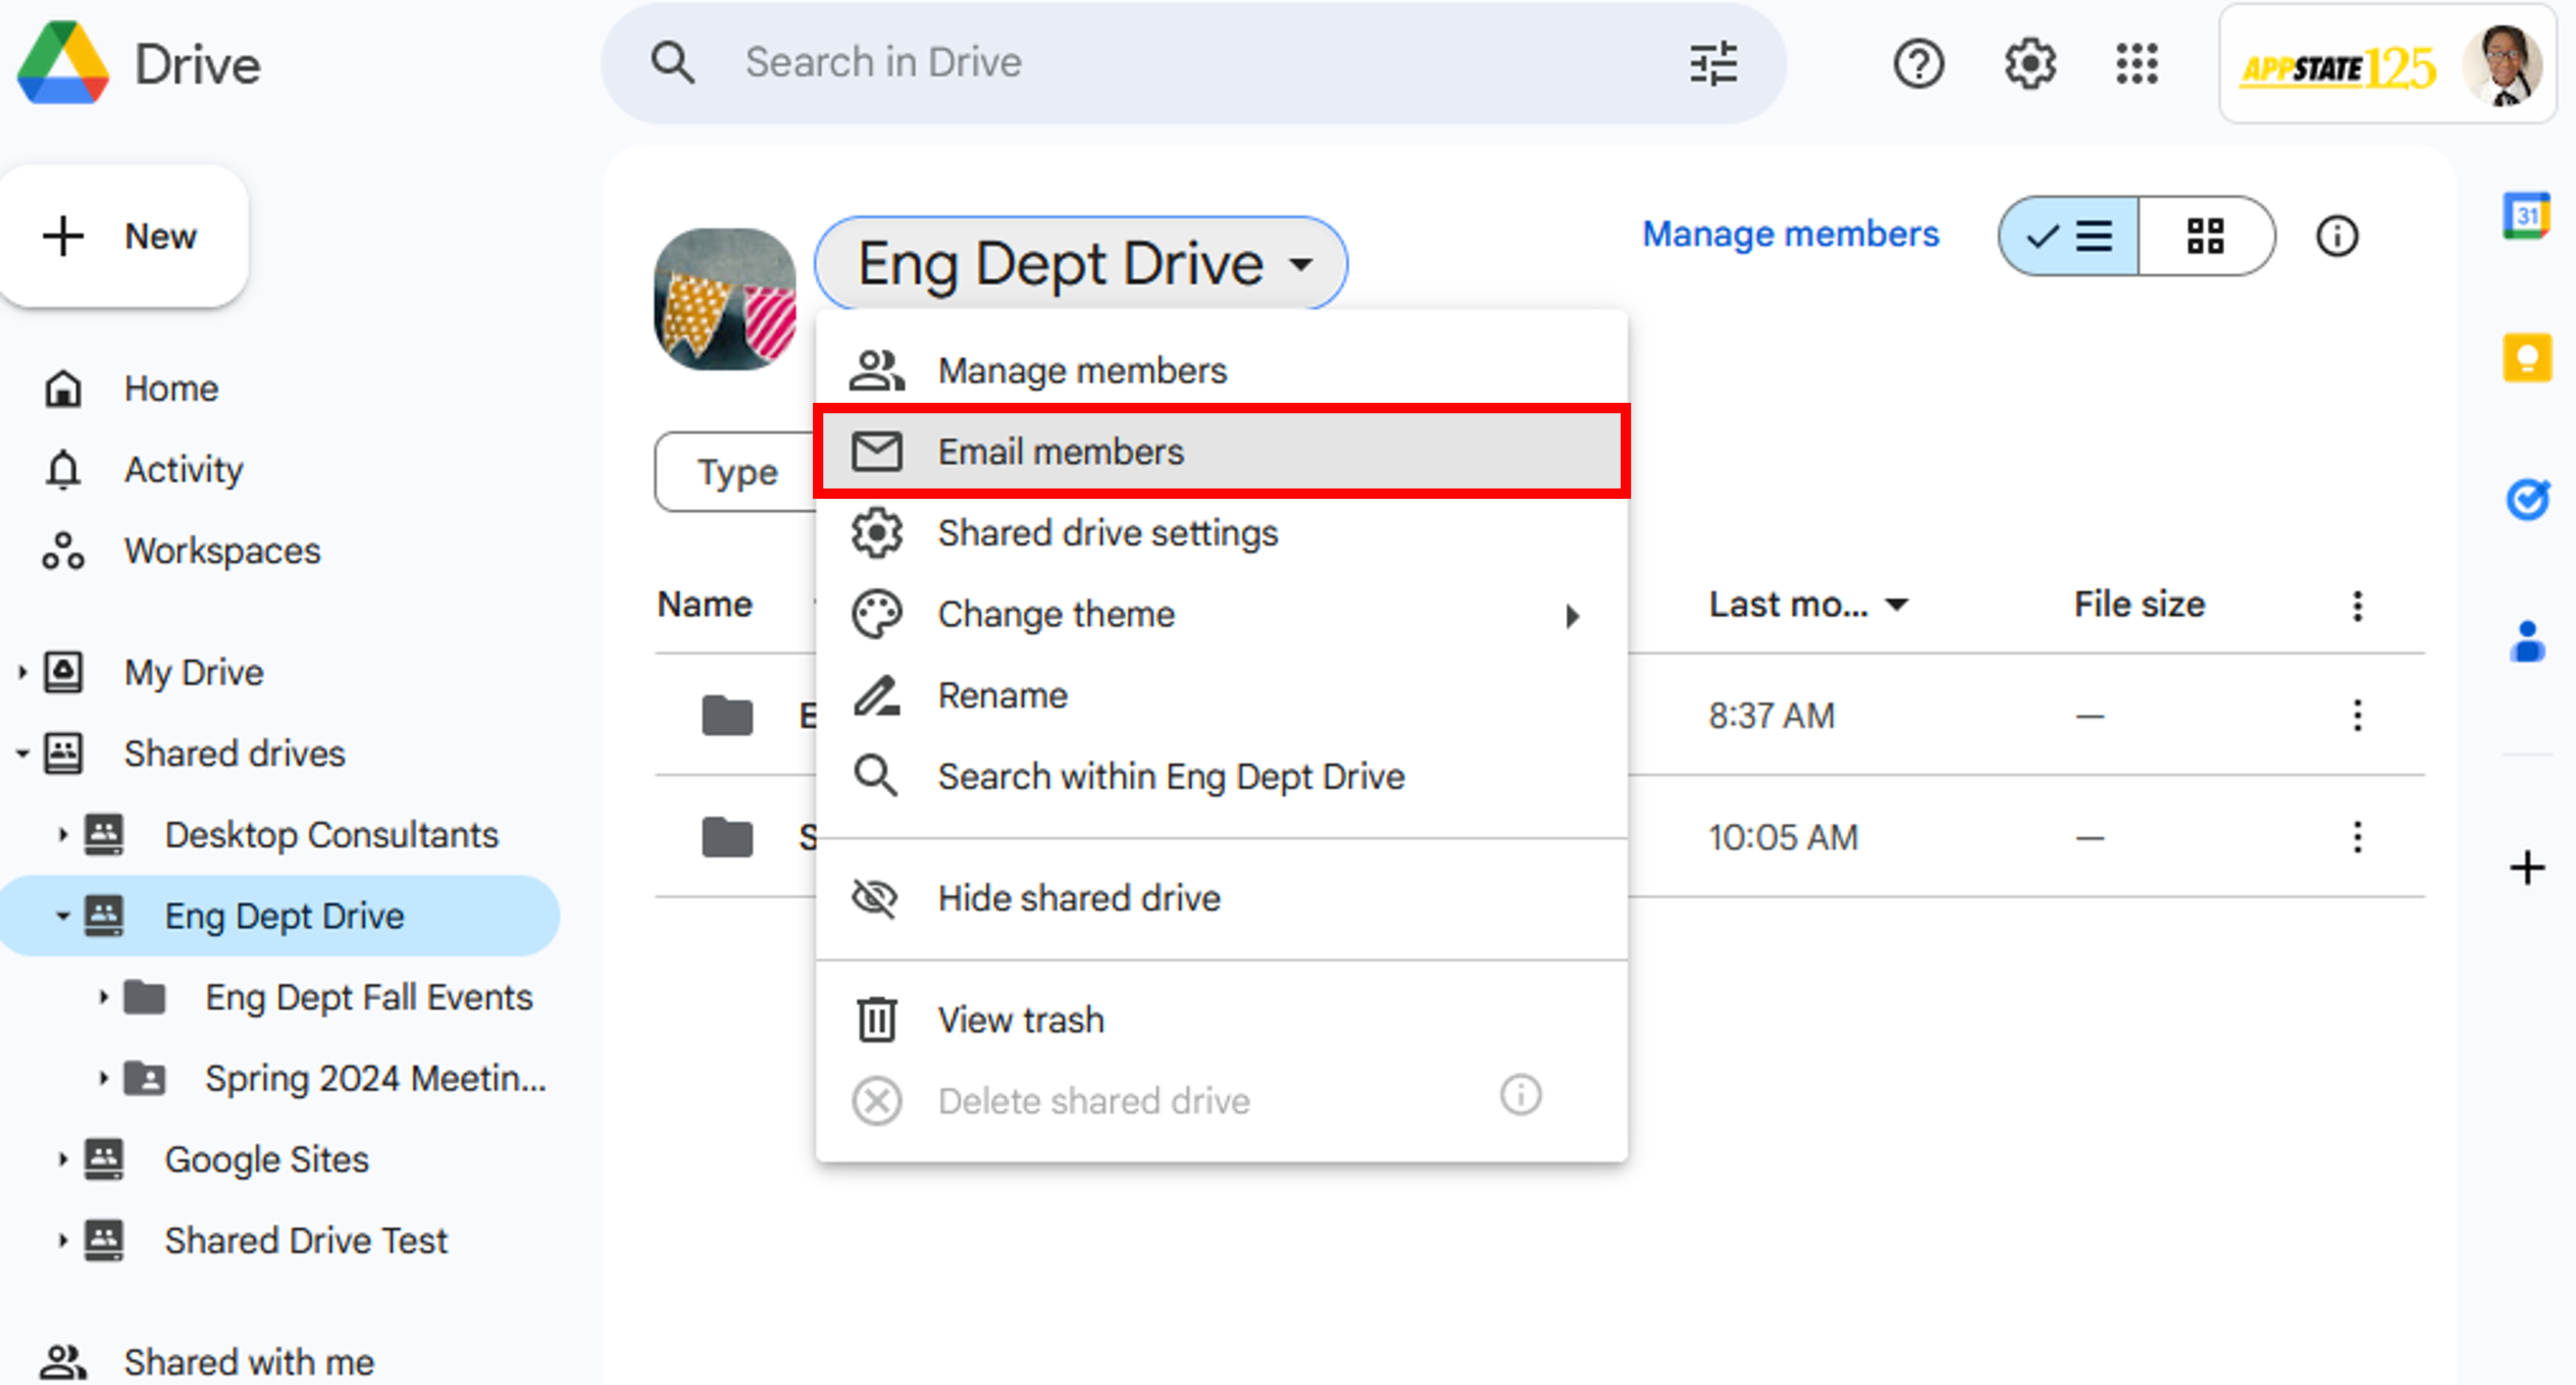
- Fill out the email form, then click Send.
Removing a Shared Drive
To delete a shared drive:
- You must be a Manager of the Shared drive
- The drive must be empty (No files, or folders)
- You may need to refresh your browser after deleting all the files and folders and before you can delete the shared drive.
- Open Google Drive and click the Shared drives button in the left sidebar menu, or navigate directly to drive.google.com/drive/shared-drives.

- Make sure the shared drive is empty. If the shared drive is not empty, select all the files and folders in the drive.

- Then click the three-dot icon at the top of the list to open a drop-down menu and either move the files and folders to your MyDrive by clicking Organize or click Move to trash to delete them.
- Once your Shared drive is empty, refresh your browser, (1) click the drop-down menu at the top of the page next to the name of the Shared drive, and (2) click Delete shared drive.

- You will be asked if you are sure you want to delete the drive.
Deleting a drive will remove the drive for every member of the shared drive and cannot be undone.
Click Delete shared drive in the confirmation dialog box.
Shared Drives Quota
As of March 28, 2024 Shared Google Drives will have a quota limit of 100 GB (sufficient collaborations of many folders documents, and files).