Steps for time or leave entry reporting in the newly updated Self-Service platform.
Visit https://controller.appstate.edu/training/payroll (login required) for videos that also walk you through the process in this updated platform.
For earn code definitions and further payroll instructions, visit https://controller.appstate.edu/forms/payroll.
Summary
- Go to AppalNet at https://appalnet.appstate.edu.
- Login to Self-Service to access your Timesheet.
- Select the Enter Time button.
- Select Position and correct pay period; then click the Start Timesheet button.
- Enter hours worked. Make corrections if needed. Save your entries.
- Click on Submit for Approval.
- Verify that the Time Sheet has been Submitted for Approval by You.
- If desired, Print a copy for your records.
Note: If the employing department requires paper time sheets to be submitted to your supervisor, your direct supervisor will forward your paper time sheet to the department head for electronic approval.
Step by step with Images
- Go to AppalNet at https://appalnet.appstate.edu.
- Login to Self-Service to access your Timesheet.

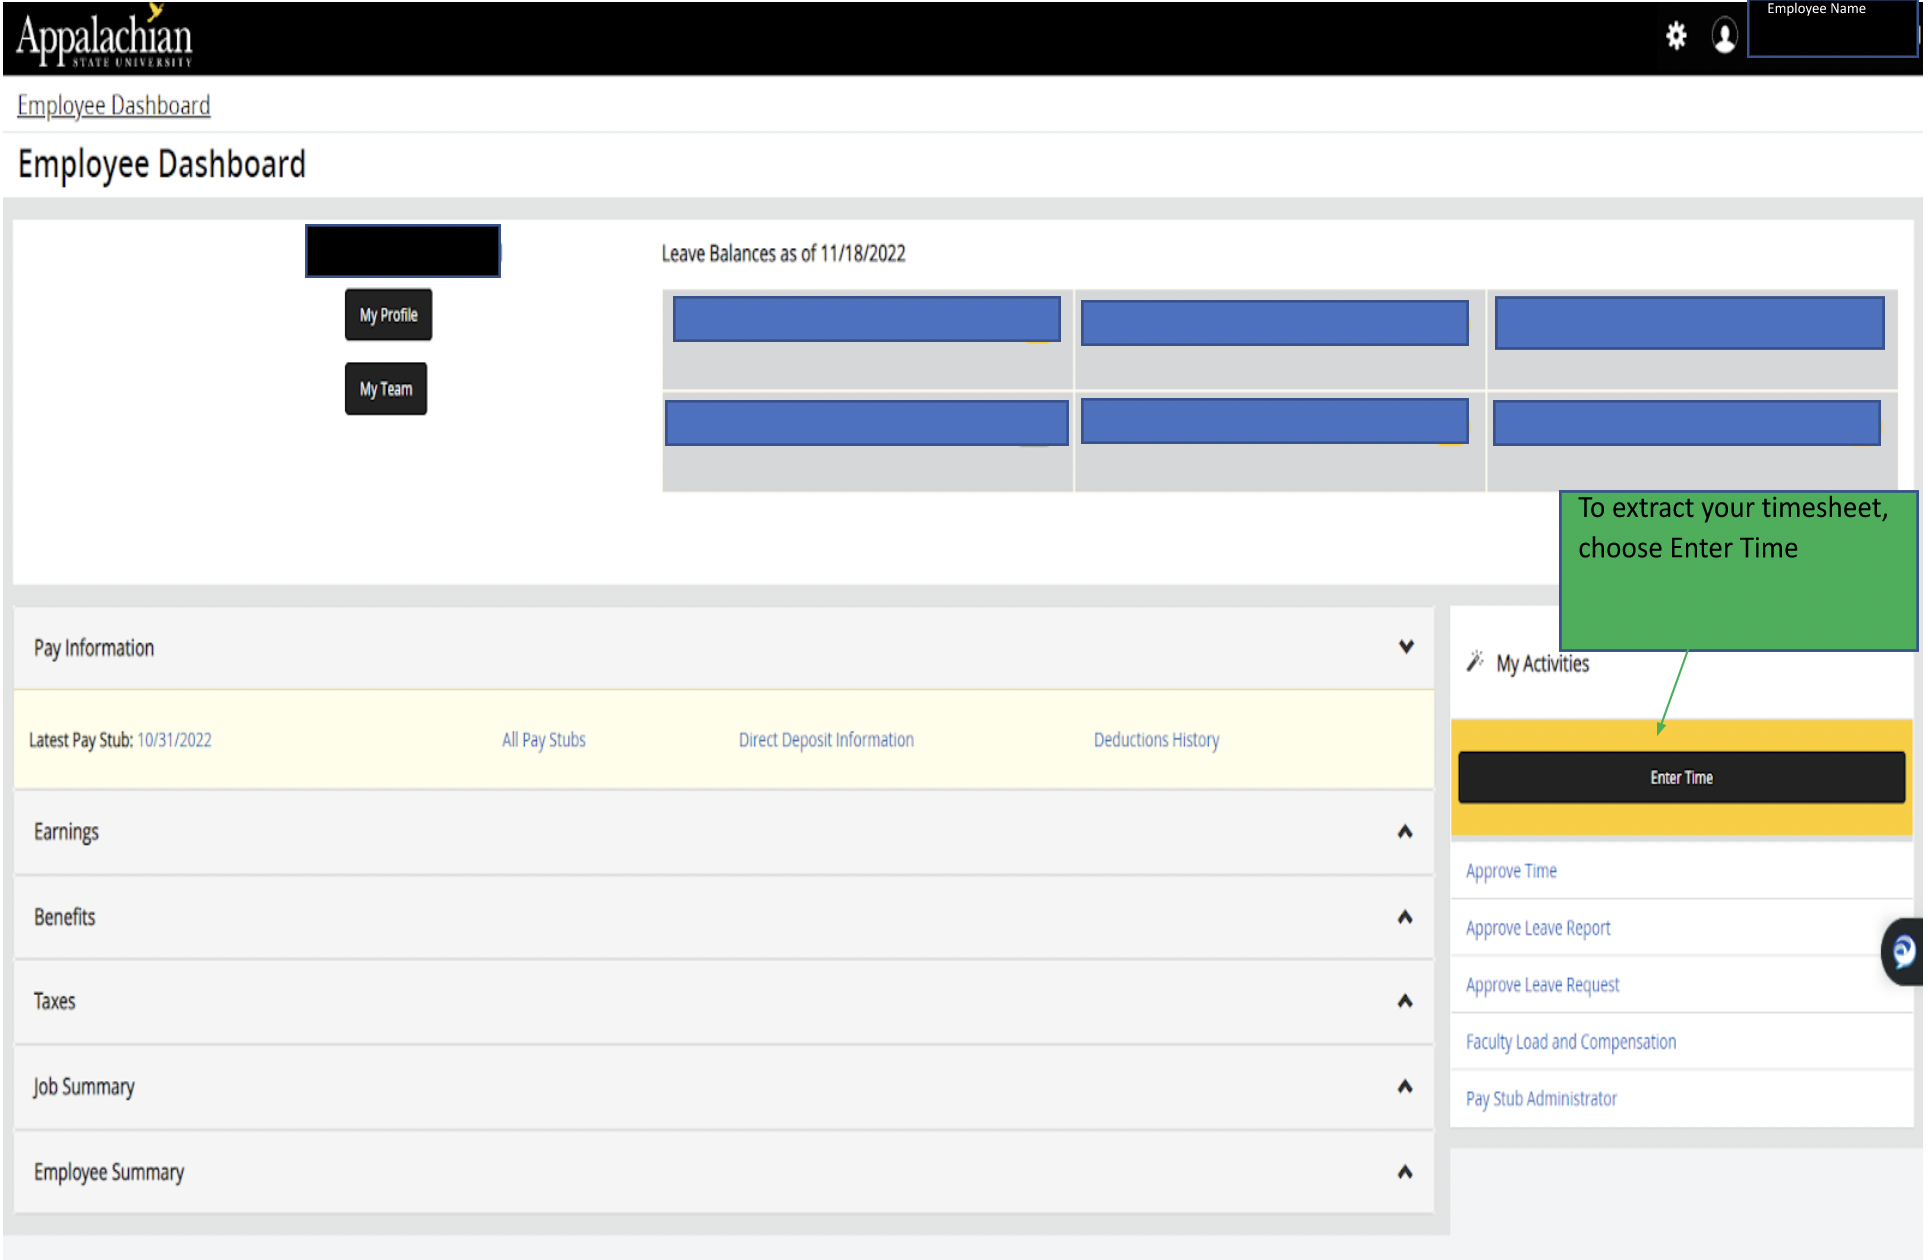
- Select the Enter Time button.
- Select Position and correct pay period;

then click the Start Timesheet button.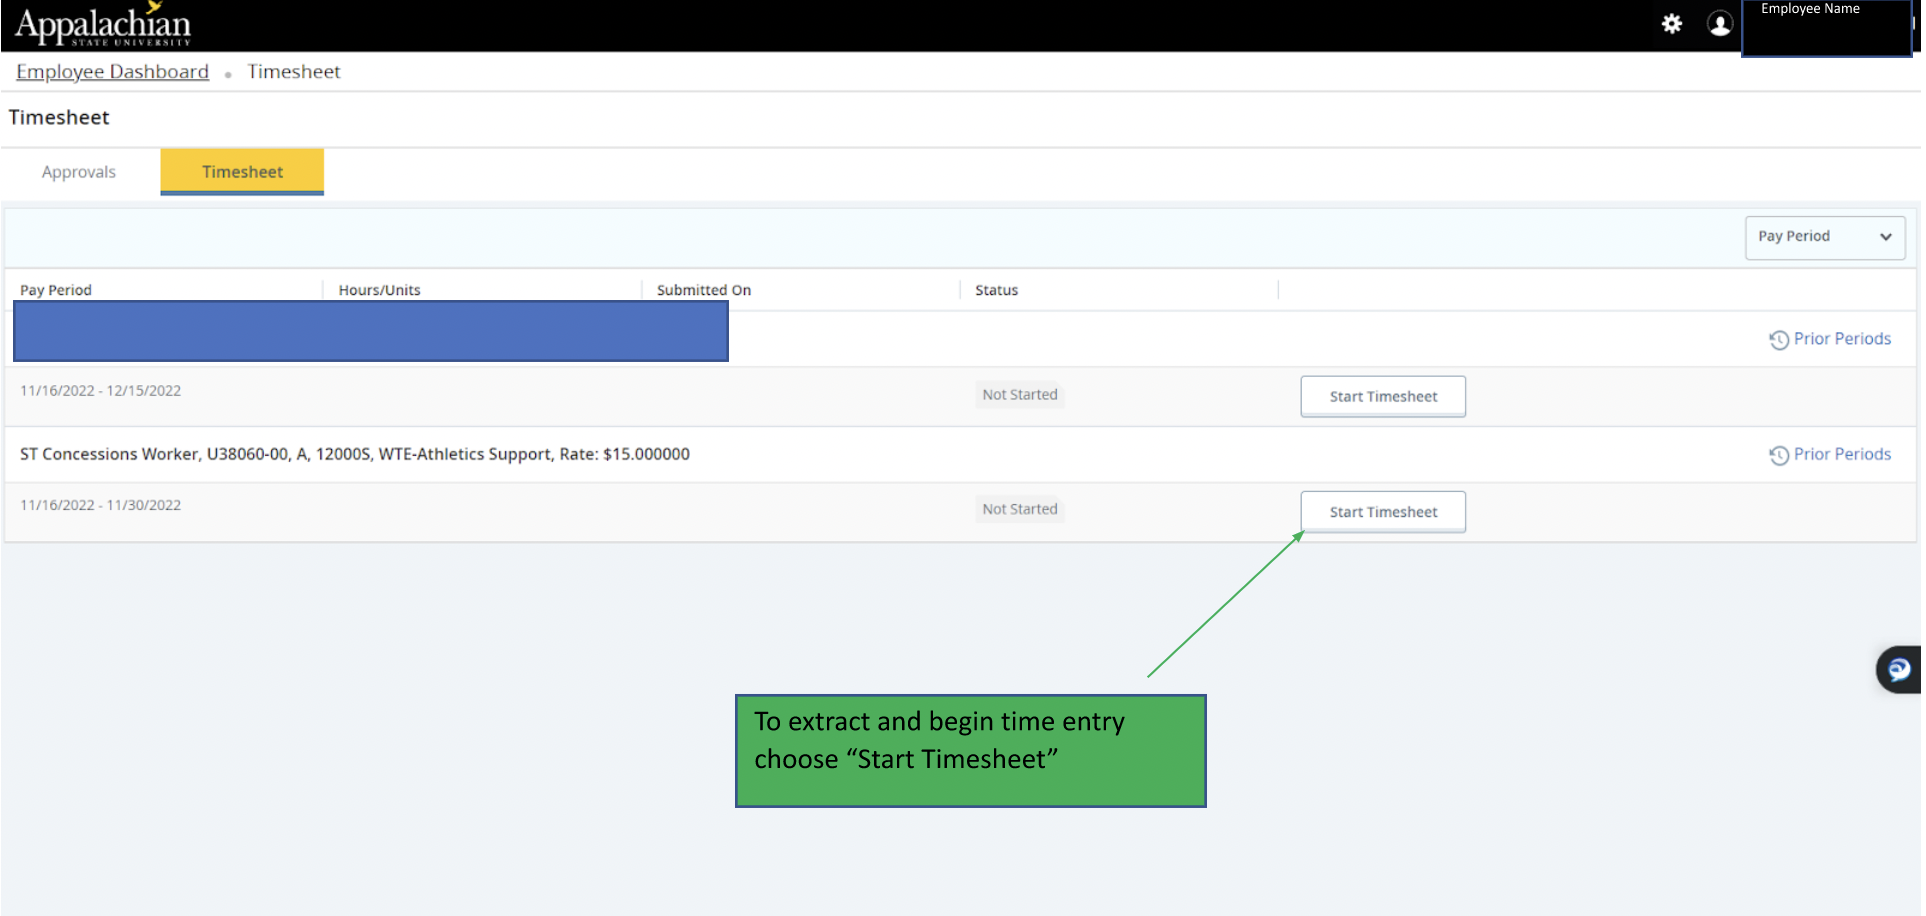
- Enter hours worked. Make corrections if needed. Save your entries.


- You can Preview your work.


- You can Preview your work.
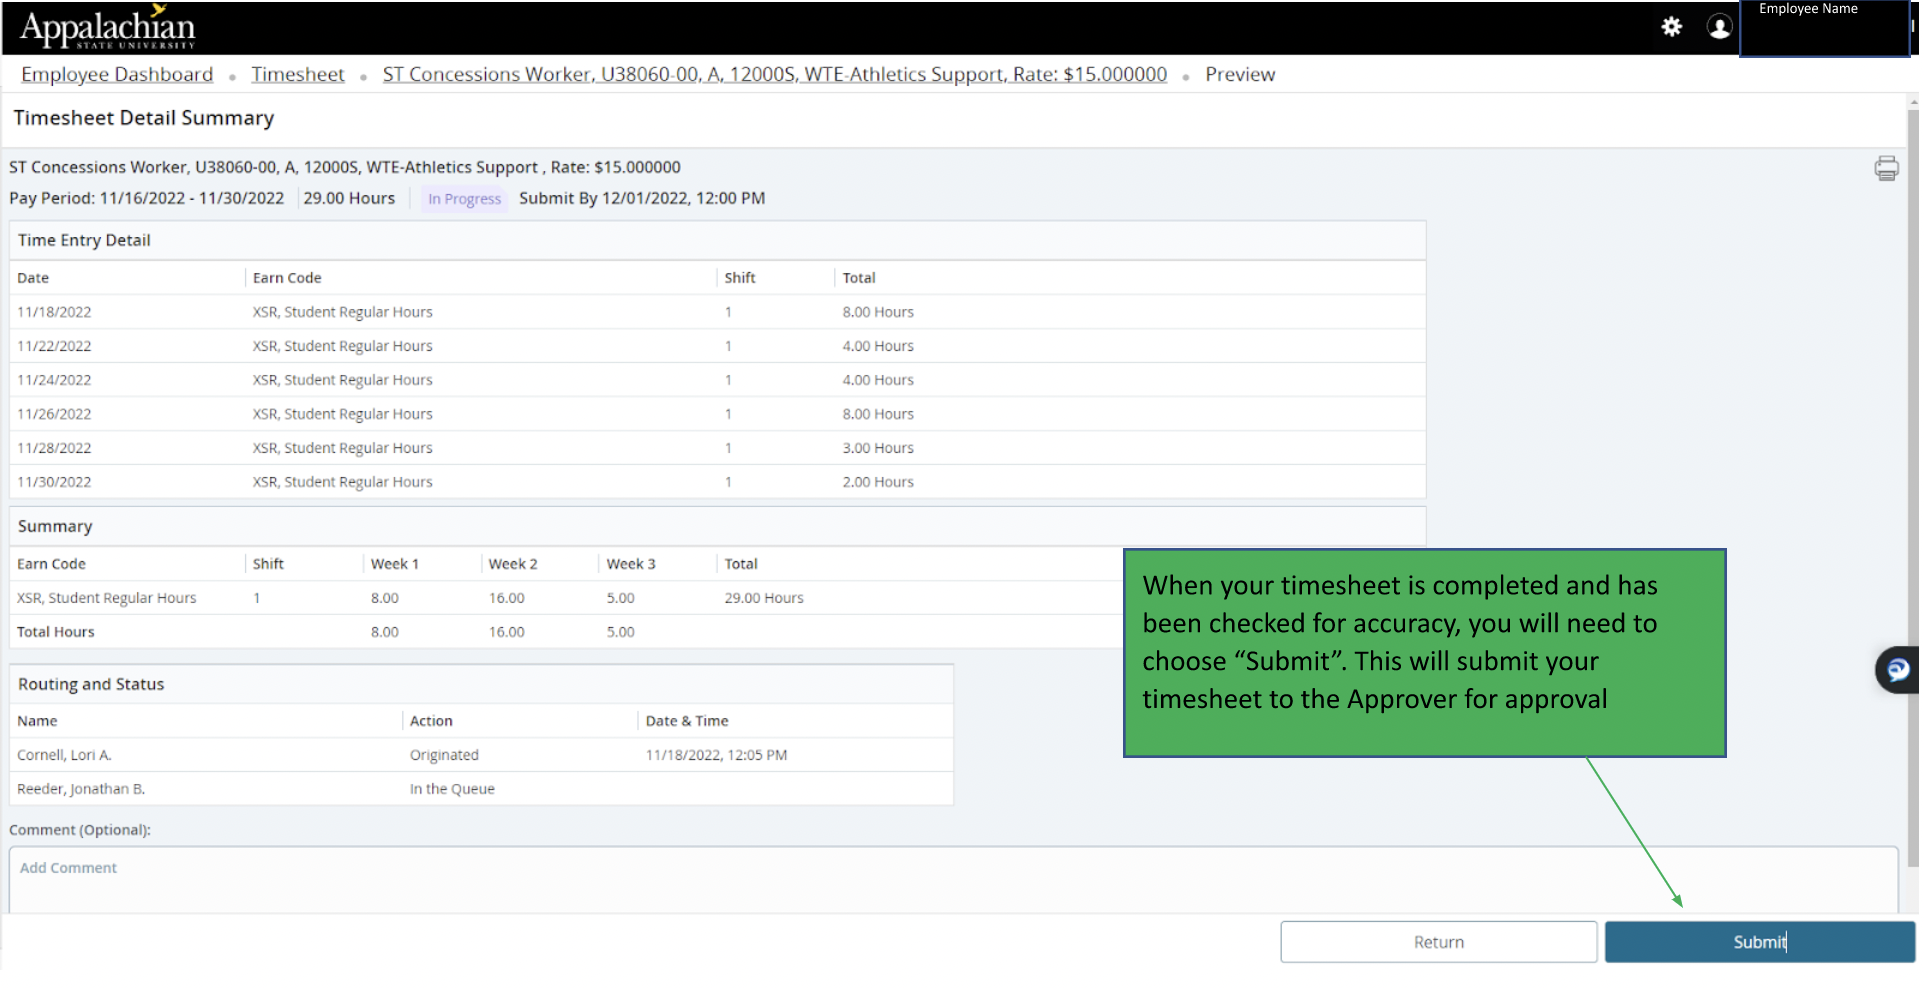
- Click on Submit for Approval.
- Verify that the Time Sheet has been Submitted for Approval by You.

- If desired, Print a copy for your records. Click the printer icon in the top right of the screen, below your username.
Note: If the employing department requires paper time sheets to be submitted to your supervisor, your direct supervisor will forward your paper timesheet to the department head for electronic approval.
Summary
- Go to https://appalnet.appstate.edu.
- Click on the Self-Service Button to login.
- Sign in with your App State username and password.
- From the “Welcome to Self-Service” dashboard, click on the Employees Tab.
- Click on the payroll drop-down menu
- From the payroll drop-down menu, click on “Time Entry”
- Your title, position #, time sheet org # and hourly rate will be on display.
- Click anywhere on the row that displays the pay period (example below).
- The current date will display in blue.
- The default earn code is REG - Regular Hours.
- Enter all Reg hours under the Hours box.
- Click save.
- To change the Earn Code, click on the + Add Earn Code icon
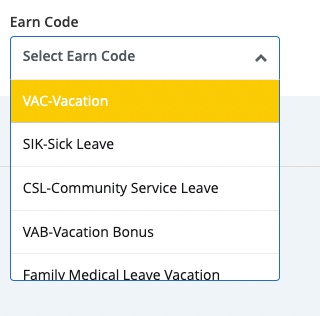
- Click on the Earn Code drop-down menu to select a new code (i.e. VAC, SIK, etc.)
- Enter the hours for the new time code and click save
- The default earn code is REG - Regular Hours.
- To enter additional hours throughout the pay period, click on the calendar icon with the corresponding date
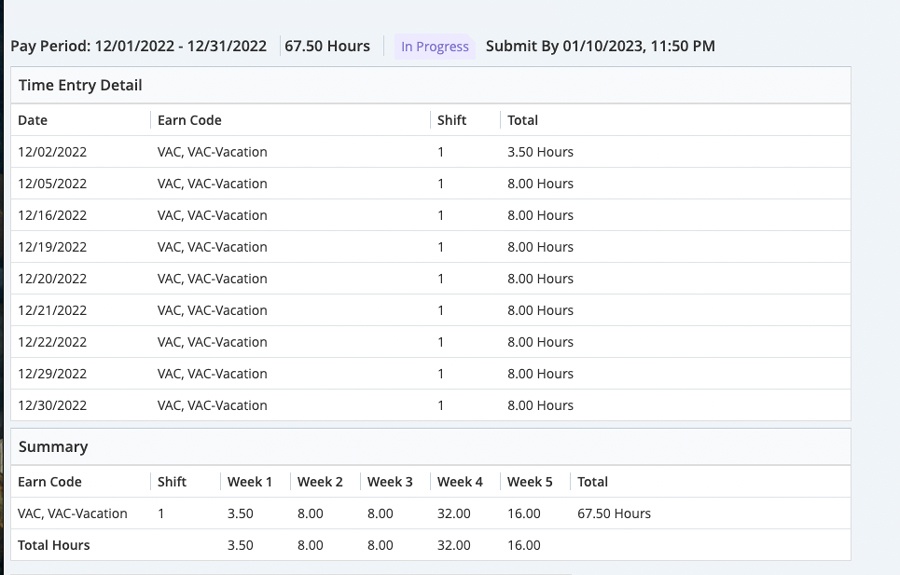
- To preview your timesheet totals, click Preview
Step by step with Images
- Go to https://appalnet.appstate.edu.
- Click on the Self-Service Button to login.
- Sign in with your App State username and password.
- From the “Welcome to Self-Service” dashboard, click on the Employees Tab at the top of the page.
- Click on the payroll drop-down menu. (You can also access through the Employee Dashboard block visible on this page in the top left under the Employees section).

- From the payroll drop-down menu, click on “Time Entry.”

- Your title, position #, time sheet org # and hourly rate will be on display.
- Click anywhere on the row that displays the pay period (example below).

- The current date will display in blue.
- The default earn code is REG - Regular Hours.
- Enter all Reg hours under the Hours box.
- Click save.

- To change the Earn Code, click on the + Add Earn Code icon.

- Click on the Earn Code drop-down menu to select a new code (i.e. VAC, SIK, etc.)
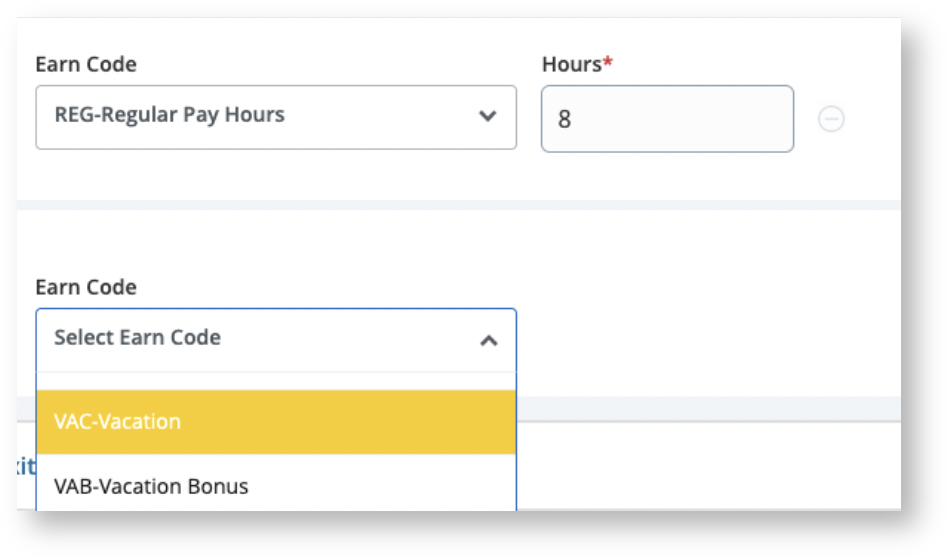
- Enter the hours for the new time code and click save
- The default earn code is REG - Regular Hours.
- To enter additional hours throughout the pay period, click on the calendar icon with the corresponding date
- To preview your timesheet totals, click Preview.

- Go to AppalNet at https://appalnet.appstate.edu.
- Login to Self-Service to access your Timesheet.
- Select the Enter Time button.
- Select Position and correct pay period; then click the Start Timesheet button.
- Enter hours worked. Make corrections if needed. Save your entries.
- Click on Submit for Approval.
- Verify that the Time Sheet has been Submitted for Approval by You.
- If desired, Print a copy for your records.
Note: If the employing department requires paper time sheets to be submitted to your supervisor, your direct supervisor will forward your paper time sheet to the department head for electronic approval.
Step by step with Images
- Go to AppalNet at https://appalnet.appstate.edu.
- Login to Self-Service to access your Timesheet.
- Sign in with your App State username and password.
- From the “Welcome to Self-Service” dashboard, click on the Employees Tab at the top of the page.
- Click on the payroll drop-down menu. (You can also access through the Employee Dashboard block visible on this page in the top left under the Employees section).
- From the payroll drop-down menu, click on “Time Entry.”
- Your title, position #, time sheet org # and hourly rate will be on display.
- Click anywhere on the row that displays the pay period (example below).
- The current date will display in blue.
- Enter hours (i.e. VAC, SIK, etc.) using the Earn Code drop-down menu.
- Click save.
- To change the Earn Code, click on the + Add Earn Code icon.
- Click on the Earn Code drop-down menu to select a new code (i.e. VAC, SIK, etc.)
- Enter the hours for the new time code and click save.
- Enter hours (i.e. VAC, SIK, etc.) using the Earn Code drop-down menu.
- To enter additional hours throughout the pay period, click on the calendar icon with the corresponding date
- To preview your timesheet totals, click Preview.

Summary
- Go to https://appalnet.appstate.edu.
- Click on the Self-Service Button to login.
- Sign in with your App State username and password.
- Click on the Employees Tab at the top of the page.
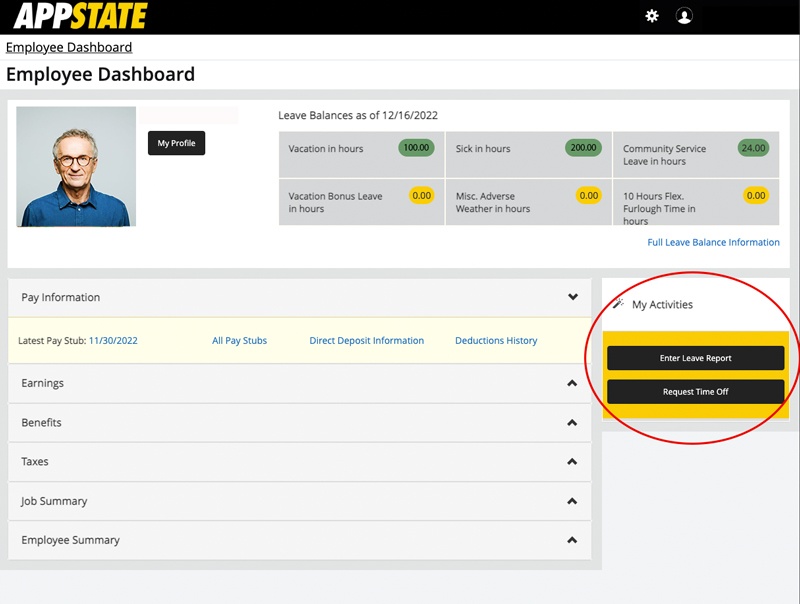
- Select the Employee Dashboard box.
- Once on the Employee Dashboard, under the My Activities box on the right-hand side, click on Enter Leave Report.
- Under Status, click Not Started.
- Once you have begun your leave report for the month it will say In Progress.
- Once you have submitted your leave report for the month it will say Completed.
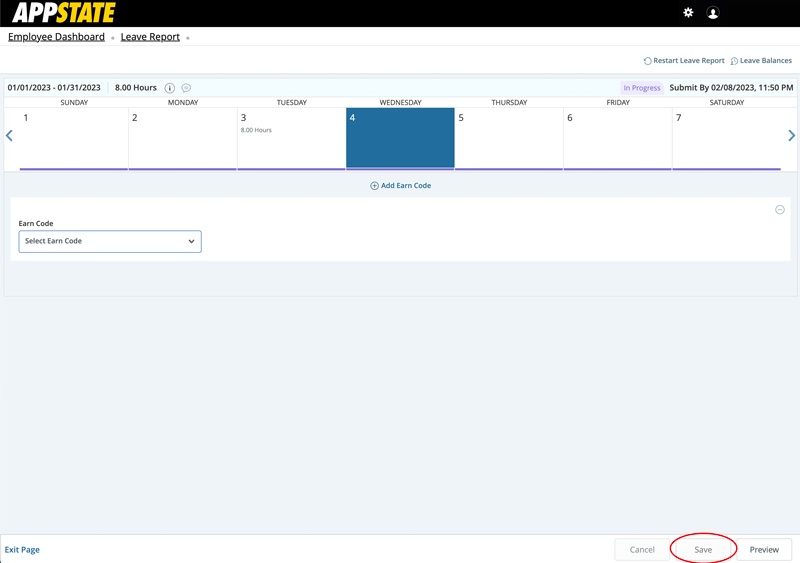
- The calendar will appear in a week-by-week format. Use the arrows to move from week to week.
- Select a date you want to enter a leave code. Use the drop-down earn code menu to select vacation, sick, etc. and enter the number of hours.
- Click Save in the bottom right corner and then see the time entered appear on the calendar.
- Use the Preview button in the bottom right corner to review your entry before submitting.
Step by step with Images
- Go to https://appalnet.appstate.edu.
- Click on the Self-Service Button to login.
- Sign in with your App State username and password.
- Click on the Employees Tab at the top of the page.

- Select the Employee Dashboard box.

- Once on the Employee Dashboard, under the My Activities box on the right-hand side, click on Enter Leave Report.
- Under Status, click Not Started.
- Once you have begun your leave report for the month it will say In Progress.
- Once you have submitted your leave report for the month it will say Completed.

- The calendar will appear in a week-by-week format. Use the arrows to move from week to week.

- Select a date you want to enter a leave code. Use the drop-down earn code menu to select vacation, sick, etc. and enter the number of hours.

- Click Save in the bottom right corner and then see the time entered appear on the calendar.
- Use the Preview button in the bottom right corner to review your entry before submitting.