Calendar Resource is a shared calendar that represents the use of a physical object or space. These resources act like regular Google calendars, except for an extra feature that makes them automatically appear in the "Rooms" list when creating an event. It gives people the ability to schedule rooms easily within our Google Enterprise Calendar system.
We are creating calendar resources for conference rooms, and training rooms. Anyone with access to the Calendar Resource can reserve the resource (e.g., room) in Google Calendar just as if they were inviting people to a meeting. Imagine - scheduling a meeting and finding a location for the meeting through Google Calendar without searching for meeting spaces by phone or email! To learn more, check out this Google Apps Help Website.
We are allowing Faculty and Staff to request the creation of a Calendar Resource for conference rooms and training rooms. You will also need to list two coordinators for this resource, who are responsible for maintaining and managing this calendar resource. Conference room: A board room or seminar room. Training room: A room with technology for individual participants. Note: Rooms that are already listed and scheduled in R25 should not be added as Calendar Resources because Google Calendar will not provide the same functionality. You can request a Calendar Resource be built through a Tech Support Request Ticket. |
|
Easier management - There is no need to check other calendars when you schedule an event that uses the Calendar Resource and the Calendar Resource can be shared widely or kept private. Adding a calendar resource to an event automatically populates the event location so there is less information to be entered manually. Continuity - if you go on vacation, or leave the University, your office doesn’t potentially lose the information in your Calendar If you have a resource (room) that is only available to a few users and you do not want to be able to schedule the resource through the “Rooms” list option, then it may be better to create a sub-calendar within a departmental generic account.
|
Once the calendar resource is created, the 2 coordinators will be notified that they have access to a new Calendar in their ‘My calendars’ list. Calendar Resources default so that everyone at Appalachian can view free/busy on the Calendar Resource, but it’s easy to change: - Hover over the Calendar Resource name to get the drop-down option.
- Click the arrow to get a list of options and choose: “Share this Calendar”.
- Uncheck the “Share this calendar with others” box.
- Under “Share with specific people”, list the individuals who should be able to book the resource.
- Only these people will be able to see the calendar under “Add Rooms, etc”.
- Note that the calendar will appear with all the appstate.edu calendars under “Browse interesting calendars”, but someone previewing the calendar will only see the events that they have access to see. Someone without access to a particular calendar will see a blank calendar with a note that they don’t have permission to view these events.
- Right now you must add a person individually. When Google Groups are available, you may be able to give a group access to a calendar to simplify this procedure.
- Assign their sharing options:
- Highest Access Level: Make changes and manage sharing, change sharing settings, add and edit events, and see details for all events, including private ones.
- Make changes to events, add and edit events, and see details for all events, including private ones.
- See all event details (allows one to schedule the resource and also allows one to see details for all events except those marked as private).
- Lowest Access Level: See free/busy information (no details), See when your calendar is booked and when it has free time, but not the names or other details of your events.
|
By default, the calendar resource is set up to automatically accept event requests when the resource is free. When the room is busy, it will not appear in the “Add Rooms” list at all. To ensure that a calendar resource is set up to accept event requests when the resource is free: - Hover over the Calendar Resource name to get the drop-down option.
- Click the arrow to get a list of options and choose Calendar Settings
- You will land on the “Calendar Details” settings page. Approximately six sections down in the list of options you will see “Auto-accept invitations”. Choose the radio button associated with Auto-accept invitations that do not conflict. Save your changes.
|
To set up a calendar resource so that resource coordinators can monitor event requests and accept or deny requests as needed: - Hover over the Calendar Resource name to get the drop-down option.
- Click the arrow to get a list of options and choose Calendar Settings
- You will land on the “Calendar Details” settings page. Further down in the list of options you will see “Auto-accept invitations”. Choose the radio button that says “Automatically add” all invitations to this calendar. Don’t forget to save your changes on this page!
- For this process to work, at least one calendar resource coordinator must set up notifications for the resource.
- Click on the “Edit notifications” page of the settings.
- In the section choose how you would like to be kept up-to-date: enable the notifications you would like to receive on behalf of the resource. Resource coordinators should enable email notifications for “New events” and “Changed events”. Save your changes.
Additional Notes: - When using the setting “Automatically add all invitations to this calendar”, all invitations will appear on this calendar, regardless of conflicts.
- Event requests are added to the calendar before they are actually accepted. Resource coordinators are notified to allow them to accept or decline the event requests at any time.
- When a resource coordinator is invited to an event that also uses a resource that they manage, they will receive two invites for the same event. The subject line for the email sent to the resource begins with “New Event:” while the subject line for the email sent to the individual begins with “Invitation:”.
|
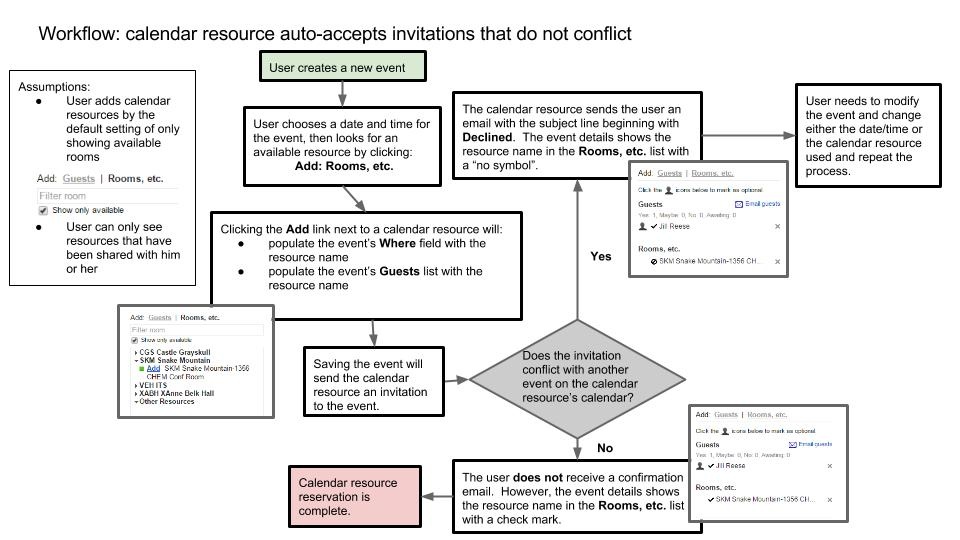
When a user creates a new event and adds a room that is set up to auto-accept if free, the event is scheduled with the resource (i.e., room) if it is free. Here is a flow chart explaining the process: 
|
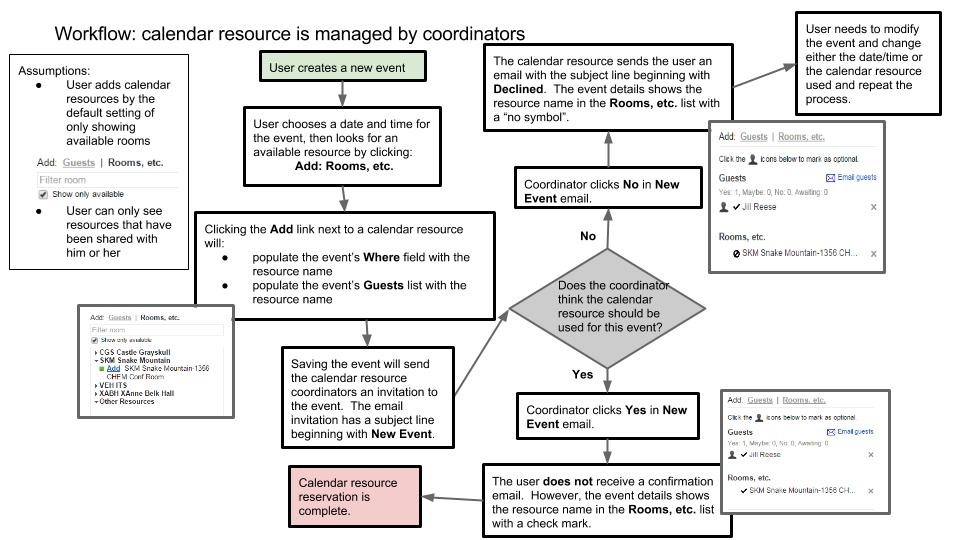
When a user creates a new event and adds a room set up to automatically add all invitations, a “New Event” notification will be sent to any resource coordinator who has enabled that notification in their calendar settings. The coordinator decides whether to accept or decline the event on behalf of the resource. - If the coordinator accepts the event, they are giving the event requestor approval to use the resource and the process is complete.
- If the coordinator declines the event, the event requestor is NOT approved to use the resource, and the event requestor is informed that they did not get the resource. At that point, the event requestor would need to look for another resource to add to their event, and the process repeats.
Here is a flowchart of the process: 
|
1. Filters are your friend! - Set up filters and labels devoted to resource management.
- Resource coordinators should create a filter for email messages with a subject line starting with “New Event:” and annotate those messages so that they aren’t missed (i.e. appear at the top of the inbox) or sent to the spam folder. “New Event:” messages will need a relatively quick response time.
- Resource coordinators (especially those managing multiple rooms) will need to tweak their inbox setup to stay organized
- Users campus-wide should set up a filter to “flag” messages with a subject beginning with “Declined:”. If a resource coordinator declines an event they have created, the user needs to see this info ASAP in order to have time to find another resource for their event.
- Advanced maneuver: Canned responses and filters can automatically send users confirmation of received requests and provide info on who the resource coordinator is for a given resource they have booked in case they need to contact that person directly for help.
2. Do not create events directly on a Calendar Resource’s calendar! Events should be created on an individual’s calendar and resources should be added to the event in the same way as guests. The event will be added to the resource’s calendar via an automated process (i.e. an invite being accepted either by a resource coordinator or automatically by the resource depending on setup). |
|
Related Articles
Related articles appear here based on the labels you select. Click to edit the macro and add or change labels.


