The Attendance activity is designed for teachers to be able to take attendance during class, and for students to be able to view their own attendance record, and optionally be able to record their own attendance.
A teacher can mark the attendance status of a student as "Present", "Absent", "Late", or "Excused". These default status options are configurable, and more can be added. The teacher adds Attendance as an activity in the course, and then creates the sessions for which attendance is to be marked.
The Attendance activity can generate reports for either the entire class or for individual students. Students may also see their own attendance record if the activity is not hidden.
The optional Attendance block allows teachers quick access to the Attendance functionality, and allows students quick access to a summary report for their own attendance.
If you prefer instructional video, see the embedded video walk-throughs at the bottom of this page.
Add the Attendance activity
- From the course page, enable Edit mode at the top right.
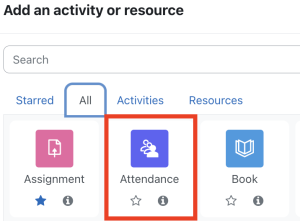
- In the topic where you want the Attendance link to appear, click +Add an activity or resource.
- Under the All or Activities tab on the chooser, click Attendance.

- On the Adding a new Attendance page, consider the following settings:
- In the General section, leave the default name of Attendance for consistency across courses for the students. Also consider providing a description of your attendance policy in the Description field.
- In the Grade section, it is strongly recommended that you set the Grade Type to None to prevent the Attendance activity from unintentionally affecting your Gradebook's Course Total.

If you choose to lower students' final grades when a certain (unexcused) absence number threshold is crossed, you can use this activity to track them, and then manually adjust grades during or at the end of the semester.
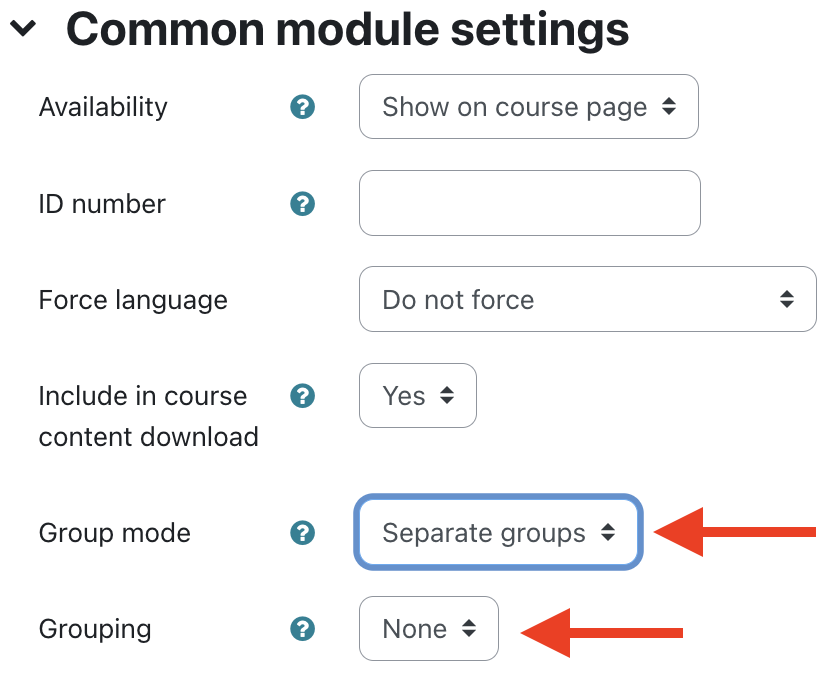
- In the Common module settings section, there is an important option to set: Group mode.
- Group mode = No groups: For a "traditional" class, where you just "take roll" each meeting, and you haven't added any course meta links, leave the Group mode set to No groups (default), and proceed to the next step. When you add sessions, they will be of the All Students type.
- Group mode = Separate groups: If you have different groups meeting on different days/times (like section groups combined in a metacourse), change the Group mode to Separate groups. When you add sessions, they will be of the Group type, and labeled by the group to which they pertain (see below under Adding Sessions). That's how you'll have a set of sessions appropriate to each group's meeting day/time. When you select Separate groups, the option to select a Grouping appears. You'll only need to create a grouping if your course requires students to participate in more than one group. In this case, many faculty create an Attendance Grouping, and add the section groups to it. See Create user groups and grouping in a course for more info.

- Click Save and display and you'll see the Attendance activity page for the course. Here, you can make any changes to the status set that you require, and add the attendance sessions on the proper days/times, as well as different sessions for different groups if needed.
The Attendance activity page
This page will show all your sessions after they are built. It also allows you to set the available attendance statuses, and to add attendance sessions, both singly and in bulk, using the available options:

Status Set
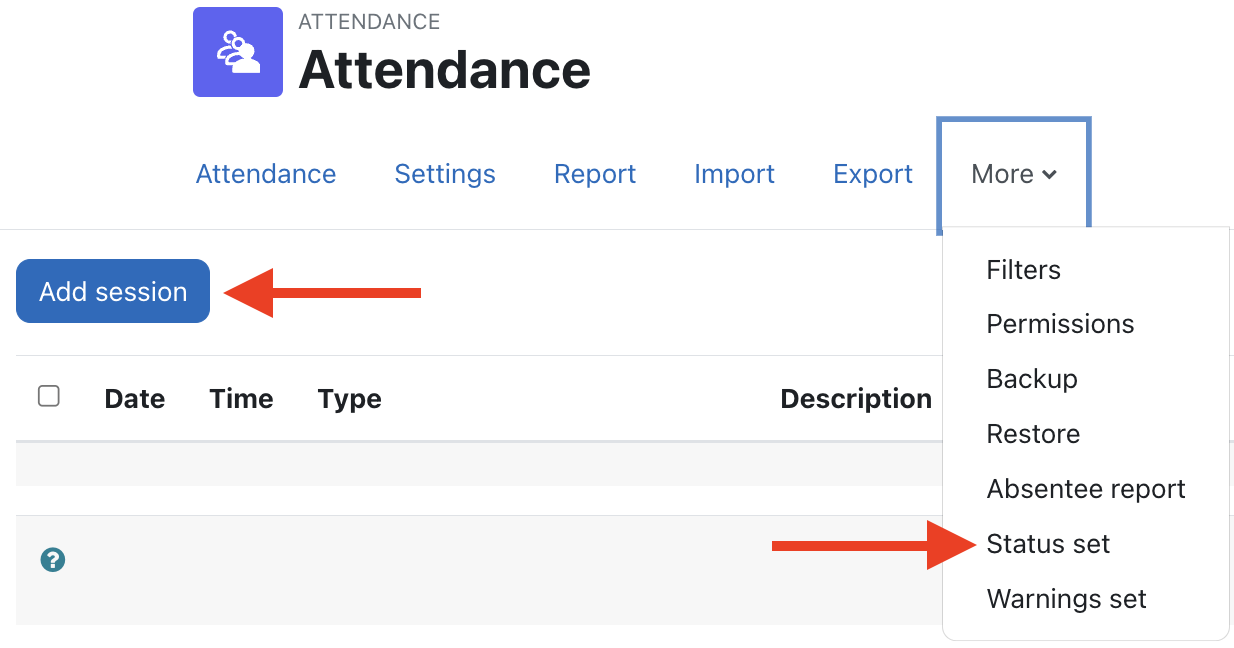
- Click the More tab in the options along the top, then choose Status set if you'd like to edit the Status set available to you for marking attendance. The default settings are: Present (P), Late (L), Excused (E), and Absent (A). Points are set to 2, 1, 1, and 0 respectively. Even if you set the Grade Type for the activity to None (see step 4 above), you can still use points within the activity itself, it just won't send scores to your gradebook. You can edit/hide/delete an existing status, add new ones, and combine and save them into Status sets. Click on the
 icons to learn more about the options on the page. If you make changes on the Status set page, be sure to click the Update button at the bottom to save them. Then return to the Attendance activity page by clicking Attendance in the options along the top.

Adding Sessions
- Back on the Attendance activity page, click the blue Add session button to add Attendance dates/sessions for your course.

- To add Attendance sessions when Group mode is set to No Groups (for Separate groups, skip to Step 3):
On the Add session page, you'll note the session Type is automatically set to All students, since no groups are being used for Attendance.
In the Add session section, enter the Date and Time for the initial class meeting.

To build the sessions for for the rest of the semester, proceed to the Multiple sessions section, and select Repeat the session above as follows.

Repeat on: Select the days of the week that the course meets.
Repeat every: If the class meets on those days every week, leave the default of Repeat every 1 week(s).
Repeat until: Enter the last day your class meets. NOTE: You can easily delete class sessions that fall on university breaks from the Attendance activity screen after the sessions are built.
Click Add at the bottom of the screen, all your attendance sessions will be built, and you'll return to the Attendance activity page. You can still add, delete, or edit sessions as needed, choose to view your sessions with the filter buttons along the top right:

You can now skip down to Taking Attendance.
- To add Attendance sessions when Group mode is set to Separate groups:
When you click the Add session button, you'll note the session Type is automatically set to Group of students.
Since these sessions will be for specific groups, click on the group name for which you wish to build the sessions (it will highlight), then in the Add session section, enter the Date and Time for the initial class meeting for that group.

To build the sessions for for the rest of the semester, proceed to the Multiple sessions section, and select Repeat the session above as follows.

Repeat on: Select the days of the week that the group meets.
Repeat every: If the group meets on those days every week, leave the default of Repeat every 1 week(s)
Repeat until: Enter the last day this group meets. NOTE: You can easily delete class sessions that fall on university breaks from the Attendance activity screen after the sessions are built.
Click Add at the bottom of the screen, all your group attendance sessions will be built, and you'll return to the Attendance activity page.

Click the Add session button, select the next group, and repeat until you've built all the group sessions you require. When you are done, you'll have all your group sessions in the list:

Because groups are enabled, you'll have a Sessions dropdown menu to allow you to easily select the class sitting in front of you when you take attendance. Selecting Section 101 above would filter the view to just that group's sessions, and you can further refine with the filters at the right.
Taking Attendance
- From the course homepage (usually with Edit mode off), click the Attendance activity.
- You can view All sessions, All past sessions, or filter by Months, Weeks, or Days with the buttons at the top right. If groups are being used, you can also use the Sessions pulldown to select the group.

- There are tool tips on each Action icon; just mouse over to see them. From left to right they are: Take attendance, Edit session, and Delete session. You can easily delete any session during a university break by clicking the trash icon for that session. You can also select multiple sessions with the checkboxes, then use the dropdown menu at the bottom to delete.
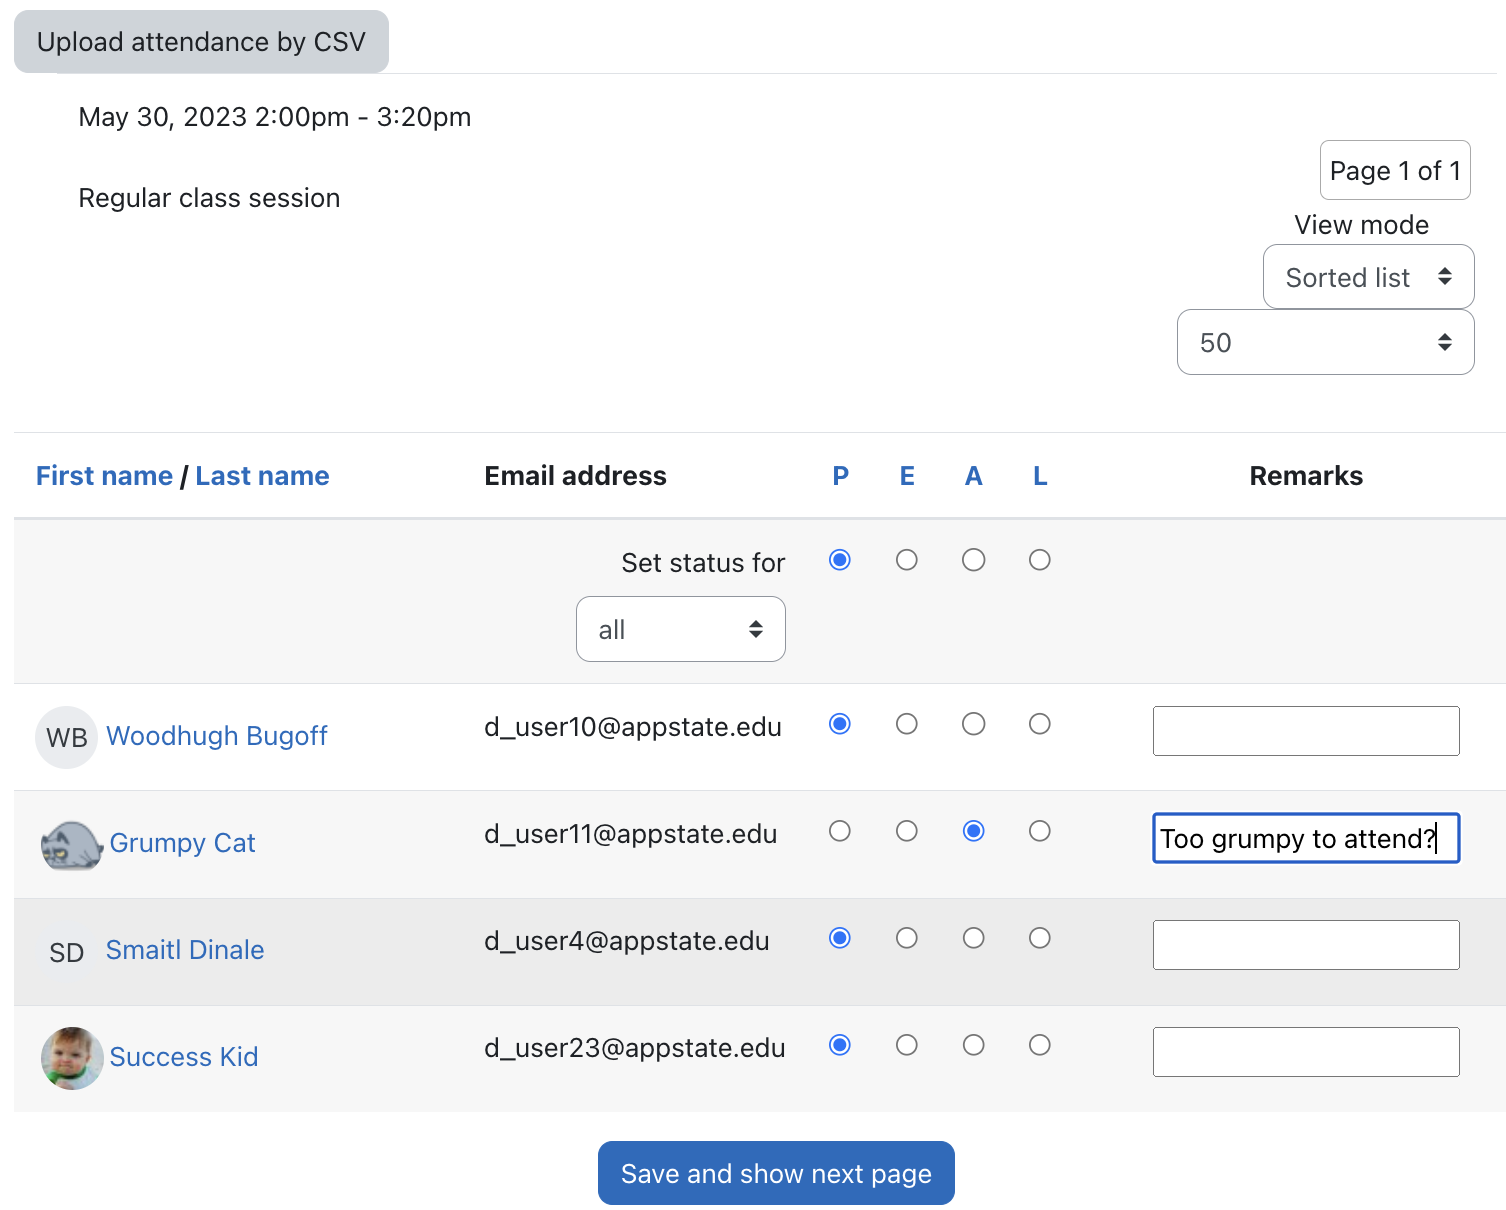
- To take attendance during (or after) a class meeting, click the forward arrow icon for the session. The list of students is displayed. Click the button in the appropriate column: Present, Absent, Late, Excused
- TIP: A shortcut for taking attendance is to click the letter P at the top to mark everyone Present . Then change the mark for any late or absent students.
- NOTE: If there are more than 50 students in the session, there will be more than one screen for the student list: in the upper right, change the dropdown with 50 to Do not use paging to display the full student list on one screen. Otherwise, click the arrows beside the Page # of # field to move through the screens.
- Change Sorted list to Sorted grid to display student pictures prominently (max 50 students per screen).
- Use the Remarks column to make notes that are visible to the teacher and the individual student, such as the reason for an excused absence.

- Click Save and show next page at the bottom of the screen. You'll be returned to the Attendance activity page. The forward arrow turns to a green arrow when attendance has been taken for a session. To edit the attendance, click the green arrow for that session.
Click the Add session tab to insert a meeting, such as a class event that meets outside the regular schedule.
The Report tab provides an aggregated visual record for the teacher about class attendance, as well as summaries for individual students. Click on student name in the Attendance report.
From the Export tab specify the options to export attendance data to a file and download, then click OK at the bottom of the screen.
Take attendance from the AsULearn mobile app
Attendance can now be taken directly from the AsULearn mobile app. Currently only sessions that started in the last 6 hours or that will start 1 day in the future will be available. This setting can be expanded systematically, so please let us know if a broader time frame would be helpful. |
- Browse to the Attendance activity in the course from within the mobile app.
- Click the Submit Attendance button below the desired session.
- Select the desired default status under Set status for to set the status for All students.
- Set the desired status for individual students under their Name.
- Click the Submit Attendance button at the bottom to save and record.
Configure Attendance Warnings
Warnings thresholds affect the Absentee report and allow students and third parties to be notified. NOTE: If more than one warning is triggered at exactly the same time, only the warning with the lower warning threshold will be sent. |
- From the Attendance activity, go to the More item, then select Warnings set from the dropdown menu. Then click the Add warning button.
- Configure the settings:
- Warn if percentage falls under: Warnings are triggered if a student's overall percentage for this attendance activity falls below this amount.
- Number of sessions taken before warning: Set the number of sessions that should be taken by a student before the warning should be triggered.
- Maximum number of email warnings: Set the number of times a student should receive the email warning for this session.
- Email user: If enabled, an email will be sent to the student.
- Email subject: This setting defaults to "Attendance warning", but it is customizable.
- Email content: Default message content is configured, but can also be customized. Wildcard options are available from the help icon next to the field.
- Notify other users: Select other users with permission to view attendance reports to receive the notification.
- Click the Add button to save the Warnings set.
Attendance Activity

Generating QR Codes to Take Attendance

Added Notes about QR Codes
- Not all students may have a mobile device in class, so be sure to have an alternative sign in sheet, just in case.
- If you set up the QR option, you can still opt for the traditional method for taking attendance.
- When students self record, the attendance marks the status and puts 'self-recorded' in the comment box.
- If a student doesn't have a mobile device with a camera to scan the QR code, they can still go to the Attendance link and self report. They will be prompted to enter a password; the password is randomly generated and appears on the QR page.
Related Articles
Related articles appear here based on the labels you select. Click to edit the macro and add or change labels.

We value your feedback! Click HERE to suggest updates to an existing article, request a new article, or submit an idea.


