What can you do with Shared Drives?
Shared Drives is a shared space where teams can easily store, search, and access their files anywhere, from any device.
Unlike files in My Drive, files in a Shared Drive belong to the team instead of an individual. Even if members leave, the files stay exactly where they are so your team can continue to share information and get work done.
Not sure whether to use My Drive or Shared Drives?
Ask yourself these questions:
- Are the files of interest to most or all members of a particular project Shared?
- Do the files share a consistent theme?
If you answered "yes" to both questions, creating a new Shared Drive is a good idea. If the files are for a variety of projects, create multiple Shared Drives.
For a comparison of My Drive and Shared Drives, see the Drive FAQ What's the difference between My Drive and Shared Drives.
- Set up a Shared Drive
- Get Started with Google Shared Drives (formerly Team Drives)
- Manage Shared Drive files and folders
- Get Started with Google Shared Drives (formerly Team Drives)
| Info |
|---|
Important: Shared Drives is only available with the G Suite Enterprise, Business, or Education editions. If you don't see Shared Drives in Google Drive, it might not be available for your organization. For details, contact your G Suite administrator. |
Step-by-step guide
1. Set up a Shared DriveAnchor Set up a Team Drive Set up a Team Drive
| Set up a Team Drive | |
| Set up a Team Drive |
In this section you learn how to:
1.2 Get Started with Google Shared Drives (formerly Team Drives)
1.3 Get Started with Google Shared Drives (formerly Team Drives)
1.1 Create a Shared DriveAnchor Create a Team Drive Create a Team Drive
| Create a Team Drive | |
| Create a Team Drive |
- Open Google Drive.
- On the left, click Shared Drives.
- At top, click

- Enter a name and click Create.

1.2 Add members and set access levelsAnchor Add members and set access levels Add members and set access levels
| Add members and set access levels | |
| Add members and set access levels |
When you add new members, they’re given Content manager access. You can change a member's access level.
Note: Give members who need to edit files in Drive File Stream Content manager access.

Add members and set access levels:
Requires Manager access
- On the left, click a Shared Drive
- At the top, under the Shared Drive name, click +Add members
- Add names, email addresses, or groups from Google Groups.
- (Optional) To change the access level, next to Content manager, click the Down arrow
 .
.
- (Optional) Enter a message.
- (Optional) If you don't want to send a notification to the new members, check the Skip sending notifications box.
- Click Send or Add.
1.3 Change member access levelsAnchor Change member access levels Change member access levels
| Change member access levels | |
| Change member access levels |
Requires Manager access
- On the left, click a Shared Drive.
- At the top, next to the Shared Drive name, click the Down arrow
 > Manage members.
 - Next to a member's name, click the Down Arrow
 and select a new access level.
- Click Done.
1.4 Remove MembersAnchor Remove Members Remove Members
| Remove Members | |
| Remove Members |
Requires Manager access
- On the left, click a Shared Drive.
- At the top, next to the Shared Drive name, click the Down arrow
 > Manage members.
 - Next to a member's name, click the Down arrow
 and select Remove member.
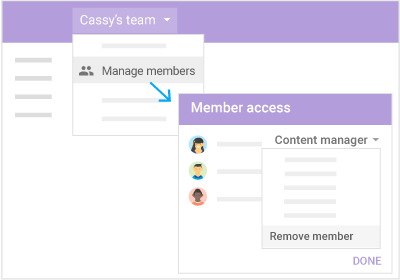
- Click Done.
2. Add files and foldersAnchor Add files and folders Add files and folders
| Add files and folders | |
| Add files and folders |
Now, add files and folders to your Shared Drive.
In this section, you learn how to:
2.1 Create foldersAnchor Create folders Create folders
| Create folders | |
| Create folders |
Create a new folder:
- On the left, click a Shared Drive or existing folder.
- Click
 >Folder.
 - Enter a folder name and click
 .
.
Note the following:
- To move folders into a Shared Drive that are already stored in My Drive or another Shared Drive, contact your G Suite admin.
- Subfolders must have the same permission as the top-level folder.
Upload an existing folder from your computer:
- On the left, click a Shared Drive folder.
- On your computer, drag an existing folder into a Shared Drive. Or, click> Folder upload. Navigate to the folder and open it.
2.2 Add and edit files
Requires at least Contributor access
Any files you add are owned by the team. If you leave the Shared Drive, your files remain.
- On the left, click a Shared Drive.
- Drag an existing file (that you own*) from your computer or from My Drive into a Shared Drive. Or, click New and choose an option:
- To create a file, select the file type you want to create, such as Google Docs.
- To upload a file, click File upload. Navigate to the file and open it.
- Double-click a file to open and edit it.
*If you don't own the file but have Can edit access in Drive, you can move it to a Shared Drive if your G Suite admin has allowed this option.
Note: To store and access files on your desktop, use Drive File Stream. See Get started with Drive.
3. Manage Shared Drive files and folders
| Anchor | ||||
|---|---|---|---|---|
|
Get tips for structuring a Shared Drive and creating and finding files.
In this section, you learn how to:
3.1 Star important files
| Anchor | ||||
|---|---|---|---|---|
|
Flag important files or folders to quickly find them later. Just right-click a file or folder and select Add star.
To see all your starred files and folders, on the left, click Starred.

3.2 Move files
| Anchor | ||||
|---|---|---|---|---|
|
To move files from My Drive into a Shared Drive or between Shared Drives, drag the files into the destination Shared Drive folder. To move folders, contact your G Suite admin.
Move files from My Drive to Shared Drives:
You can move any file you own into a Shared Drive, whether it’s from another Drive location or from your computer or mobile device.
If you’re not the owner of a file in My Drive, but you have Edit access to the file, you might be able to move that file into a Shared Drive, if:
- Your G Suite admin has enabled this option.
- The file’s owner is a member of the Shared Drive where you want to move the file.
Otherwise, you need to ask the owner to move the file into the Shared Drive.
Move files between Shared Drives:
To move files between Shared Drives, you need Manager access to the original Shared Drive and at least Contributor access to the destination Shared Drive.
3.3 Delete or restore files
| Anchor | ||||
|---|---|---|---|---|
|
Move a file to trash:
Requires at least Content manager access
- Click the file you want to delete.
- At the top, click Trash .
- Click Delete For Everyone.
The file moves to the Shared Drive's Trash folder. Files in a Shared Drive’s Trash folder are automatically deleted after 30 days.
Permanently delete a file in trash:
Requires Manager access
- In the Trash folder, right-click the file you want to delete and select Delete forever.
- Click Delete Forever to confirm.
Restore a file (up to 30 days):
Requires at least Contributor access
- On the left, click a Shared Drive.
- At top, next to the Shared Drive name, click the Down arrow > View trash.
- Click the file > Restore
 .
.
3.4 Search for files
| Anchor | ||||
|---|---|---|---|---|
|
Search in a Shared Drive or folder:
- Right-click a Shared Drive and click Search withinShared Drive name.
- In the Search box, enter your search term and press Enter.
4. Share and collaborate
| Anchor | ||||
|---|---|---|---|---|
|
Any files you put in a Shared Drive are automatically shared with members of the Shared Drive. Any member can also share Shared Drive files with people who aren’t members unless you restrict sharing.
In this section, you learn how to:
4.1 Share files
| Anchor | ||||
|---|---|---|---|---|
|
Requires at least Contributor access
Note: Folders in Shared Drives can’t be shared.
Just like in Drive, there are different ways to share files in Shared Drives with people who aren't members of the Shared Drive.
Note: Your ability to share files might be limited by your organization. Ask your G Suite admin for more information.
Share files with individuals or groups:
- In a Shared Drive, click the file you want to share.
- At the top, click Share .
- Add names, email addresses, or groups from Google Groups.

- (Optional) To change the permission from Edit, click the Down arrow and choose another permission.
- (Optional) Add a message.
- (Optional) If you don't want to send notifications, check the Skip sending notification box.
- Click Send or Add.
To limit sharing options, see Restrict sharing options on sensitive Drive files.
Share a link:
To make a file widely accessible and avoid managing access in your organization, you can share the file with a link. Anyone in your organization who gets the link can access the file. Optionally, you can let other users share the link with people that are not in your organization.
- In a Shared Drive, click the file you want to share.
- At the top, click Share .
- Click Who has access.
- Next to Link sharing off, click the Down arrow .
- Next to Link Sharing, click Turn on to make the link accessible to anyone in your organization.
- Under the URL, click the Down arrow and select a permission level.

- (Optional) To allow sharing the link outside of your organization, check the Allow external access box.
Note: If you don't see this option, it could be turned off by your G Suite admin.
- (Optional) To make the document searchable in Drive, check the Findable in search results box.
- Click Copy to copy the link.
- Click Done.
- Paste the link in an email, on a website, or wherever you need to share it.
4.2 Unshare files
| Anchor | ||||
|---|---|---|---|---|
|
Unshare files with your organization:
- In a Shared Drive, click the file you want to unshare.
- Click Share .
- Click Who has access.
- Next to Link Sharing, click Turn off .

- Click Done.
Unshare files with individuals:
- In a Shared Drive, click the file you want to unshare.
- Click Share .
- Click Who has access.
- Next to the person, click the Down arrow > Remove.

- Click Done.
Note: Group settings can override individual settings. So, if you try to unshare a file with a person who belongs to an organization or group with access to the file, this person can still access the file.
4.3 Protect files
| Anchor | ||||
|---|---|---|---|---|
|
Protect all files in a Shared Drive:
Requires Manager access
- On the left, click the Shared Drive that contains the files you want to protect.
- At the top, next to the Shared Drive name, click the Down arrow > Shared Drive settings.

- Click Edit to set any of these permissions:
- Sharing files with people outside of your organization
- Sharing files with people in your organization who aren’t members of the Shared Drive
- Allowing people with Commenter and Viewer access to download, copy, or print files
- After you choose an option, click Apply.
- Click Done.
Prevent people from downloading, printing, or copying a file:
Requires Manager access
- Click the file you want to protect.
- At the top, click Share .
- At the bottom, click Who Has Access.

- Click More > check the Restrict download, print, & copy actions on this file for commenters and viewers box.
- Click Done.
Note: You can limit how people share, print, download, and copy within Google Drive, Docs, Sheets, and Slides, but you can't stop how others share the file content in other ways.
4.4 See or email members
| Anchor | ||||
|---|---|---|---|---|
|
See members of a Shared Drive:
- On the left, click a Shared Drive.
- At the top, next to the Shared Drive name, click the Down arrow
 > View members.
Email members of a Shared Drive:
- On the left, click a Shared Drive.
- At the top, next to the Shared Drive name, click the Down arrow> Email members.
- Change the subject and enter your message.
- (Optional) To only email members with specific access levels, or to send yourself a copy of the email, check the boxes.
- Click Send.
Related Articles
| Content by Label | ||||||||||||||||
|---|---|---|---|---|---|---|---|---|---|---|---|---|---|---|---|---|
|
Search Knowledge Base
Submit a Service Request
| Page properties | ||
|---|---|---|
| ||
|