...
- Log into your Google account in a browser and go to Google Calendar. Click a date to set up appointments, or click the +Create button in the top left corner.
- Select Appointment Slots below the Title field.

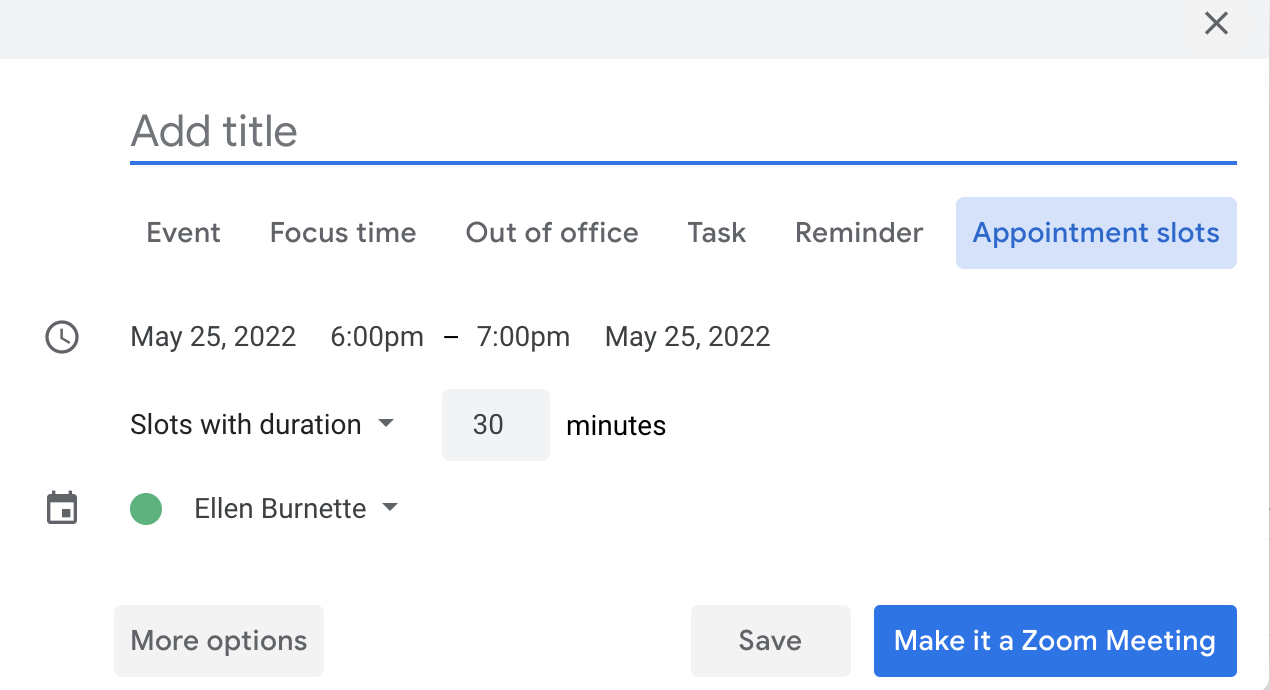
- Add a Title, the topic or purpose of the meeting, e.g., Interviews, Reviews, Office Hours.
- Set the date and time range for all the appointments in a block. Unless your appointments are around the clock, a block of appointments will start and end the same day: be . Be sure to set the second date the same as the first (depending on the calendar view you were on, they may default to a day apart).
- Set the Duration for each individual appointment. Include the time you need between appointments in the total duration.
For example, for 15-minute meetings with 5 minutes in between appointments, set the duration for to 20 minutes.
TIP: You cannot delete an appointment slot, so if you want a break that is the length of an appointment, book the appointment for yourself and change the Title to something like Free Time. If the break isn’t equal to a multiple of the appointment duration, you’ll need to set up separate blocks of appointments. - Ownership: Set the calendar you want the appointments to be on if for anyone other than your personal calendar. See TIP below.
, for yourself or someone's calendar that you manage, in the name field. - Specify the location Click Save or More Options to :
- Set up repeating appointments. If you want the same block of time across more than one day, or every week, for example, click the Does not repeat dropdown and select Custom…
Enter the settings for repeating this block of appointments, then click Done. Specify the Location where the meeting will occur, your office, for example. If this will be a Zoom meeting, see the . For setting up Zoom meetings, see instructions below. - Enter a Description: here is where you enter the URL for your Zoom Personal Meeting ID. Users making the appointment can edit the Description field for their slot, so you can request information from them by instructing them to add text to this fieldinclude the reason for the meeting, link to an agenda, or any other helpful documentation/information.
- Add Guests to collaborate on managing the appointments. Note: This is not for those you’re inviting to make an appointment, but rather someone you want to be able to see the appointments that have been made. For example, an assistant can set up these Appointment Slots and make the Supervisor who is actually conducting the meetings the Guest, or vice versa.
- Click Save or More Options to :
- Set up repeating appointments. If you want the same block of time across more than one day or every week, for example, click the Does not repeat dropdown and select Custom…
Enter the settings for repeating this block of appointments, then click Save. - Copy the link that you will send or post for users to make appointments by right-clicking the link for This calendar’s appointment page, or click to go to the Appointment page and copy the URL from the browser address bar.
- Click Save when you’re done.
- Set up repeating appointments. If you want the same block of time across more than one day or every week, for example, click the Does not repeat dropdown and select Custom…
- If you don’t set More Options or you have closed that screen, you can get the Appointment Page link from the event on your Google Calendar: click Need to share a link? Click the event for the Appointment Slots block (it has a grid icon before the title), then right-click the Go to appointment page for this calendar and Copy link address; or click the link, then copy the URL from the browser address bar.
NOTE: All Appointment Slots created for a calendar are visible for anyone with a link to the Appointment Page, so if you set up more than one Appointment Slots Slot type, be sure the Titles are distinguishable. - Users with the link to the Appointment Page can click the button for the time slot they want to select. Time slots already selected are will no longer be visible. To see the details of the Time slot, move the mouse pointer over it. Click Save to make an appointment for the selected time slot.
- If users want to cancel their appointment or change to another slot, they should delete the event on their calendar, then go back to the Appointment Page and select another slot. The previously booked slot will be open for someone else.
...
| Info | ||||
|---|---|---|---|---|
| ||||
If you plan to use Appointment Slots regularly and often need to print a daily list, consider creating a Calendar calendar just for your appointments, then you can easily filter out all other events with step 1. |
...
You can include a link to your Zoom account for conducting meetings for the Appointment Slots you set up. If you If you want the meetings to be private, that is you’re meeting with one person at a time and do not want others to join a meeting before you are ready for them, turn on the Waiting Room option.
...
feature in your Zoom settings.
- Before your first Appointment, log into the Zoom application. When users click the URL to attend the appointment, Zoom will display a notification to wait for you to start the meeting. You will see in the Participants panel of the Zoom application window (click Participants to display it on the right) that the user is in the Waiting Room.
- Move your mouse over the name and then click the Admit
- button. The name will move from “is waiting” to “in the meeting.”
- To move someone out of the meeting before letting the next person in, the person can leave the meeting, or you can move your mouse over the person’s name and click the More > menu and either Put in Waiting Room (if you want to meet again in this session) or Remove if you have finished meeting.
- To alert users in the Waiting Room of something, you can click the Message link, then use the Chat to text them. The Chat window dropdown lets you message Everyone (in Waiting Room) or Everyone (in Meeting) or a specific person in the meeting.
- If the Chat window covers the Participants list, click the More… menu at the bottom of your Zoom application window, then select Chat to hide it.
Related Articles
| Content by Label | ||||||||||
|---|---|---|---|---|---|---|---|---|---|---|
|
...