Access

Your Account

All App State faculty, staff, and students already have an App State-managed GitHub account created for them, and the password is synced with their App State password. Your account will be your App State username followed by "_appstate".

AppstateUsername_appstate


However, users will still need to be invited to work within GitHub. Organization or repository owners can invite any App State faculty, staff, or student. Invited people, then access GitHub using their App State-managed GitHub account. Outside (non-App State) collaborators are also permitted on an organization-by-organization basis.

You can interact with GitHub within a web browser or via another machine with Git software installed. If Git is not already installed, download it from one of the following locations, depending on your operating system:

Sign out of any personal GitHub accounts first.

  1. Go to github.com and click Sign In in the top-right of your browser.
  2. In the Username or email address field, enter your App State username followed by "_appstate".
    Enter your App State username followed by "_appstate".

  3. This will populate the identity provider button. Click Sign in with your identity provider.
    Sign in with your identity provider.

  4. Click Continue to use the App State single sign-on (SSO).

Using GitHub

Take a minute to check out this Key Terminology to help you get started.

  1. Click the Create repository button, or click the plus symbol and select New repository from the drop-down menu.
    Creating a new repository.

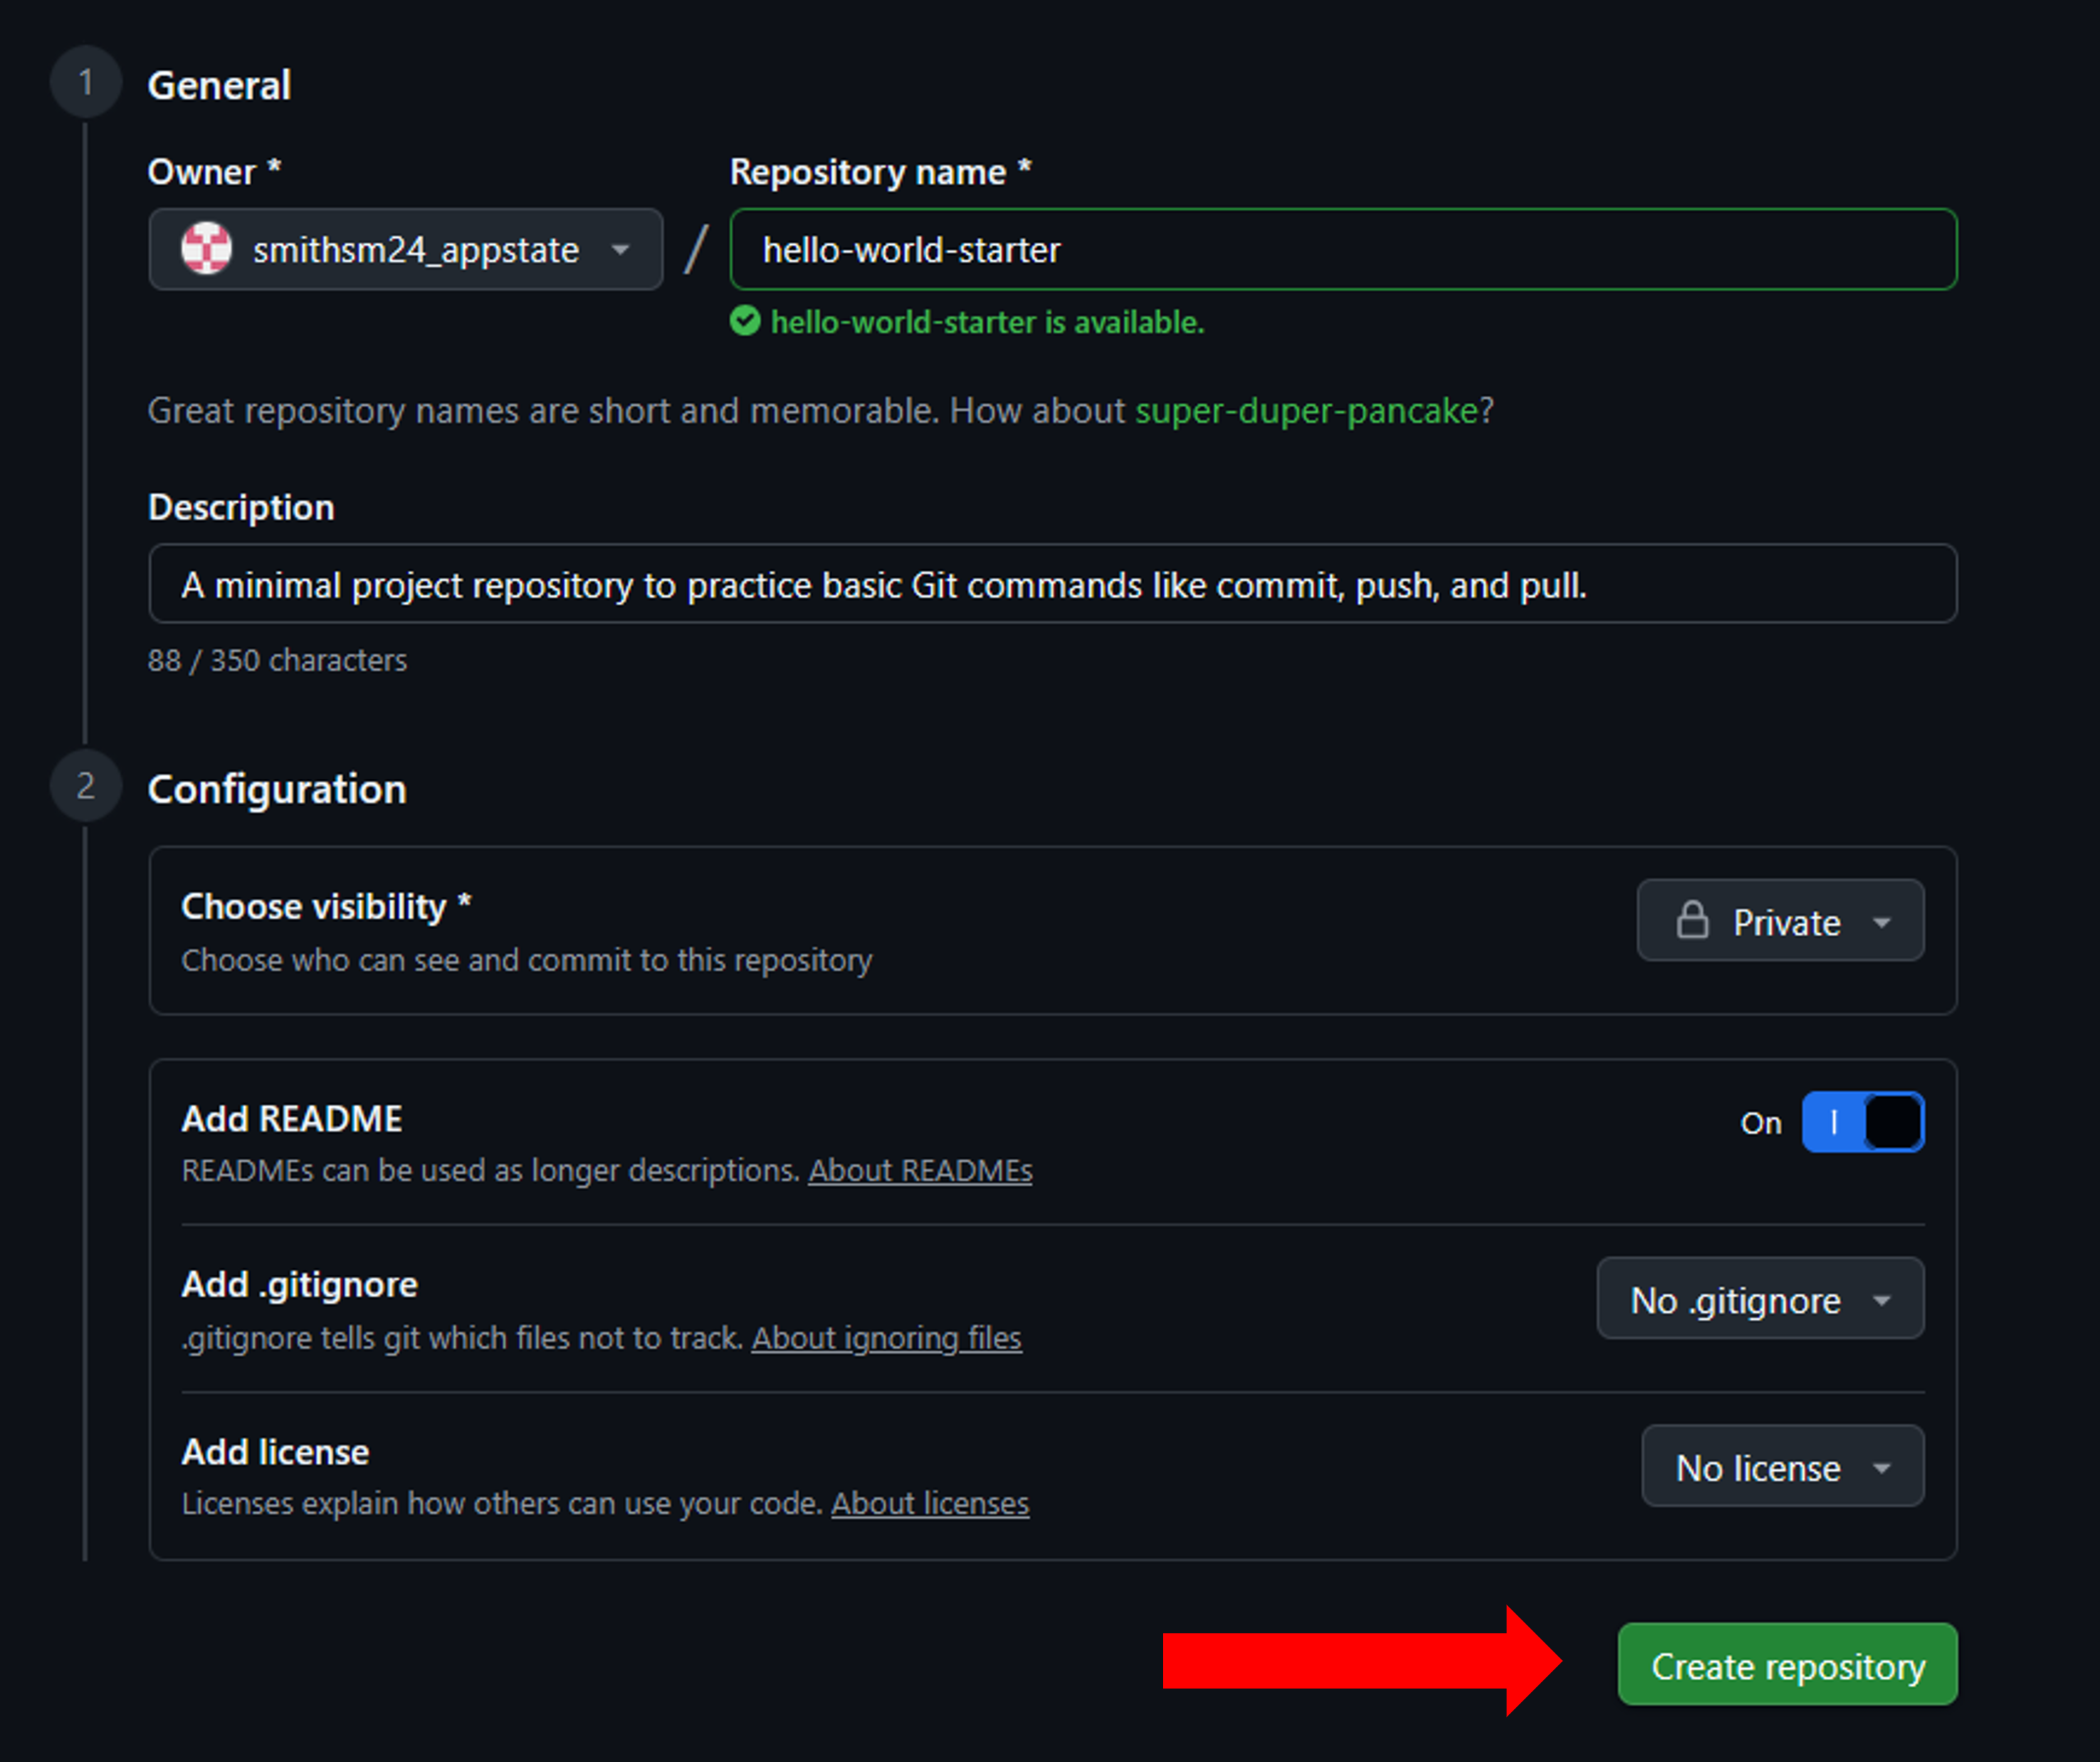
  2. Create a short, memorable repository name, and enter a description.

    Naming a Repository

    Repository names should be all lowercase, with words separated by dashes (-).

  3. You can set your repository's visibility by clicking the Choose visibility drop-down menu (the default is private).
    Set your repo's visibility.

  4. Toggle on the option to add a README.

    This file is the most important for any Git repository, as it's the first thing people see and it provides context and instructions.


  5. Scroll down and click Create repository.
GitHub repositories can accept any type of file, as long as the file size is within the platform's limits (100MiB). 

 Files recommended for version control

  • source code - .js, .py, .java, .cpp, .html, .css, .ts, .php, .go
  • documentation (plain text and markup) - .txt, configuration files (.json, .yaml, .xml, .ini), data files

Warning: Data Security

Never store passwords, SSNs, credit cards, student grades, or confidential data in GitHub.
Read the Security Data Classification.


To add a file to your repository,

  1. Navigate to the main repository page, click on the Add file drop-down, then click Upload files.
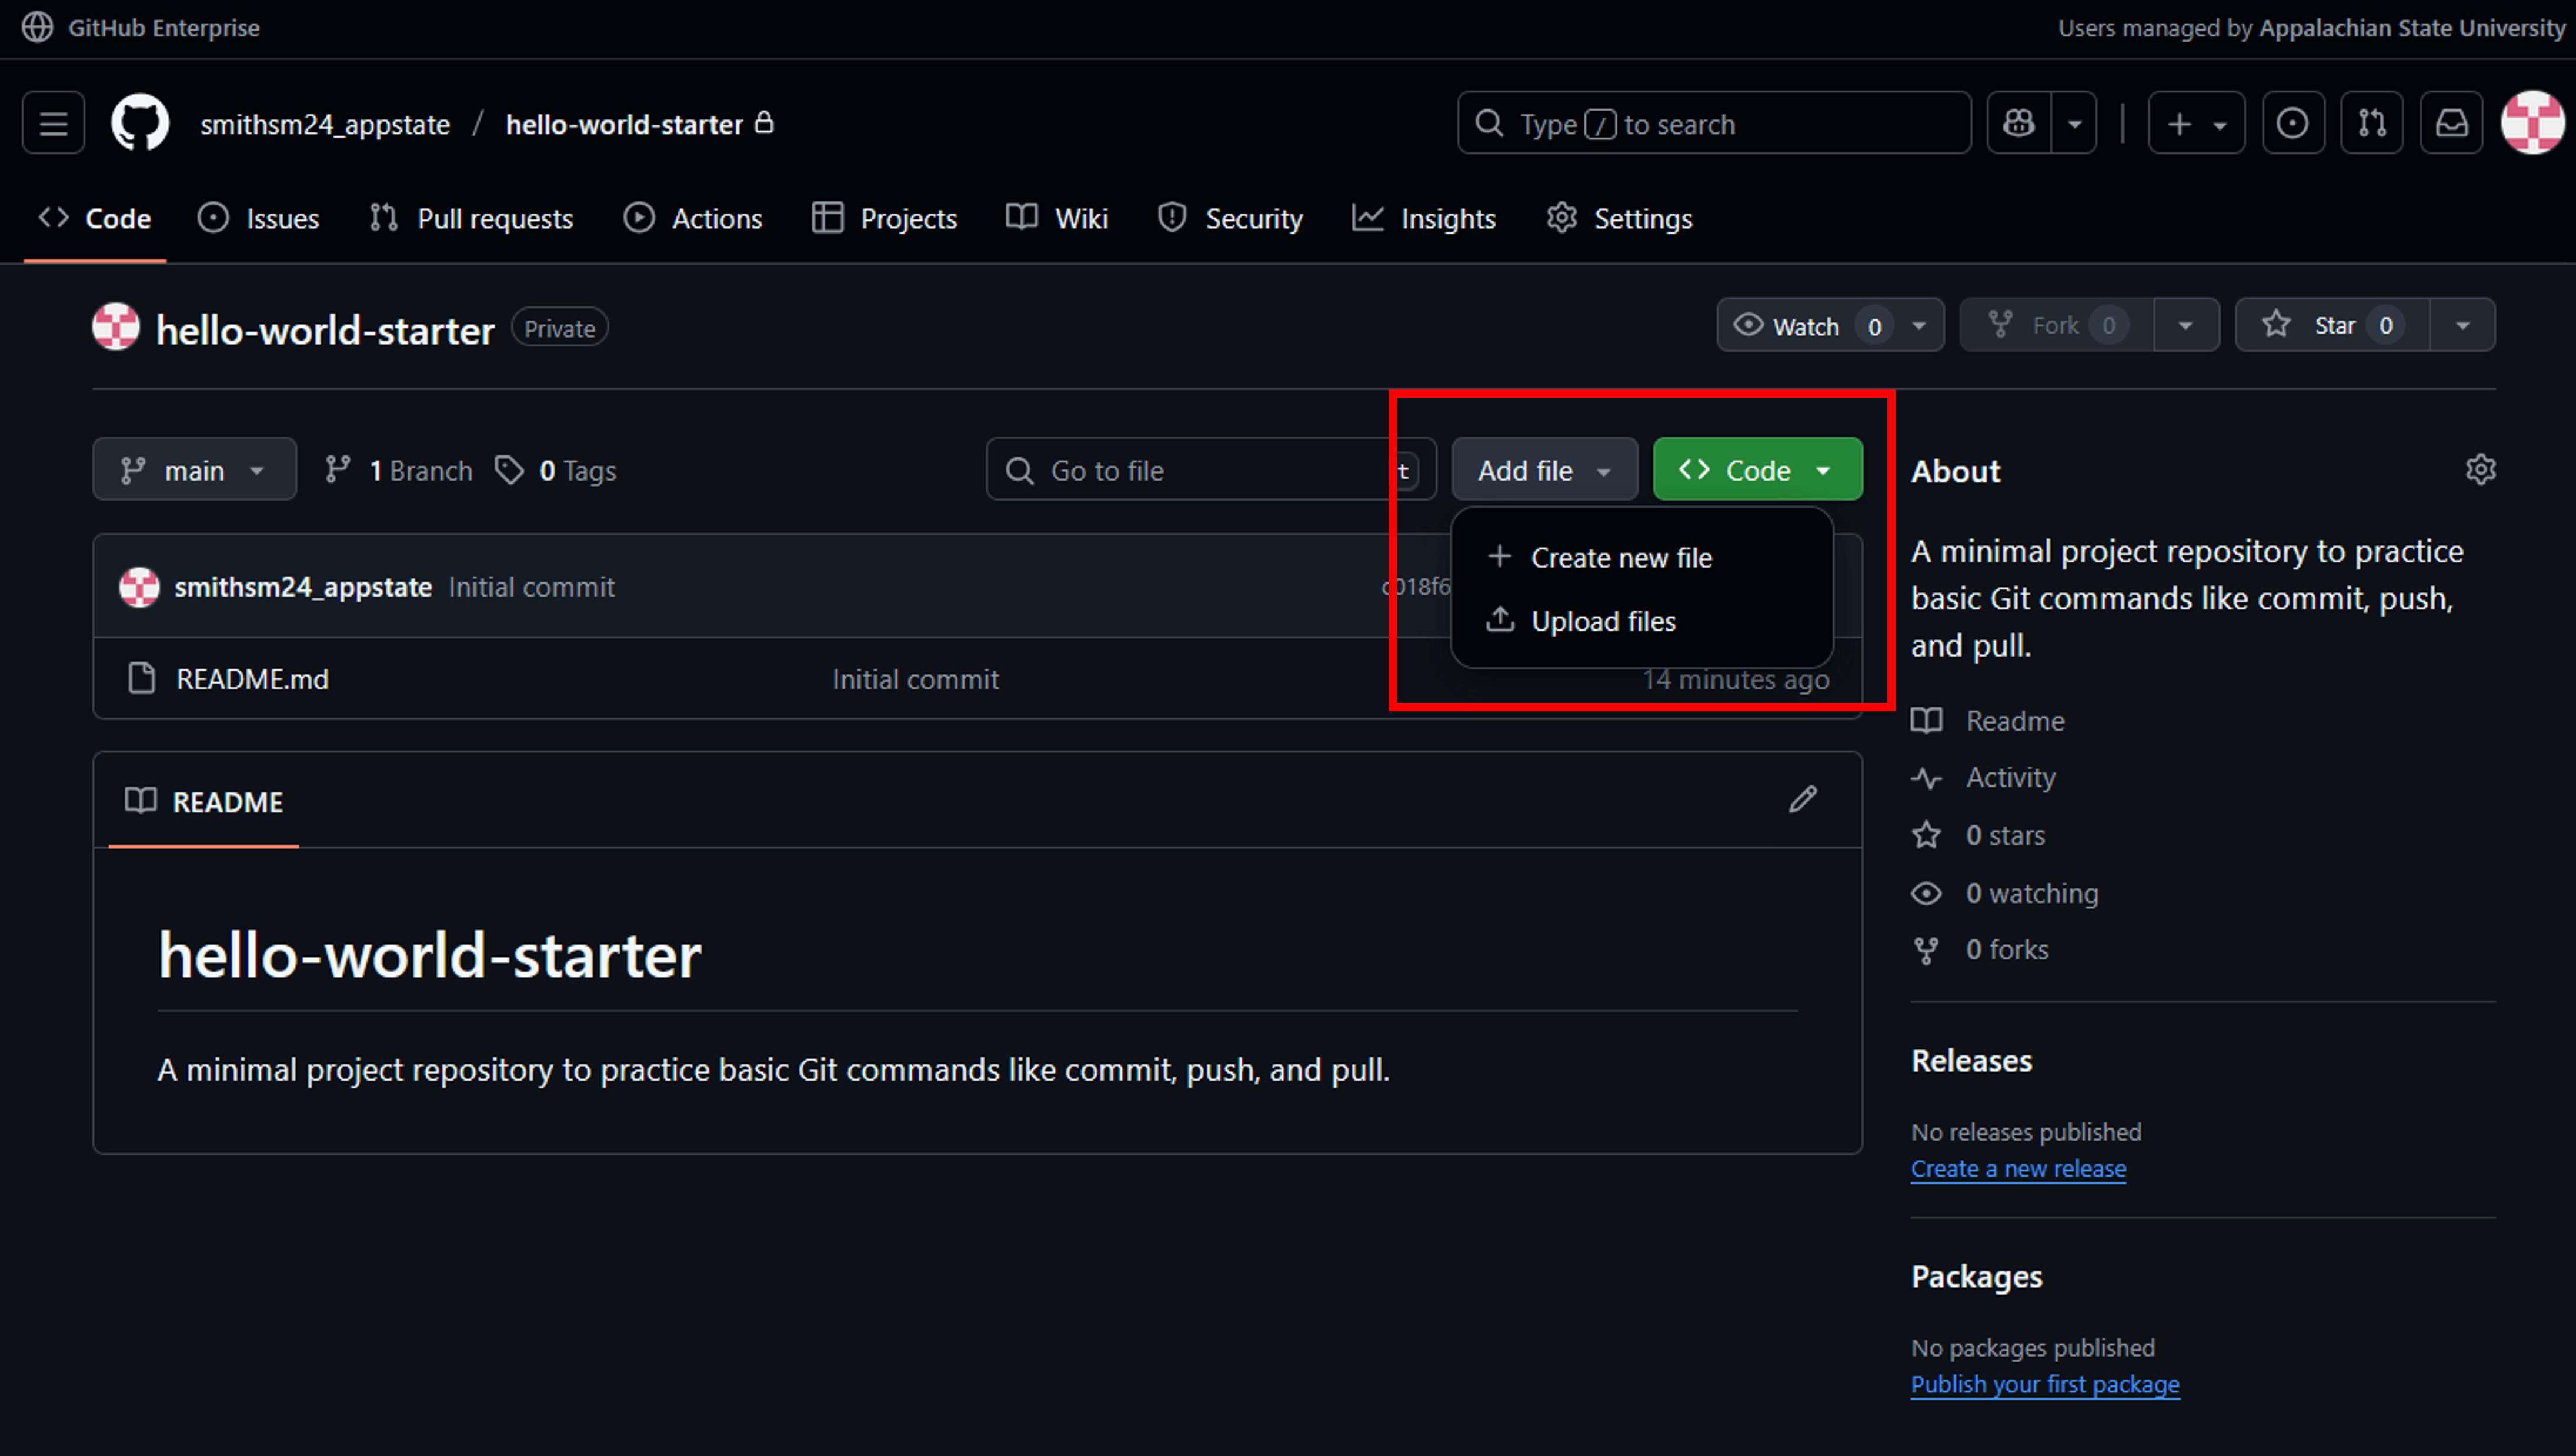
    Add or create a file.

  2. You can drag and drop or choose your files; they will then populate under the file drop box.
    Add your files to your repo.

  3.  Scroll down and click Commit changes.
    Click commit changes.

  4. The files will show in your main repo page.
    The files will populate in your main repo page.

A commit is a save point or a snapshot of your entire repository at a specific moment in time.

Every time you create a commit, you are doing three key things:

  • Saving a Snapshot of Your Work - A commit records the exact state of all your files that you included in the commit (staged files).
  • Creating a History Checkpoint - Commits are chained together to form a timeline so you can easily revert your code to a previous stable version or track the evolution of a file or feature over the project's lifespan.
  • Including Essential Metadata - A commit contains information that makes its history traceable and useful.
    • A Unique ID (SHA)
    • Commit Message
    • Author and Date

Commit Messages

Commit messages should be clear and descriptive. Aim for messages like "Add login function" instead of vague ones like "update".

Collaboration and Creating Organizations

Invite people to your repository to collaborate. 

  1. From the main GitHub page, click the Settings button.
    Opening the settings menu on the main page.

  2. Click Collaboration and access in the left sidebar.
    Find and click on collaborate and access from the sidebar menu.

  3.  Next, add people to your repository, by clicking the Add people button.
    Add people to your repository.

  4. Search for other users by entering their name, username, or email.
    Search for users to add.

  5. Click on the user's name, then click the Add button.
    Click the add button

  6. You'll automatically be redirected to the Collaborators and teams menu, where you'll see (1) how many collaborators have access to your repository and (2) a list of all collaborators with access. To delete a member, click the red trashcan icon (3) to the right of their username.
    View the collaborators and team menu

Teams

Teams may be set up inside GitHub @ App State. These can be ad-hoc managed in GitHub or synced with an existing App State Directory Group.

Visibility

Private: Only you + collaborators
Internal: All App State GitHub users


For information on requesting and setting up an organization, see the knowledge base article GitHub Organizations.

Understanding Permissions in GitHub Enterprise

GitHub Enterprise provides a flexible and hierarchical permissions model to manage access across enterprise accounts, organizations, teams, and repositories. This guide outlines the key roles and their responsibilities

In addition to owner and member roles, there are also pre-defined organization roles that a member may have depending on how the organization owner has set up permissions:

  • All-repository read: Grants read access to all repositories in the organization.
  • All-repository write: Grants write access to all repositories in the organization.
  • All-repository triage: Grants triage access to all repositories in the organization.
  • All-repository maintain: Grants maintenance access to all repositories in the organization.
  • All-repository admin: Grants admin access to all repositories in the organization.
  • CI/CD admin: Grants admin access to manage Actions policies, runners, runner groups, hosted compute network configurations, secrets, variables, and usage metrics for an organization.
  • Security manager: Grants the ability to manage security policies, security alerts, and security configurations for an organization and all its repositories.
  • App Manager: Grants the ability to create, edit, and delete all GitHub Apps in an organization.

Organization owner: See Using organization roles for more information.

Team-level roles also use pre-defined roles within an organization that can let members manage a team. See Promoting an organization member to team maintainer, for more information.

Teams may be set up inside GitHub @ App State. These can be ad-hoc managed in GitHub or synced with an existing App State Directory Group. 

Purpose

  • Teams are used to efficiently manage permissions for groups of users.

Structure

  • Teams can be nested within other teams.

  • Permissions can be assigned at the team level for one or more repositories.


Role

Description

Read

View and clone repositories, participate in issues

Write

Push code to repositories

Admin

Full control over repository settings and permissions

Role

Permissions

Read

View and clone the repository, open and comment on issues

Write

Push code, manage branches, and contribute to the codebase

Admin

Full administrative control, including managing settings, webhooks, and access

Triage

Allows contributors to proactively manage issues, discussions, and pull requests without write access

Maintain

Allows full access to the project, including sensitive and destructive actions like managing security or deleting a repository

Troubleshooting

  • Check you're invited as a collaborator.
  • Verify the repository isn't private.
  • Contact the repository owner.
  • Check the Organizations drop-down.
  • Verify the spelling.
  • The repository might be private, which means you'll need an invitation.
  • Check the history tab.
  • You can revert any commit using the git revert command.

Accessing Public GitHub Enterprise and GitHub Enterprise EMU Repositories on the Same Computer

If you have already established a "personal" github account under the appstate domain (for instance, lastfm@appstate.edu) and have imported your local SSH key (for instance, ~/.ssh/id_ed25519.pub) into that account, you will find that GitHub does not also allow you to import that same key into your Enterprise Managed github user (for instance, lastfm_appstate). This is because your SSH public key uniquely identifies your github account, and the same public key cannot be shared by two different user accounts.

In order to create a new SSH key for your appstate-managed user:

1. Run `ssh-keygen -t ed25519 -f ~/.ssh/github_managed_ed25519` (or whatever you want to call the file)
2. Go through the SSH key process. If your disk is encrypted (as it is on a managed Windows, Mac, or Linux laptop or desktop), you do not need to set a passphrase.
3. Edit ~/.ssh/config (creating a blank file if it doesn't exist already)
4. Add a new block to the end of this file, like so:

Host managed-github
	User git
	Hostname github.com
	IdentityFile ~/.ssh/github_managed_ed25519

Note

The IdentityFile must be the one created in step 1.


5. `cat ~/.ssh/github_managed_ed25519.pub` and import this public key into your User Settings under your Github EMU account (lastfm_appstate being the username)
6. After the key has been added on your "SSH and GPG" page, you will need to click on "Configure SSO" next to the key, select the repositories you want access to with that key, and engage in SSO to prove the key's association with your account.

Now, when you clone a repository from the Enterprised-managed (github-appstate) instance, you cannot just copy and paste the clone command. You'll have to substitute "managed-github" for the "github.com" portion of the URL.

For example, if you would like to clone the appstate-internal/github-kb repository from App State EMU, the recommended clone URL will be `git@github.com:appstate-internal/github-kb.git` but that won't work. Instead, try:

git clone managed-github:appstate-internal/github-kb.git


Note

You don't have to provide the `git` user because that is implied by the ~/.ssh/config file.


This should successfully clone the repository from the Enterprise Managed instance AND allow you to work with it without having to think about what instance you are logged into. Unless you need to clone it again on a different computer, you can push, pull, commit, rebase, reflog, etc. to your heart's content.

Quick Reference Guides

project-name/
├── README.md (explains project)
├── data/ (data files)
├── docs/ (documentation)
├── src/ (source code)
└── results/ (outputs)

Commit messages

Ineffective: Vague, Undetailed, or Subjective. These messages lack context, make it hard to understand why the change was made, or use non-specific language.

Examples

  • Updated
  • Changes
  • Stuff
  • A little more work

Effective: Specific, Action-Oriented, and Concise. These messages clearly state what was done and why, often following a common pattern like "Action Verb (in imperative mood) + Subject."

  • Add introduction section
  • Fix typo in methods
  • Update Fall 2025 syllabus
  • Refactor database connection

File Names

Ineffective: Vague, Generic, or Unsearchable. These names require you to open the file to know its contents, often include subjective terms like "final," or use generic system defaults. (Example: Document1.docx / final.txt / stuff.md / 2025-report-finished.pdf)

Effective: Explicit, Structured, and Consistent. These names include key identifying elements (e.g., date, version, content type) and are immediately understandable without opening the file (Example: meeting-2025-01-15.md / syllabus-fall-2025.docx / data-analysis-v2.R / project-budget-2026-draft.xlsx)

Resources