Courses where students enroll through the Registrar's Office are automatically populated with students, since AsULearn is connected to Banner. With a committee or workgroup site on AsULearn-Projects you may have a large number of participants to be added manually.
Note that you may only enroll existing Appalachian users with this process. You will only be able to seach/add users who have "@appstate.edu" accounts in good standing.
Option 1: Manually Add Individual Users
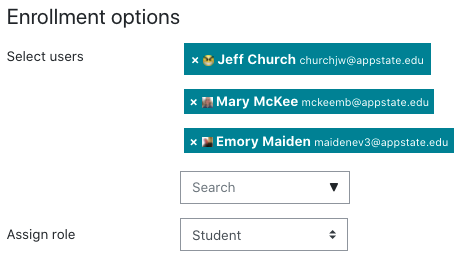
If you have a committee or workgroup AsULearn site on the AsULearn-Projects server, you can manually add participants by following the process outlined on the Participants: Add to Course support page. It is possible to search for select multiple users and assign them the same role:
Option 2: Import Users with List of Email Addresses OR Banner IDs
If you need to enroll a large number of users, it may be faster to create a plain text file of email addresses or Banner ID Numbers. NotePad is a great tool for creating text files in Windows, and TextWrangler or TextEdit is good for Macs. The list should not have any headers and only include the email addresses or Banner IDs in a single column, one per line. Pick whichever is easier for you to obtain.

OR

If the list includes users that will have different roles in AsULearn, either separate the lists or you will need to change the roles for some after you import.
- Go to your course homepage in AsULearn where you wish to import the users, click the 3-line hamburger button (top left) to open the drawer, and select Participants:

- Click the gear icon (top right) of the Participants panel, and select Import Enrolls from the dropdown menu.

- For User Field, select Email address or ID Number (Banner ID), depending on the user list you created above. Under Enrollment Options, select the Role to be applied for all (or most) of the users in the import list. Drag your import file to the Import file window (blue arrow) or click Choose a file... button to select and Upload this file.

- After the import file uploads, click the Import button at the bottom of the screen; or click Cancel to abandon your import. Participants will be imported into the course with the role you selected.
If you have trouble with this process, contact your college's lead consultant.