Kaltura offers two tools for creating media: Express Capture and Kaltura Capture.
- Express Capture does not require the installation of any software on your computer. You can access Kaltura Express Capture via AsULearn or Kaltura MediaSpace. It is best for short recordings and only records your webcam and microphone.
- Kaltura Capture is a more robust product and does require users to download the software. It provides a way to record anything you can show on your computer screen, including PowerPoint presentations, websites, webcam, and applications, while allowing you to record your voice while you are recording. Once you download Kaltura Capture to your machine, you can then access it directly from the application itself, outside of AsULearn.
Info
Do not use Express Capture to record lectures. Express Capture is a web-based service, so any interruption in internet service could corrupt your recording, and it will not be recoverable. Use Express Capture for quick videos that are a few minutes long such as answers to discussion questions, explanations about how to do a homework problem or providing a review of the week.
Express Capture records from your webcam only. It does not record your desktop nor any content you may share on your screen.
Creating a Video Using Kaltura Capture
- To access Kaltura Capture, login to AsULearn.
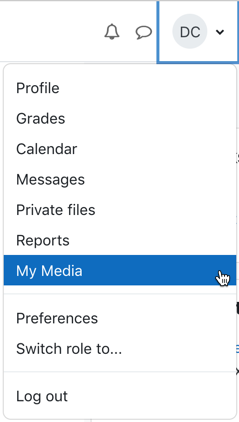
- Click the My Media link in the User menu on the right hand side of the screen.
It is also possible to access Kaltura Capture and Express Capture within an Assignment or Discussion Forum. - When the My Media page loads, click the Add New button and select Kaltura Capture.
- A screen will load which allows you to download the recording client for Windows or Mac. Download and open/run the installation file that you need for your system.
- When the install completes, you will see a shortcut appear on your desktop, but the client still needs to be configured. Repeat step 2 by going back to your My Media list and again select Add New >> Kaltura Capture, but rather than downloading the installation file, wait a moment for the client to configure and launch automatically. You will see a Kaltura Capture icon loading icon appear and the recording controls will appear when configuration is complete.
Recording Controls - You can select multiple combinations of screen, webcam, and microphone using the source buttons on the recording controls. Clicking on the Screen, Camera, or Audio icons will enable or disable the sources. Active sources will appear in blue and if you have multiple inputs to select from for a given source, those can be selected from on the drop-downs beneath each the source buttons.
- When you have selected your sources, click the red record button. A countdown timer will display and the recording will start after the countdown. A timer will show the elapsed time of the recording on the controls.
- When finished, click the square stop button and confirm that you do want to stop.
- A screen will load where you can preview the recording and enter a name, description, etc. for the video. Click the Save & Upload button when complete.
- The recording will then begin to upload. When upload completes, it will appear on your Kaltura 'My Media' list when it finishes processing. You can keep that recording private or link to this resource in an AsULearn forum, assignment or as a teacher resource.

